

This section contains the following topics:
Agent for Oracle iPlanet Upgrade Roadmap
How to Upgrade an Agent for Oracle iPlanet
The following illustration describes how to upgrade a CA SiteMinder® Agent for Oracle iPlanet to r12.5:
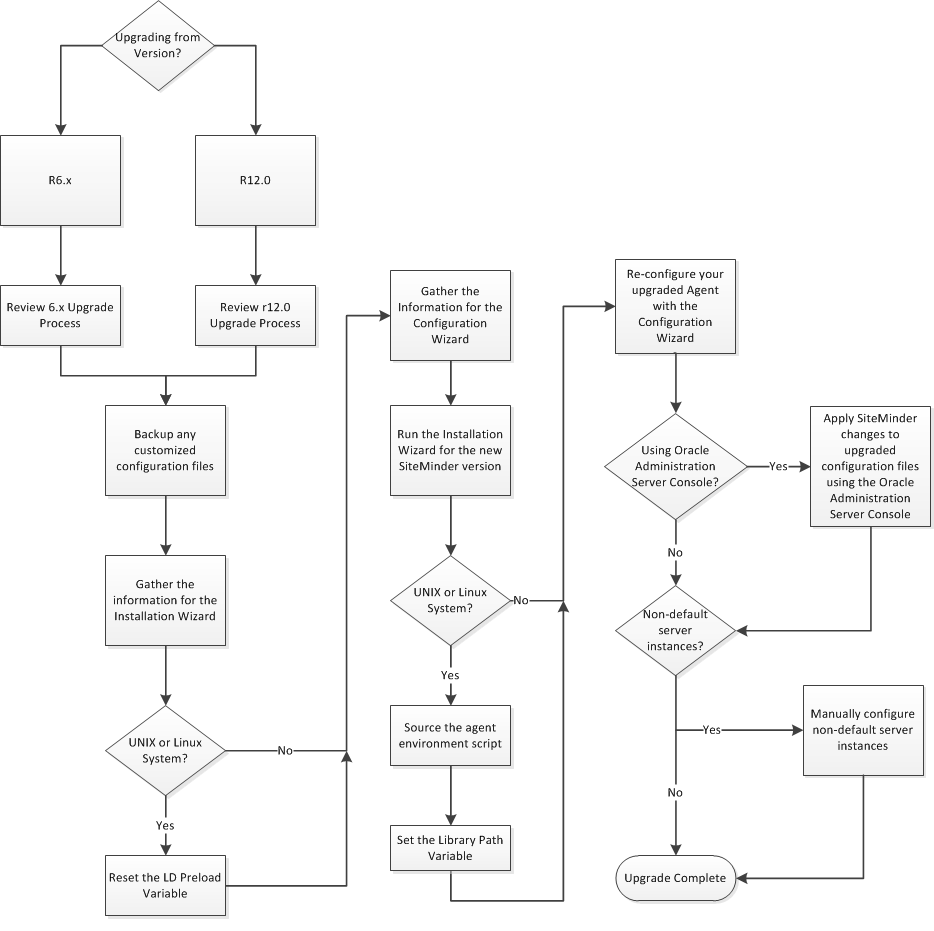
Upgrading a CA SiteMinder® agent for Oracle iPlanet involves several separate procedures. To prepare for an upgrade of your agent, follow these steps:
An agent upgrade to 12.52 from r6.x occurs at stage three of the CA SiteMinder® upgrade process, as shown in the following illustration:
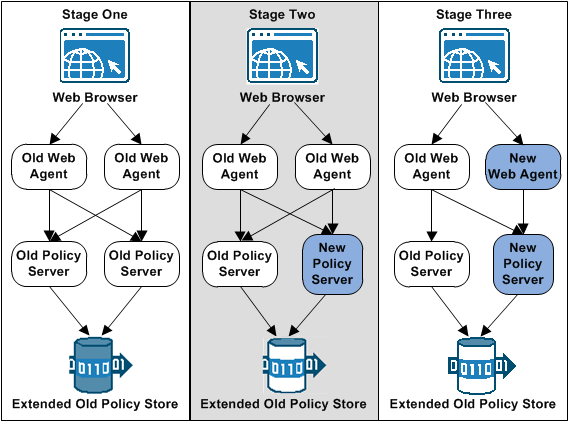
Note: For more information about the CA SiteMinder® upgrade process, see the Upgrade Guide.
An agent upgrade to 12.52 from r12.0 occurs at stage two of the CA SiteMinder® upgrade process, as shown in the following illustration:
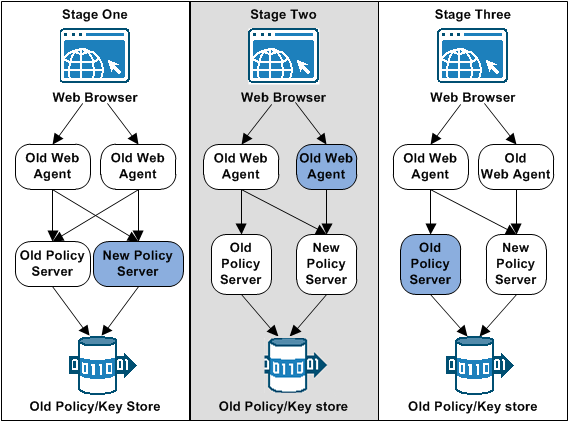
Note: For more information about the CA SiteMinder® upgrade process, see the Upgrade Guide.
If you are upgrading or reinstalling a Web Agent on a Linux system, from the shell, set the LD_PRELOAD variable so that it points to a different location from any existing Web Agent installation directory. For example, if an existing LD_PRELOAD entry is set to:
LD_PRELOAD=web_agent_home/bin/libbtunicode.so
Before you reinstall or upgrade, set the variable to:
export LD_PRELOAD=
This entry sets the variable to a blank value.
The installation program for the CA SiteMinder® agent installs the agent on one computer at a time using the Windows operating environment. This installation program can be run in wizard or console modes. The wizard and console-based installation programs also create a .properties file for subsequent installations and configurations using the unattended or silent method with the same settings.
For example, suppose the Agents in your environment use the same web server version, installation directory, Agent Configuration Object and Policy Servers. Use the installation wizard or console-based installation program for your first installation. Afterwards, you could create your own script to run the installation program with the .properties file the wizard or console-based installation program created.
Follow these steps:
executable_file_name.exe -i console
The installation program for the CA SiteMinder® agent installs the agent on one computer at a time using the UNIX or Linux operating environments. This installation program can be run in wizard or console modes. The wizard and console-based installation program also creates a .properties file for subsequent installations and configurations using the unattended or silent method with the same settings.
For example, suppose the Agents in your environment use the same web server version, installation directory, Agent Configuration Object and Policy Servers. Use the installation wizard or console-based installation program for your first installation. Afterwards, you could create your own script to run the installation program with the .properties file the wizard or console-based installation program created.
Follow these steps:
executable_file_name.exe -i console
The agent installation program creates an environment script in the following directory:
web_agent_home/ca_wa_env.sh
Indicates the directory where the CA SiteMinder® Agent is installed.
Default (UNIX/Linux installations): /opt/ca/webagent
For most Apache-based web servers, source this script after doing any of the following tasks:
Note: If you perform all the previous tasks in the same shell, only source the script once.
For the embedded Apache web server included with RedHat Linux, do one of the following tasks:
/etc/init.d/htppd
Set the library path variable on UNIX or Linux systems before running the agent configuration program.
The following table lists the library path variables for the various UNIX and Linux operating environments:
|
Operating System |
Name of Library Path Variable |
|---|---|
|
AIX |
LIBPATH |
|
Linux |
LD_LIBRARY_PATH |
|
Solaris |
LD_LIBRARY_PATH |
Set the value of the library path variable to the web_agent_home/bin directory.
Indicates the directory where the CA SiteMinder® Agent is installed.
Default (UNIX/Linux installations): /opt/ca/webagent
After gathering the information for your agent configuration, run the agent configuration program. This program creates an agent runtime instance for the web servers running on your computer.
This configuration program is wizard or console based, depending on the option you select. Running the configuration program in the wizard or console mode once creates a properties file. Use the properties file to run unattended configurations on other computers with same operating environment in the future.
Follow these steps:
web_agent_home\install_config_info
Indicates the directory where the CA SiteMinder® agent is installed on your web server.
Default (Windows 32-bit installations only): C:\Program Files\CA\webagent
Default (Windows 64-bit installations only): C:\Program Files\CA\webagent\win64
Default (Windows 32-bit applications operating on 64-bit systems [Wow64]): C:\Program Files (x86)\webagent\win32
ca-wa-config.exe
-i console
The agent runtime instance is created for your web servers.
After gathering the information for your agent configuration, run the agent configuration program. This program creates an agent runtime instance for the web servers running on your computer.
This configuration program is wizard or console based, depending on the option you select. Running the configuration program in the wizard or console mode once creates a properties file. Use the properties file to run unattended configurations on other computers with same operating environment in the future.
Follow these steps:
web_agent_home/install_config_info
Indicates the directory where the CA SiteMinder® Agent is installed.
Default (UNIX/Linux installations): /opt/ca/webagent
ca-wa-config.bin
-i console
The agent runtime instance is created for your web servers.
The Agent Configuration Wizard modifies the default obj.conf, and mime.types files that the Oracle iPlanet web server uses.
If you are using version 6.1 of a SunOne web server, and you plan to use the Oracle iPlanet Administration console, apply the changes to these files before using the console. If you do not apply the changes using the console first, the changes that are made for your CA SiteMinder® configuration could be corrupted. If you lose your configuration, run the configuration program again.
Note: The agent adds settings to the obj.conf file of the Oracle iPlanet web server when the Agent is configured to support an advanced authentication scheme. CA SiteMinder® does not remove these settings later. Edit the obj.conf file manually to remove any obsolete settings.
Follow these steps:
A warning message about loading the modified configuration files appears.
The CA SiteMinder® Web Agent Configuration wizard only configures the default instance of your Oracle iPlanet web server. To configure a different instance of the Oracle iPlanet web server for CA SiteMinder®, manually edit the obj.conf file that is associated with that server instance. Examples of server instances that need manual configuration include:
Note: The CA SiteMinder® Agent Configuration wizard only modifies the default obj.conf file on the Oracle iPlanet (formerly Sun Java System) web server. To protect other instances or reverse proxy deployments with CA SiteMinder®, copy the CA SiteMinder® settings from the default obj.conf file to any respective instance_name-obj.conf files. For example, your web server created an obj.conf file when you installed it, but you later added a server instance named my_server.example.com. To protect resources on my_server.example.com with CA SiteMinder®, copy the CA SiteMinder® settings the wizard added from the obj.conf file to the my_server.example.com-obj.conf file.
Note: SunOne/Sun Java 7.0 web servers do not require these manual configuration steps.
Follow these steps:
<Object name="default">
AuthTrans fn="SiteMinderAgent"
AuthTrans fn="match-browser" browser="*MSIE*" ssl-unclean-shutdown="true"
NameTrans fn="pfx2dir" from="/siteminderagent/pwcgi" dir="web_agent_home/pw" name="cgi"
NameTrans fn="pfx2dir" from="/siteminderagent/pw" dir="web_agent_home/pw"
NameTrans fn="pfx2dir" from="/siteminderagent/jpw" dir="web_agent_home/jpw"
NameTrans fn="pfx2dir" from="/siteminderagent/redirectjsp" dir="web_agent_home/affwebservices/redirectjsp"
NameTrans fn="pfx2dir" from="/siteminderagent/certoptional" dir="web_agent_home/samples"
NameTrans fn="pfx2dir" from="/siteminderagent" dir="web_agent_home/samples"
NameTrans fn="pfx2dir" from="/siteminderagent/pwservlet" dir=web_agent_home/jpw"
Indicates the directory where the CA SiteMinder® agent is installed on your web server.
Default (Windows 32-bit installations only): C:\Program Files\CA\webagent
Default (Windows 64-bit installations only): C:\Program Files\CA\webagent\win64
Default (Windows 32-bit applications operating on 64-bit systems [Wow64]): C:\Program Files (x86)\webagent\win32
NameTrans fn="ntrans-j2ee" name="j2ee"
PathCheck fn="SmRequireAuth"
NameTrans fn="pfx2dir" from="/mc-icons" dir="C:/Program Files/Sun/WebServer7.0/lib/icons" name="es-internal"
ObjectType fn="force-type" type="text/plain"
Service method="(GET|POST)" fn="SmAdvancedAuth"
The Oracle iPlanet web server is manually configured.
|
Copyright © 2013 CA.
All rights reserved.
|
|