

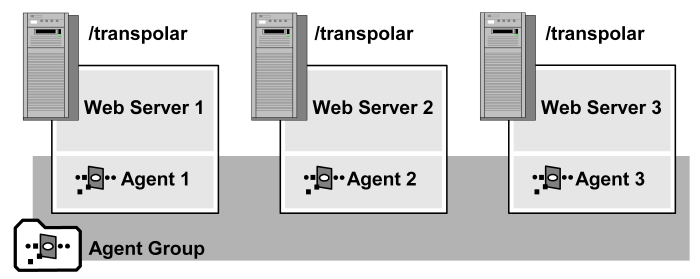
An Agent group is a collection of Agents of the same type grouped together for common resource protection. The advantage of Agent Groups is that you can provide access to the same resource to a larger user base because the resource is duplicated on many web servers/Web Agents. It also saves time because you define only one policy for all of the Web Agents. For example, you can use an Agent group to protect a group of Web Servers that use round robin processing to supply access to the same resources.
In the following figure, you can protect the Web farm with one set of policies, and create an Agent group that is bound to the set of policies.
You can create Agent groups even if the Agents you want to include in a group have not yet been created. Once you add a new Agent in CA SiteMinder®, you can edit an Agent group and add the new Agent to the group.
Note: If you configure Agent groups, you cannot directly assign a set of parameter values to an Agent group. You can assign the same Agent Configuration Object to multiple agents and edit the object.
You can manage Agents that protect a common resource more efficiently by creating an Agent group. All Agents in a group must be of the same type.
Note: The following procedure assumes that you are creating an object. You can also copy the properties of an existing object to create an object.
To configure an Agent group
The Agent Groups page appears.
Verify that the Create a new object of type Agent Group option is selected.
The Create Agent Group page appears.
Note: Click Help for descriptions of settings and controls, including their respective requirements and limits.
Note: An Agent group can only contain one type of agent, for example, all Web Agents, all Affiliate Agents, or all RADIUS Agents.
The Agent Group Members page appears.
Note: Only Agents of the specified Agent type are listed under Available Members. For example, if the specified Agent Style is Radius and the specified Agent Type is 3-Com, only 3-Com Agents are listed. If the specified Agent Type is Generic Radius, all RADIUS Agents are listed.
The Agents are removed from the list of Available Members and added to the list of Selected Members.
Note: To select more than one member at a time, hold down the Ctrl key while you click the additional members. To select a block of members, click the first member and then hold down the Shift key while you click the last member in the block.
The selected Agents are added to the Agent group.
The Agent group is configured.
You can add existing Agents to an Agent group.
To add Agents to an Agent group
The Agent Groups page appears.
A list of agent groups that match the search criteria appears.
The View Agent Group page appears.
The settings and controls become active.
The Agent Group Members page appears.
Note: Only Agents of the specified Agent type are listed under Available Members. For example, if the specified Agent Style is Radius and the specified Agent Type is 3-Com, only 3-Com Agents are listed. If the specified Agent Type is Generic Radius, all RADIUS Agents are listed.
The Agents are removed from the list of Available Members and added to the list of Selected Members.
Note: To select more than one member at a time, hold down the Ctrl key while you click the additional members. To select a block of members, click the first member and then hold down the Shift key while you click the last member in the block.
The selected agents are listed under Group Members in the Modify Agent Group page.
The selected agents are added to the Agent group.
|
Copyright © 2013 CA.
All rights reserved.
|
|