

This section contains the following topics:
Policy Server Tools Introduced
Import Policy Data Using smobjimport
Overview of the XML-based Data Format
Verify that Federated SAML Partnerships Intended for 12.52 Do Not Have the Same Backchannel Username
Delete SiteMinder Data in ODBC Databases
CA SiteMinder® provides a number of administrative tools to help manage your CA SiteMinder® environment. The following list describes the function of each tool.
Imports policy data into the CA SiteMinder® policy store.
Note: This utility is available only to import an existing backup smdif file into the policy store. To migrate a policy store manually, use the XPSExport and XPSImport utilities.
Exports keys from the key store.
Imports keys into the key store.
Lets you manage the certificate data store.
You can also use this utility with the access legacy key store flag (-accessLegacyKS) to manage an existing smkeydatabase during a migration to 12.52.
Note: For more information about migrating the contents of a smkeydatabase to the certificate data store, see the CA SiteMinder® Upgrade Guide.
Manages the CA SiteMinder® policy store in an LDAP directory.
Removes CA SiteMinder® policy store, token data, and log schema from ODBC databases.
Verifies that all required/recommended patches are installed on your Solaris system.
Reads RADIUS log files that the Policy Server generates.
Lets you change the CA SiteMinder® superuser password.
In addition, CA SiteMinder® provides tools for working with policy data. The following list provides an overview of the XPS-family of tools. XPS tools are platform-independent command line utilities that XPS administrators can use to manage policy store data. To learn about the options for a particular tool, enter the tool name and the following parameter at the command line:
?
Manages configuration data including vendors, products, and product parameters.
Note: To use XPSConfig, your administrator account requires XPSConfig privileges.
Evaluates expressions and lets you test performance.
Note: To use XPSEvaluate, your administrator account requires XPSEvaluate privileges.
Manages policy data including vendors, products, and applications.
Note: To use XPSExplorer, your administrator account requires XPSExplorer privileges.
Exports data from a policy store.
Imports data to a policy store.
Allows interactive creation and editing of XPS Administrators and their rights. To use this tool, copy it from either \win32\tools or /solaris/tools from the CA SiteMinder® installation file that you downloaded from Support to siteminder_home\bin.
Specifies the Policy Server installation path.
Important! After you use XPSSecurity, delete it from siteminder_home\bin to prevent unauthorized use.
Note: To use XPSSecurity, your administrator account requires XPSSecurity privileges.
Synchronizes XPS and CA SiteMinder® policy stores.
Note: To use XPSSweeper, you require an administrator. No additional rights are required.
If you are running a CA SiteMinder® utility or executable on Windows Server 2008, be sure to open the command–line window with Administrator permissions, even if you are logged into the system as an Administrator. For more information, see the release notes for your CA SiteMinder® component.
For the Policy Server tools to work correctly on a Linux Red Hat operating system, define the Policy Server host name in /etc/hosts. You define the host name in this location because these utilities generate adminoids and OIDs. The operating system uses the gethostid() and gettimeofday() Linux functions when generating these OIDs.
You can use the smobjimport tool to import the entire policy store or a single policy domain.
Note: This utility is available only to import an existing backup smdif file into the policy store. To migrate a policy store manually, use the XPSExport and XPSImport utilities.
Follow these steps:
Specifies the Policy Server installation path.
smobjimport -ifile_name -dadmin-name -wadmin-pw -v -t [-cf | -cb]
Example 1: smobjimport -ipstore.smdif -dSiteMinder -wpassword -v -t -cf
Example 2: smobjimport -ipstore.smdif -dSiteMinder -wpassword -v -t -cb
(Optional) Imports sensitive data using FIPS-compatible (AES) cryptographic algorithms.
Note: This argument is required only if the Policy Server is operating in FIPS-only mode.
(Optional) Imports sensitive data using RC2 cryptographic algorithms.
Important!
-c
Failure to use this option can corrupt the policy store.
Enterprise environments can require policy store data to be moved from one environment to another, such as from a development environment to a staging environment. In releases prior to r12, policy objects are represented using the proprietary SiteMinder Data Interchange Format (SMDIF), using smobjimport and smobjexport for migrating the data. This export format and these tools have been replaced by an XML-based export format, using XPSExport and XPSImport to migrate the data.
The XML-based export format uses the following fundamental schemas:
Describes the top-level schema, which includes the other schemas. It defines the root element and sub-elements. An XML file conforming to this schema can contain an instance of Data Dictionary, Policy, and Security Data.
Describes meta-data information about object types and their properties.
Describes the meta-data information about objects stored in the policy store, such as domains, policies, rules, applications, and the relationships between them.
Describes meta-data used for representing policy store administrators and their access rights.
Contains definitions of the generic data types used in the other schema files.
This format supports not only exporting and importing policy data in its entirety, but also exporting and importing a subset of the policy data. A granular export presupposes knowledge of how the data will be imported. On export, you can specify the entire policy data, or a portion of the data using an object identifier and optionally one of these three export types:
Note: The XPSExport and XPSImport tools encrypt sensitive data based on the FIPS mode the Policy Server is operating in. There are no additional parameters in these tools to set for data encryption.
The XPSExport tool supports the following tasks for migrating Policy Store data:
You can export a subset of policy data by specifying the identifier of a root object. Specify this identifier in the command line or in a file (using the -xf parameter). Only those objects that do not have a parent class can be exported. For example, to export a realm object, you specify the identifier (XID) of the parent domain for the realm.
You can also create and edit a custom export file using the "shopping cart", or XCart, capability in XPSExplorer (XPSExplorer -xf). You can set the import mode (ADD, OVERLAY, REPLACE, or DEFAULT) on a per object basis in the XCart file. You can then pass the XCart file to XSPExport using the -xf parameter.
Consider the following factors:
Depending on the mode you select when using XPSExport, these objects could possibly be added to the new environment or can overwrite existing settings. Be sure that you do not adversely affect environment settings when importing the objects.
The syntax of the XPSExport is following:
XPSExport output_file [-xo object_XID] [-xo-add object_XID] [-xo-replace object_XID]
[-xo-overlay object_XID] [-xf file_name] [-xb] [-xe] [-xp] [-xs] [-xc] [-xi] [-xm]
[-f] [-fm] [-q] [-m <number>[%]] [-pass <passphrase>][-npass] [-comment comment]
[-cf commentpath] [-?] [-vT] [-vI] [-vW] [-vE] [-vF] [-l log_file] [-e err_file]
The output XML file.
Specifies one or more objects for granular export. You can optionally specify one of the following export types:
Specifies only additions are done during an import.
Overwrites the policy data during an import.
Updates the policy data during an import.
(Optional) Specifies the absolute name of a file that contains the list of XIDs of objects to be exported.
The entries in the file have the following format:
CA.SM::UserDirectory@0e-255e2456-556d-40fb-93cd-f2fed81f656e
ADD = CA.SM::AuthScheme@0d-4afc0e41-ae25-11d1-9cdd-006008aac24b
REPLACE = CA.SM::Agent@01-cb8b3401-a6aa-4794-964e-c569712269c0
OVERLAY = CA.SM::Domain@03-7bdf31f2-44d7-4d7b-a8f5-5de2eaa0b634
These entries correspond to the following command-line parameters:
-xo CA.SM::UserDirectory@0e-255e2456-556d-40fb-93cd-f2fed81f656e
-xo-add CA.SM::AuthScheme@0d-4afc0e41-ae25-11d1-9cdd-006008aac24b
-xo-replace CA.SM::Agent@01-cb8b3401-a6aa-4794-964e-c569712269c0
-xo-overlay CA.SM::Domain@03-7bdf31f2-44d7-4d7b-a8f5-5de2eaa0b634
(Optional) Exports all the objects of a policy store, including the location of the policy store. The policy store location is set on the Data tab of the SiteMinder Policy Server management console.
Important! Any Policy Server to which you import this data uses the policy store that is specified during the export. For example, suppose you export data from Policy Server one, which uses an ODBC database as a policy store. Later, you import the data into Policy Server two, which uses Active Directory as a policy store. The existing Active Directory policy store location of Policy Server two is replaced with the ODBC database location of Policy Server one.
(Optional) Exports the object types that are related to the execution environment.
(Optional) Exports the object types that are related to the policies.
Note: The -xe and -xp options cannot be used with -xo, -xo-add, -xo-replace, -xo-overlay, or -xf.
Important! The -xe and -xp options supersede the -xa option to extract all policy data. You can also use the -xb option that lets you take complete backup of the Policy Server location-specific data, such as the policy store location.
(Optional) Exports the entire security data.
(Optional) Exports the entire configuration data.
(Optional) Exports the object types that were initially installed.
Example: AgentType
(Optional) Exports the objects that are specified in an ExtractManifest object.
(Optional) Overwrites the output file.
(Optional) Uses less memory, but affects the performance.
(Optional) Suppresses progress messages.
(Optional) Indicates that progress messages are output after every <number> of objects.
If the optional percent sign ("%") is included, then <number> is a percentage of the total objects, not a number of objects.
Default: Ten percent.
(Optional) Specifies the passphrase that is required for encryption of sensitive data. This passphrase must be at least eight characters long and must contain at least one digit, one uppercase, and one lowercase character. The passphrase can contain a space that is enclosed in quotes. If not specified as a command-line option, the export process prompts for a passphrase when sensitive data is being exported.
(Optional) Specifies that no passphrase is used.
Important! Sensitive data is exported as clear text.
(Optional) Adds a comment to the output file.
(Optional) Obtains the comment from the <commentpath> and adds it to the output file.
Displays command-line help.
(Optional) Averts the beeps on error.
(Optional) Sets the verbosity level to TRACE.
(Optional) Sets the verbosity level to INFO.
(Optional) Sets the verbosity level to WARNING (default).
(Optional) Sets the verbosity level to ERROR.
(Optional) Sets the verbosity level to FATAL.
(Optional) Outputs log to the specified file.
(Optional) Specifies the file to which errors and exceptions are logged. If omitted, stderr is used.
XPSExport PolicyData.xml -xo CA.SM::UserDirectory@0e-255e2456-556d-40fb-93cd-f2fed81f656e
-xo-overlay CA.SM::Domain@03-7bdf31f2-44d7-4d7b-a8f5-5de2eaa0b634
Note: For granular exports, the export type is specified explicitly on the command line or is retrieved from the data dictionary. For dump exports, the export type attribute for all objects is Replace. A load import of the policy data overwrites all of the policy data in the policy store.
If the XPSExport tool encounters any errors in the command-line options, the tool aborts and records the errors in the exception file (or stderr). The export process also aborts when the export of any object fails. The appropriate errors are logged to the exception file (or stderr) and the XML output file (if it has been created) is deleted.
The diagram following shows a SiteMinder policy domain named Domain1 in the source policy store that has to be exported and imported to the target policy store.
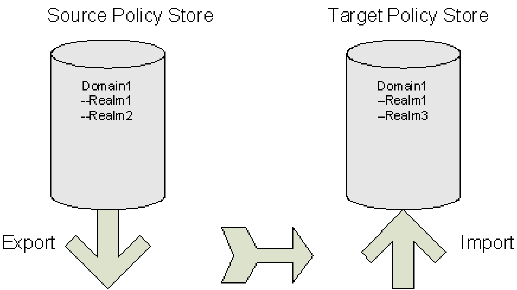
The target policy store already has a domain with the same name, but there are differences between the two:
To specify a granular import of only one object (Realm2) into the target policy store, the command line on export would look like this:
XPSExport gran-add.xml -xo-add CA.SM: :Domain@03-0fb7bd02-6986-4bb9-b240-c232358958b1
After a successful import Domain1 in the target policy store has three realms. The properties of Realm1 are not updated, as shown in the figure following.
To specify a granular export of an explicitly specified object (domain) into the target policy store using the add method, use the following command:
XPSExport -ma -xo <object_XID>
Adds all the objects appearing after this parameter on the command line.
To specify a granular export of all the relevant objects of the explicitly specified object (domain) into the target policy store using the add method, use the following command:
XPSExport -ra -xo <object_XID>
Adds the relevant system objects of the objects appearing after this parameter on the command line.
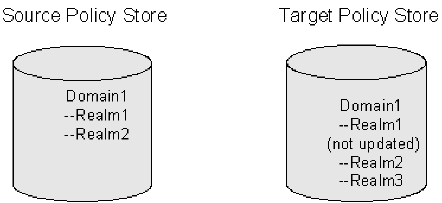
The diagram following shows a SiteMinder policy domain named Domain1 in the source policy store that has to be exported and imported to the target policy store.
The target policy store already has a domain with the same name, but there are differences between the two:
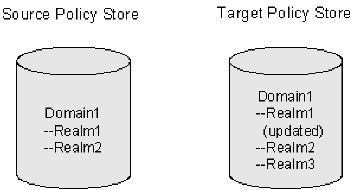
To specify a granular import where the target policy store is updated with the latest changes from the source policy store, the command line on export would look like this:
XPSExport gran-add.xml -xo-overlay CA.SM: :Domain@03-0fb7bd02-6986-4bb9-b240-c232358958b1
After a successful import the properties of Realm1 on the target policy store are updated, as shown in the figure following.
To specify a granular export of an explicitly specified object (domain) into the target policy store using the overlay method, use the following command:
XPSExport -mo -xo <object_XID>
Overlays all the objects appearing after this parameter on the command line.
To specify a granular export of all the relevant objects of the explicitly specified object (domain) into the target policy store using the overlay method, use the following command:
XPSExport -ro -xo <object_XID>
Overlays the relevant system objects of the objects appearing after this parameter on the command line.
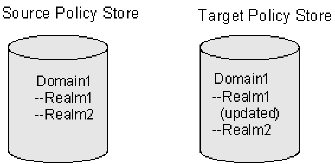
The diagram following shows a SiteMinder policy domain named Domain1 in the source policy store that has to be exported and imported to the target policy store.
The target policy store already has a domain with the same name, but there are differences between the two:
To duplicate the contents of the source policy store in the target policy store, the command line on export would look like this:
XPSExport gran-add.xml -xo-replace CA.SM: :Domain@03-0fb7bd02-6986-4bb9-b240-c232358958b1
After a successful import Domain1 in the target policy store is exactly the same as Domain1 in the source policy store, as shown in the figure following.
To specify a granular export of an explicitly specified object (domain) into the target policy store using the replace method, use the following command:
XPSExport -mr -xo <object_XID>
Replaces all the objects appearing after this parameter on the command line.
To specify a granular export of all the relevant objects of the explicitly specified object (domain) into the target policy store using the replace method, use the following command:
XPSExport -rr -xo <object_XID>
Replaces the relevant system objects of the objects appearing after this parameter on the command line.
When you migrate a domain object from one policy store to another, only the explicitly specified object (domain) is migrated. All the relevant objects of the domain (for example, user directories, agents, agent types) are not migrated to the target policy store. Without the relevant system objects, you cannot import the domain to a policy store.
To specify a granular export of an explicitly specified object (domain) into the target policy store using the merge method, use the following command:
XPSExport -mm -xo <object_XID>>
Merges all the objects appearing after this parameter on the command line.
To specify a granular export of all the relevant objects of the explicitly specified object (domain) into the target policy store using the merge method, use the following command:
XPSExport -rm -xo <object_XID>
Merges the relevant system objects of the objects appearing after this parameter on the command line.
Note: The Merge option is an alternative to the Add, Replace, or Overlay options. The Merge option is similar to the add option, the only difference being that this option adds not only the missing objects but also adds the missing attributes of the existing objects.
In CA SiteMinder® 12.52, no two SAML 2.0 partnerships can share an incoming backchannel username. Similarly, no two SAML 1.0 partnerships can share an incoming backchannel username. A SAML 1.0 and a SAML 2.0 partnership can share an incoming backchannel username but it is not recommended. However, it was possible to configure such partnerships in earlier releases.
Before you export a configuration that features partnerships for backup or import into 12.52, verify that none have such similar incoming backchannel usernames.
If an earlier configuration does have such partnerships, do the following steps before you export the policy store:
Attempting to import a configuration that has incoming backchannel user names (within the same protocol) are the same into 12.52 results in failure.
The XPSImport tool supports the following tasks for migrating policy store data:
Note: XPSImport does not import keys into the key store. You must use smkeyimport for this purpose.
The syntax for XPSImport is:
XPSImport input_file [-pass <passphrase>] [-npass] [-validate] [-fo] [-vT] [-vI] [-vW] [-vE] [-vF] [-e file_name] [-l log_path] [-?]
Specifies the input XML file.
(Optional) Suppresses progress messages.
(Optional) Indicates that progress messages are output after every <number> of objects.
If the optional percent sign ("%") is included, then <number> is a percentage of the total objects, not a number of objects.
Default: 10%.
(Optional) Specifies the passphrase required for decryption of sensitive data. The phrase must be the same as the phrase specified during export, or the decryption will fail.
(Optional) Specifies that no passphrase is to be used.
Important! Sensitive data is imported as clear text.
(Optional) Validates the input XML file without updating the database.
Specifies the schema file to validate the input file. If this option is not specified then input file will not be validated.
Allows force overwrite of existing policy store date for a dump load.
Displays command-line help.
(Optional) Averts the beeps on error.
(Optional) Sets the verbosity level to TRACE.
(Optional) Sets the verbosity level to INFO.
(Optional) Sets the verbosity level to WARNING (default).
(Optional) Sets the verbosity level to ERROR.
(Optional) Sets the verbosity level to FATAL.
(Optional) Outputs log to the specified file.
(Optional) Specifies the file to which errors and exceptions are logged. If omitted, stderr is used.
Example
XPSImport PolicyData.xml -e C:\\tmp\\ExceptionLog.txt
This example imports policy data objects as specified in the PolicyData.xml file. It is not immediately evident from the command line if the import is a dump load or a granular import. That information can however be retrieved by looking at the IsDumpExport attribute of <PolicyData> element in the input XML file. If this attribute is set to true, it indicates that the input XML file has to be used for dump load.
The following factors might possibly be relevant when transferring policy store data:
The smexportkey tool exports keys from the key store. The syntax for smkeyexport is following.
smkeyexport -dadminname -wadminpw [-ooutput_filename] [-f] [-c] [-cb] [-cf] [-l] [-v] [-t] [-?]
Specifies the name of the SiteMinder administrator.
Specifies the password of the SiteMinder administrator.
(Optional). Specifies the output file; defaults to stdout.smdif.
(Optional).Overwrites an existing output file.
(Optional). Exports sensitive data unencrypted.
(Optional). Exports sensitive data encrypted with backward-compatible cryptography.
(Optional). Exports sensitive data encrypted with FIPS-compatible cryptography.
(Optional). Creates and logs entries to the specified file (filename.log).
(Optional). Specifies verbose messaging.
(Optional). Enables tracing.
(Optional). Displays command options.
The CA SiteMinder® key tool utility (smkeytool):
siteminder_home\bin
Specifies the Policy Server installation path.
Follow these steps:
Use smkeytool to:
If you are using a root or chain Certificate Authority (CA) at the consuming authority that is not listed in the smkeydatabase, add it to the smkeydatabase.
For example, a signed VeriSign CA server-side certificate is used to SSL-enable the producer-side web server that is installed with the Web Agent Option Pack. To use this certificate for Basic over SSL authentication, add the VeriSign certificate to the smkeydatabase at the consumer. The addition of the certificate helps ensure that the consumer is communicating with a producer with a server-side certificate. The presence of the certificate also helps ensure that a trusted CA verified the certificate.
Use the addPrivKey option to import only a private key/certificate pair into the certificate data store. Consider the following items:
Typically, the key is the first private key/certificate pair found in the certificate data store.
Arguments for this option include the following:
Specifies that the option applies to the legacy smkeydatabase. If you do not supply this argument, the option applies to the 12.52 certificate data store.
Required. Assigns an alias to a private key/certificate pair in the database. The alias must be a unique string and can contain only alphanumeric characters.
Specifies the full path to the location of the certificate that is associated with the private key/certificate pair. Required for keys in PKCS1, PKCS5, and PKCS8 format.
Specifies the full path to the location of the private key file. Required for keys in PKCS1, PKCS5, and PKCS8 format.
Specifies the full path to the location of the PKCS12 file that contains the private key/certificate pair data. Required for keys in PKCS12 format.
(Optional) Specifies the password that was used to encrypt the private key/certificate pair when the pair was created. Supply this password to decrypt the key/certificate pair before it gets written to the certificate data store.
Note: This password is not stored in the certificate data store.
After the key/certificate pair is decrypted and placed in the certificate data store, CA SiteMinder® encrypts the pair again using its own password.
Use the addCert option to add a public certificate or trusted CA certificate to the certificate data store.
Consider the following items:
Arguments for this option include the following:
Specifies that the option applies to the legacy smkeydatabase. If you do not supply this argument, the option applies to the 12.52 certificate data store.
Required. Specifies the alias to the certificate associated with the private key in the certificate data store.
Limit: A unique string that contains only alphanumeric characters.
Required. Specifies the full path to the location of the newly added certificate.
Optional. Checks that the user provider certificate being added is a CA certificate. The utility checks that the certificate has a digital signature extension and that the certificate has the same IssuerDN and Subject DN values.
(Optional) The user is not prompted to confirm the addition of the certificate.
Use the addRevocationInfo option to specify the location of a CRL. The certificate data store references the location of the CRL.
Arguments for this option include the following:
Specifies that the option applies to the legacy smkeydatabase. If you do not supply this argument, the option applies to the 12.52 certificate data store.
Required. Specifies the alias of the Certificate Authority who issues the CRL.
Example: -issueralias verisignCA
Required. Specifies if the CRL is LDAP–based or file–based.
Required. Specifies the location of the CRL.
Example: -location c:\crls\siteminder_root_ca.crl
Example: -location "http://localhost:880/sn=siteminderroot, dc=crls,dc=com"
Use the deleteRevocationInfo option to delete a CRL from the certificate data store.
Arguments for this option include the following:
Specifies that the option applies to the legacy smkeydatabase. If you do not supply this argument, the option applies to the 12.52 certificate data store.
(Required) Specifies the name of the Certificate Authority who issues the CRL.
(Optional) The user is not prompted to confirm that the CRL can be deleted.
Use the removeAllCertificateData option to remove all certificate data from the certificate data store.
The argument for this option is the following:
(Optional) The user is not prompted to confirm that the certificate data can be removed.
Use the delete option to remove a certificate from the certificate data store. If the certificate has an associated private key, the key is also deleted.
Arguments for this option include the following:
Specifies that the option applies to the legacy smkeydatabase. If you do not supply this argument, the option applies to the 12.52 certificate data store.
(Required) Specifies the alias of the certificate that the option is to remove.
(Optional) The user is not prompted to confirm that the certificate can be removed.
Use the export option to export a certificate or private key to a file.
Consider the following items:
Arguments for this option include the following:
Specifies that the option applies to the legacy smkeydatabase. If you do not supply this argument, the option applies to the 12.52 certificate data store.
(Required) Identifies the certificate or key to be exported.
(Required) Specifies the full path to the file to which the data is exported.
(Optional) Specifies whether a certificate or key is being exported.
Default: certificate.
Required only when exporting a private key. Specifies the password that is used to encrypt the private key when exported. You do not need a password to export the certificate holding the public key because certificates are exported in clear text.
To add this private key back to the certificate data store, use the addPrivKey option with this password.
Use the findAlias option to find the alias that is associated with a certificate in the certificate data store.
Arguments for this option include the following:
Specifies that the option applies to the legacy smkeydatabase. If you do not supply this argument, the option applies to the 12.52 certificate data store.
(Required) Specifies the full path to the certificate file associated with the alias you want.
Required only when a password–protected P12 file is specified as the certificate file.
Use the importDefaultCACerts option to import all default trusted Certificate Authority certificates that are included with CA SiteMinder® to the certificate data store.
The argument for this option is the following:
Specifies that the option applies to the legacy smkeydatabase. If you do not supply this argument, the option applies to the 12.52 certificate data store.
Use the listCerts option to list some metadata of all certificates stored in the certificate data store.
Arguments for this option include the following:
Specifies that the option applies to the legacy smkeydatabase. If you do not supply this argument, the option applies to the 12.52 certificate data store.
(Optional) Lists the metadata details of the certificate and key that are associated with the alias specified.
This option supports an asterisk (*) as a wildcard character. Use the wildcard at the
Enclose the wildcard in quotes to prevent a command shell from interpreting the wildcard character.
Use the listRevocationInfo option to display a list of certificate revocation lists in the certificate data store. The following items are listed:
Arguments for this option include the following:
Specifies that the option applies to the legacy smkeydatabase. If you do not supply this argument, the option applies to the 12.52 certificate data store.
(Optional) Name of the Certificate Authority who issues the CRL.
This option supports an asterisk (*) as a wildcard character. Use the wildcard at the:
Enclose the wildcard in quotes to prevent a command shell from interpreting the wildcard character.
Use the printCert option to display some metadata for a specified certificate. This command is useful on systems where viewing certificate properties is difficult.
Arguments for this option include the following:
Specifies that the option applies to the legacy smkeydatabase. If you do not supply this argument, the option applies to the 12.52 certificate data store.
Required. Location of the certificate file.
The password is required only when a password-protected P12 file is specified as the certificate file.
Use the renameAlias option to rename an alias that is associated with a certificate.
Arguments for this option include the following:
Specifies that the option applies to the legacy smkeydatabase. If you do not supply this argument, the option applies to the 12.52 certificate data store.
(Required) Specifies the alias that is associated with a certificate.
(Required) Specifies the new alias name.
Limits: Must be a unique string that contains only alphanumeric characters.
Use the validateCert option to determine if a certificate is revoked.
Arguments for this option include the following:
Specifies that the option applies to the legacy smkeydatabase. If you do not supply this argument, the option applies to the 12.52 certificate data store.
(Required) Specifies the alias to the certificate associated with the private key in the certificate data store
Limits: Must be a unique string that contains only alphanumeric characters.
(Optional) Specifies the CRL that you want the utility to look in for the certificate to validate it.
Use the loadOCSPConfigFile option to reload the OCSP configuration file into the certificate data store without restarting the Policy Server. When the file loads, any existing OCSP configuration is removed from the data store and the configuration is replaced with the contents of the file. The OCSPUpdater picks up the configuration changes the next time that it wakes.
The name of the OCSP configuration file is SMocsp.conf.
The command syntax for Windows is:
smkeytool.bat -loadOCSPConfigFile
The command syntax for UNIX is:
smkeytool.sh -loadOCSPConfigFile
The smldapsetup utility allows you to manage an LDAP policy store from the command line. Using smldapsetup, you can configure an LDAP policy store, generate an LDIF file, and remove policy store data and schema.
To use smldapsetup, specify a mode, which determines the action that smldapsetup will perform, and arguments, which contain the values that are used to configure the LDAP server.
The following table contains the modes you can use with smldapsetup and the arguments each mode uses:
|
Modes |
Arguments |
|---|---|
|
reg |
-hhost, -pportnumber, -duserdn, |
|
ldgen |
-hhost, -pportnumber, -duserdn, |
|
ldmod |
-hhost, -pportnumber, -duserdn, |
|
remove |
-hhost, -pportnumber, -duserdn, |
|
switch |
none |
|
revert |
-v |
|
status |
-v |
To use smldapsetup
Specifies the installed location of CA SiteMinder®.
smldapsetup mode arguments
Important! Before running a CA SiteMinder® utility or executable on Windows Server 2008, open the command line window with administrator permissions. Open the command line window this way, even if your account has administrator privileges.
Example: smldapsetup reg -hldapserver.mycompany.com -d”LDAP User”
-wMyPassword123 -ro=security.com
Note: When running smldapsetup, make sure that the LDAP user you specify has the appropriate administrator privileges to modify schema in the LDAP Directory Server. If this user does not have the proper privileges, then the LDAP server will not allow you to generate the policy store schema and to update or remove the policy store data. After running the smldapsetup command, this user appears in the Admin Username field on the Data tab of the Policy Server Management Console.
The mode indicates the action that smldapsetup performs. You can specify a mode to connect to the LDAP server, generate an LDIF file, configure an LDAP policy store and remove policy data.
The modes for smldapsetup include:
Tests the connection to the LDAP server. If the connection succeeds, smldapsetup configures the CA SiteMinder® LDAP server as its policy store using the -hhost, -pportnumber, -duserdn, -wuserpw, -rroot, -ssl1/0 and -ccertdb arguments.
Automatically detects supported LDAP servers and generates an LDIF file with the CA SiteMinder® schema. The generated file is used by smldapsetup ldmod to create the CA SiteMinder® schema. If the -e argument is specified, smldapsetup ldgen creates an LDIF file that can be used with ldmod to delete the CA SiteMinder® schema. Use the -m switch to skip automatic detection of LDAP servers. The ldgen mode requires the -f switch unless previously configured in reg mode.
Connects to the LDAP server and the CA SiteMinder® schema without populating the policy store with any data. It requires the LDAP modify program and the LDIF file, specified with the -fldif argument. If you specify the -hhost, -pport_number, -duserdn,-wuserpw, -rroot, -ssl1/0 and -ccertdb arguments, smldapsetup ldmod will modify the LDAP directory specified using these arguments. If you do not specify -hhost, -pportnumber, -duserdn, -wuserpw, -rroot, -ssl1/0 and -ccertdb, smldapsetup ldmod uses the LDAP directory previously defined using smldapsetup reg or the Policy Server Management Console.
Connects to the LDAP server, then removes all policy data stored under the CA SiteMinder® LDAP node that corresponds to the current version of smldapsetup. If you specify the -hhost, -pport_number, -duserdn,-wuserpw, -rroot, -ssl1/0 and -ccertdb arguments, smldapsetup remove will remove policy data from the LDAP directory specified by these arguments. If you do not specify -hhost, -pport, -duserdn, -wuserpw, -rroot, -ssl1/0 and -ccertdb, smldapsetup remove will remove the policy data from the LDAP directory previously defined using smldapsetup reg or the Policy Server Management Console.
Reconfigures the Policy Server to use LDAP rather than ODBC. It does not prepare the LDAP store or the LDAP connection parameters before making the change.
Reverts to ODBC policy store from LDAP. The only argument used with this mode is -v.
Verifies that the LDAP policy store connection parameters are configured correctly. It requires the -v argument. If you specify the
-hhost, -pport_number, -duserdn, -wuserpw, -rroot,
-ssl1/0 and -ccertdb arguments, smldapsetup status tests the connection to the LDAP directory specified using these arguments. If you do not specify -hhost, -pport_number, -duserdn, -wuserpw,
-rroot, -ssl1/0 and -ccertdb, smldapsetup status verifies the connection to the LDAP directory previously defined using smldapsetup reg or the Policy Server Management Console.
From the Data tab in the Policy Server Management Console, you can view or change the settings you configured with the reg, switch and revert functions using a GUI interface. You must use smldapsetup to perform the ldgen, ldmod, remove, and status functions.
Arguments allow you to specify the information used by the modes to manage the LDAP policy store. If you do not specify arguments, smldapsetup uses the values configured in the Policy Server Management Console.
Note: smldapsetup does not allow spaces between an argument and its value. For example, the -h argument should be specified as follows:
smldapsetup ldmod -hldapserver.mycompany.com
The arguments you can specify in an smldapsetup call are listed below:
Specifies the fully qualified name of the LDAP server; the relative name, if the machines are in the same domain (-hldapserver); or the IP address (-h123.12.12.12). If you do not specify a host, smldapsetup uses the previously configured value as the default.
Example: -hldapserver.mycompany.com
Specifies a non-standard LDAP port. The LDAP port must be specified if the LDAP server is using a non-standard port or if you are moving a server to a new server that uses a different port, such as moving from a server using SSL to one that is not. If a port is not specified, the previous configuration values are used. If no previous port configuration has been specified, smldapsetup uses the default ports 389, if SSL is not being used, or 636, if SSL is being used.
Specifies the LDAP user name of a user with the power to create new LDAP directory schema and entries. This is not necessarily the user name of the LDAP server administrator. If you do not specify a user name, smldapsetup uses the previously configured name as the default.
Specifies the password for the user identified in the -d argument. If you do not specify a password, smldapsetup uses the previously configuration value.
Example: -wMyPassword123
Specifies the distinguished name of the node in the LDAP tree where CA SiteMinder® will search for the policy store schema. If you do not specify a root, smldapsetup uses the previously configured root.
Example: -ro=security.com
When specified with smldapsetup ldgen, generates an LDIF file that can delete the CA SiteMinder® schema. The generated file must be used with smldapsetup ldmod to remove the schema.
Skips automatic detection of LDAP servers and specify type of LDAP policy store where n is one of the following:
iPlanet v4 LDAP servers.
Active Directory LDAP servers.
Oracle Internet Directory.
iPlanet v5.
Sun Directory Servers.
Active Directory Application Mode (ADAM).
Specifies the absolute or relative path to an LDIF file from the directory in which smldapsetup is being executed.
Example: -f../siteminder/db/smldap.ldif
Default: if you do not specify a path, smldapsetup uses the current directory as the default.
Specifies the absolute or relative path, including filename and extension, of the ldapmodify command line utility. Ldapmodify is used to configure the server schema using the LDIF format commands. LDAP servers and CA SiteMinder® provide a copy of ldapmodify. If the utility is not in the default location, use this argument to specify its location.
Specify -ssl1 to use an SSL-encrypted connection to the LDAP server, and -ssl0 to use a non-SSL connection. If you do not specify a value for -ssl, smldapsetup uses the previously configured value. If the LDAP connection has not been configured before, the initial default value is 0.
This argument must be specified when using an SSL encrypted
(-ssl1) LDAP connection. Specifies the path of the directory where the SSL client Netscape certificate database file, which is usually called cert8.db, exists.
Example: If cert8.db exists in /app/siteminder/ssl, specify -c/app
/siteminder/ssl when running smldapsetup ldmod -f/app/siteminder/pstore.ldif -p81 -ssl1 -c/app/siteminder/ssl.
Note: For policy stores using an SSL-encrypted connection to Sun Java System LDAP, make sure the key3.db file exists in the same directory as cert8.db.
Enables you to use smldapsetup to set up or modify a key store if you are storing key information in a different LDAP directory. If you specify -k, smldapsetup checks to see if the Policy Server is pointing to the key store before performing any functions. If the Policy Server is not pointing to the key store, smldapsetup issues a warning. If you specify -k1, in conjunction with smldapsetup ldgen and the other arguments for a new policy store, smldapsetup creates a separate key store in the location you specify. If you do not specify -k or -k1, smldapsetup will modify the policy store.
Enables verbose mode for troubleshooting. With -v, smldapsetup logs its command-line arguments and configuration entries as it performs each step in the LDAP migration.
Specifies the distinguished name of an account that should be used by CA SiteMinder® to make modifications to the policy store. This argument allows an administrator account to retain control of the CA SiteMinder® schema while enabling another account that will be used for day-to-day modifications of CA SiteMinder® data. When a change is made using the Administrative UI, the account specified by this argument is used. Be sure to enter the entire DN of an account when using this argument.
Enables quiet mode for no questions to be asked.
Creates a 6.x upgrade schema file (LDIF).
Use the -x argument with ldmod to generate replication indexes for another 5.x Sun Java System Directory Server Enterprise Edition (formerly Sun ONE/iPlanet) LDAP directory server.
This option allows you to specify a suffix other than the default parent suffix when configuring the 6.x Policy Server's schema in a Sun Java System Directory Server Enterprise Edition (formerly Sun ONE/iPlanet) LDAP directory server.
Example: assume the following:
ou=Apps,o=test.com is the Policy Store root.
o=test.com is the root suffix.
ou=netegrity,ou=Apps,o=test.com is the sub suffix.
If you do not use the -s parameter with smldapsetup, the Policy Server assigns ou=Apps,o=test.com as a parent suffix of ou=netegrity,ou=Apps,o=test.com. To change this and have the appropriate parent suffix set, run smldapsetup using the -s parameter while specifying o=test.com.
Displays the help message.
Note: If the arguments contain spaces, you must enter double quotes around the entire argument. For example, if the name of the CA SiteMinder® administrator is LDAP user, the argument for smldapsetup would be: -d”LDAP user".
In a Sun Java System Directory Server Enterprise Edition (formerly Sun ONE/iPlanet) directory server, smldapsetup creates the ou=Netegrity, root sub suffix and PolicySvr4 database.
The directory root you specified in the Root DN field on the Data tab of the Policy Server Management Console. This variable has to be either an existing root suffix or sub suffix.
Example: If your root suffix is dc=netegrity,dc=com then running smldapsetup produces the following in the directory server:
Example: If you want to place the policy store under ou=apps,dc=netegrity,dc=com, then ou=apps,dc=netegrity,dc=com has to be either a root or sub suffix of the root suffix dc=netegrity,dc=com.
If it is a sub suffix, then running smldapsetup produces the following:
Note: For more information about root and sub suffixes, see the Sun Microsystems documentation.
To remove the CA SiteMinder® policy store data and schema from an LDAP directory, you must first delete the data, then remove the schema.
Important!
To remove the policy store using smldapsetup
Specifies the installed location of CA SiteMinder®.
smldapsetup remove -hLDAP_IP_Address -pLDAP_Port
-d LDAP_Admin -wLDAP_Admin_Password -rLDAP_Base_DN
-v
Example: smldapsetup remove -h192.169.125.32 -p552 -d"cn=directory manager" -wfirewall -rdc=ad,dc=test,dc=com -v
Note: Removing the policy store data may take a few moments.
smldapsetup ldgen -e -fldif
Specifies the name of the LDIF file you are generating.
Example: smldapsetup ldgen -e -fdelete.ldif
smldapsetup ldmod -fldif
Specifies the name of the LDIF file you generated using smldapsetup ldgen
-e.
Example: smldapsetup ldmod -fdelete.ldif
CA SiteMinder® provides SQL scripts that delete the CA SiteMinder® schema from ODBC databases. The following list describes each SQL script:
Removes the CA SiteMinder® policy store and data from an Oracle database.
If the database was created using sm_oracle_logs.sql, removes CA SiteMinder® logs stored in an Oracle database
Removes the CA SiteMinder® session store tables and data from an Oracle database.
Removes the CA SiteMinder® policy store and data from an SQL database.
If the database was created using sm_mssql_logs.sql, removes CA SiteMinder® logs stored in an SQL database
Removes the CA SiteMinder® session store tables and data from a SQL database.
Removes the CA SiteMinder® policy store and data from a DB2 database.
If the database was created using sm_db2_logs.sql, removes CA SiteMinder® logs stored in a DB2 database
Removes the CA SiteMinder® session store tables and data from a DB2 database.
The ODBC database SQL scripts are in the following location:
Specifies the Policy Server installation path.
Specifies the Policy Server installation path.
Delete the database objects by running the appropriate SQL script using DB2, SQL Plus for Oracle, or SQL Server Query Analyzer.
Note: For more information about running SQL scripts, see your database documentation.
The smpatchcheck tool lets you determine whether you have the Solaris patches required for the Policy Server and Web Agent installed on your system. Smpatchcheck can be run on the Solaris versions listed on the CA SiteMinder® Platform Matrix. To access this matrix, go to Technical Support and search for the CA SiteMinder® Platform Support Matrix.
To use smpatchcheck
Specifies the Policy Server installation path.
Smpatchcheck looks for each required/recommended patch and then displays its status.
For example:
Testing for Required Patches:
  Testing for Patch: 106327-09 ... NOT Installed
Testing for Recommended Patches:
  Testing for Patch: 106541-08 ... Installed
  Testing for Patch: 106980-00 ... Installed
SiteMinder Patch Check: Failed
Smpatchcheck returns one of the following messages:
One or more of the required patches is not installed.
One or more of the recommended patches is not installed.
All of the required and recommended patches are installed.
The CA SiteMinder® Test Tool is a utility that simulates the interaction between Agents and Policy Servers. It tests the functionality of the Policy Server. During testing, the Test Tool acts as the Agent, making the same requests to the Policy Server as a real Agent. This allows you to test your CA SiteMinder® configuration before deploying it.
Note: For further information about this tool, see the Policy Server Configuration Guide.
To change the super user password
Specifies the Policy Server installation path.
Note: If the utility is not present, you can find it in the Policy Server installation media available on the Support site.
smreg -su password
Specifies the password for the CA SiteMinder® super user account.
Note: Be sure that there is a space between -su and the password.
The utility changes the super user account password.
Deleting the utility prevents anyone from changing the super user password.
To comply with the terms of your CA SiteMinder® license, you can count the number of users in your CA SiteMinder® environment. The following process describes how to configure your directories and count the CA SiteMinder® users stored within them:
Note: For more information, see the CA SiteMinder® Policy Server Configuration Guide.
If your CA SiteMinder® user stores are on Microsoft Active Directory servers, map the inetOrgPerson in each server before counting the CA SiteMinder® users.
Follow these steps:
inetOrgPerson
Custom Mapping to Count Active Directory Users (with XPSCounter)
User
The inetOrgPerson attribute is mapped.
To comply with the CA SiteMinder® licensing terms, you can determine how many users in your organization are associated with CA SiteMinder® policies.
Note: If you do not have write access to the CA SiteMinder® binary files (XPS.dll, libXPS.so, libXPS.sl), an Administrator must grant you permission to use the related XPS command line tools using the Administrative UI or the XPSSecurity tool.
To determine the number of users
XPSCounter
The tool starts and displays the name of the log file for this session, and the License Parameters menu opens.
The Parameter menu appears.
The Counter menu appears.
Note: This tool counts the number of user objects in each directory that you specify. It does not account for the same user object being listed in multiple directories or multiple user objects for the same user in a directory. You must consider this when interpreting the results provided by this tool.
The users are counted and a confirmation message appears.
The following information appears for each directory counted:
Displays the unique identifier for the specified user directory.
Example: CA.SM::UserDirectory@0e-50ea30f0-b5c0-450c-a135-1e317dd25f11
Displays the name of the specified user directory (as defined in the Administrative UI).
Displays the most-recent user count of the specified user directory. You do not have to delete any previous values stored in the counter because this value is updated automatically every time the counter is run.
Example: : 23
Displays the total of number of users from all of the user directories you counted. For example, if you counted number of users for two different directories, and each directory has 23 users, the total shown will be 46.
XPSConfig is an interactive command-line utility that allows administrators and members of operations to view product parameters and, if allowed, edit their settings. While you may have your own product-specific configuration tool using XPS programming interfaces, XPSConfig is available so that this is not a requirement.
For each vendor and installed product, XPSConfig manages the parameters or named settings that are defined in the product's Data Dictionary. Each product can read, write, and validate its own parameter settings.
To use XPSConfig, you must be an administrator with XPSConfig rights.
Parameters have the following attributes:
Specifies the name of the parameter.
Limits:
Specifies the data type of the parameter value:
Logical | Numeric | String
Specifies a Boolean value: TRUE or FALSE.
Specifies an integer.
Specifies a string of characters.
Specifies the value or scope of the parameter:
Ask | Global | Local | Managed | Overrideable | Read Only
Specifies that the value is managed by the product, not by XPS, and that the value is read only.
Specifies that the value is stored in the policy store and accessible by all Policy Servers sharing that policy store.
Specifies that each Policy Server stores its own value.
Specifies that the value is managed by the product, not by XPS, and that the value is read-write.
Specifies that a value stored locally on a Policy Server can override a value stored globally on a shared policy store.
Specifies that the value is both the default value and read only.
Specifies whether the parameter is included in exports of the policy store.
Type: Boolean
Specifies whether the parameter is included in capabilities reporting for the Policy Server.
Type: Boolean
Specifies what type of access the remote API has to the parameter:
None | Read | ReadWrite
Describes the purpose of the parameter.
Specifies the type of license limit:
None | SoftLimit | HardLimit | ExpDate
Specifies that the parameter is not a license limit.
Specifies that the parameter is a soft or advisory license limit.
Specifies that the parameter is a hard or absolute license limit.
Specifies that the parameter is the date on which the license expires.
Specifies a default value for use when the current value is undefined.
Note: If the default value is undefined, its value is specified according to its data type:
space
zero
FALSE
Specifies whether the parameter is visible to XPSConfig.
Type: Boolean
XPSConfig has the following format:
XPSConfig [-vendor vendor] [-product product]
[-?] [-vT | -vI | -vW | -vE | -vF]
[-l log_path] [-e err_path] [-r rec_path]
XPSConfig includes the following options:
(Optional) Specifies the name of the vendor whose data you want to view.
(Optional) Specifies the name of the product whose data you want to view.
(Optional) Displays help information for this utility.
(Optional) Specifies when to log error information to the error file and how much information to log.
Logs detailed information so that you can TRACE errors.
Logs information in case there is an error.
Logs error information in the event of a WARNING, ERROR, or FATAL error.
Logs error information in the event of an ERROR or FATAL error.
Logs error information in the event of a FATAL error.
(Optional) Outputs logging information to the specified location.
Default: stdout
(Optional) Outputs error information to the specified location.
Default: stderr
(Optional) Outputs a record of the session to the specified location.
XPSEvaluate is an interactive command-line utility that allows administrators and application developers to evaluate expressions and test performance. To use XPSEvaluate, you must be an administrator with XPSEvaluate rights.
XPSEvaluate has the following format:
XPSEvaluate [-np] [-trace] [-dbg debuglist]
[-f DB | formulapath] [-c contextpath] [-u userpath] [-step]
[-?] [-vT | -vI | -vW | -vE | -vF]
[-l log_path] [-e err_path] [-r rec_path]
XPSEvaluate includes the following options:
(Optional) Specifies no prompt.
(Optional) Turns on tracing.
(Optional) Specifies the debug list.
(Optional) Specifies the location of the named expressions.
Note: DB specifies the policy store.
(Optional) Specifies the location of the context values.
(Optional) Specifies the location of the user attributes.
(Optional) Shows evaluation steps.
(Optional) Displays help information for this utility.
(Optional) Specifies when to log error information to the error file and how much information to log.
Logs detailed information so that you can TRACE errors.
Logs information in case there is an error.
Logs error information in the event of a WARNING, ERROR, or FATAL error.
Logs error information in the event of an ERROR or FATAL error.
Logs error information in the event of a FATAL error.
(Optional) Outputs logging information to the specified location.
Default: stdout
(Optional) Outputs error information to the specified location.
Default: stderr
(Optional) Outputs a record of the session to the specified location.
XPSExplorer is an interactive command-line utility that allows an administrator or application developer to view the data in a policy store. XPSExplorer has two uses:
To use XPSExplorer, you must be an administrator with XPSExplorer rights.
XPSExplorer has the following format:
XPSExplorer [-?] [-vT | -vI | -vW | -vE | -vF]
[-l log_path] [-e err_path] [-r rec_path]
XPSExplorer includes the following options:
(Optional) Displays help information for this utility.
(Optional) Specifies when to log error information to the error file and how much information to log.
Logs detailed information so that you can TRACE errors.
Logs information in case there is an error.
Logs error information in the event of a WARNING, ERROR, or FATAL error.
Logs error information in the event of an ERROR or FATAL error.
Logs error information in the event of a FATAL error.
(Optional) Outputs logging information to the specified location.
Default: stdout
(Optional) Outputs error information to the specified location.
Default: stderr
(Optional) Outputs a record of the session to the specified location.
To export a subset of policy store data, you need the identifiers of the objects (XIDs) that you want to export. You can use XPSExplorer to locate object identifiers. To use XPSExplorer, you must be an administrator with XPSExplorer rights.
In this use case, you export the following accounting applications:
Export a subset of policy store data
XPSExplorer
The main menu opens and lists vendors, products, and classes.
Note: Only objects in top-level classes can be exported. Top-level classes are marked with asterisks.
The Class Menu opens.
Example: If the number 15 corresponds to accounting, enter 15.
The Search Menu opens and the objects in the class are listed.
Example Search Results:
1-CA.SM::Accounting@0e-08c6cadb-e30b-4e06-9e2e-b3d7a866fab8
(I) Name : "Accounts Payable"
(C) Desc : "accounts payable"
2-CA.SM::Accounting@0e-3b0f4ccf-71f3-4968-b095-2b5a830c3244
(I) Name : "Accounts Receivable"
(C) Desc : "accounts receivable"
3-CA.SM::Accounting@03-1c7ac22e-6646-4c61-8f2f-6261a0ef3a92
(I) Name : "General Ledger"
(C) Desc : "general ledger"
4-CA.SM::Accounting@10-8d78bb81-ae15-11d1-9cdd-006008aac24b
(I) Name : "Payroll"
(C) Desc : "payroll"
5-CA.SM::Accounting@@12-88f119a0-3fd1-46d0-b8ac-c1e83f00f97d
(I) Name : "Job Costing"
(C) Desc : "job costing"
Example Object Identifiers (XIDs):
CA.SM::Accounting@0e-08c6cadb-e30b-4e06-9e2e-b3d7a866fab8
CA.SM::Accounting@0e-3b0f4ccf-71f3-4968-b095-2b5a830c3244
CA.SM::Accounting@03-1c7ac22e-6646-4c61-8f2f-6261a0ef3a92
CA.SM::Accounting@10-8d78bb81-ae15-11d1-9cdd-006008aac24b
CA.SM::Accounting@@12-88f119a0-3fd1-46d0-b8ac-c1e83f00f97d
XPSExport output_file -xo object_XID_1 -xo object_XID_2
-xo object_XID_3 -xo object_XID_4
Specifies the XML file to which the policy store data is exported.
Specifies the identifier of each object that you want to export.
Note: You can copy the object identifiers (XIDs) from the Search results and paste them in the command line.
Example:
XPSExport accounting.xml
-xo CA.SM::Accounting@0e-08c6cadb-e30b-4e06-9e2e-b3d7a866fab8
-xo CA.SM::Accounting@0e-3b0f4ccf-71f3-4968-b095-2b5a830c3244
-xo CA.SM::Accounting@03-1c7ac22e-6646-4c61-8f2f-6261a0ef3a92
-xo CA.SM::Accounting@10-8d78bb81-ae15-11d1-9cdd-006008aac24b
The policy store data for the specified accounting applications is exported to accounting.xml.
XPSExplorer includes the XCart feature. XCart allows you to collect the identifiers of the objects (XIDs) that you want to export and save them to a file for later use without manually copying and pasting each one. To use XPSExplorer, you must be an administrator with XPSExplorer rights.
To access XCart, enter X for XCart Management in the Main Menu of XPSExplorer. The XCart Menu opens and displays any objects that are in the XCart. The following options are context-sensitive and may or may not be displayed depending on the context:
Empties the XCart.
Note: The name of the XCart file does not change.
Saves the contents of the XCart to the XCart file.
Important! The S command overwrites the contents of the XCart file without prompting first.
Saves the contents of the XCart to the specified file and remembers the specified file name as the XCart file.
Note: The N Command prompts before overwriting the specified file.
Each object is tagged with an import mode that determines how it will be imported from the XPS file to the policy store:
Adds new objects; does not replace existing objects.
Replaces existing objects; does not add new objects.
Replaces existing objects and adds new objects.
Specifies the default import mode.
Note: For each product class, there is a default import mode defined in the product's data dictionary.
Exits the XCart Menu and returns to the Main Menu.
To export a subset of policy store data, you need the identifiers of the objects (XIDs) that you want to export. You can use the XCart feature of XPSExplorer to locate objects and save them in an XCart file for later use when you export. For example, an administrator can set up an XCart file for members of operations to use as needed. To use XPSExplorer, you must be an administrator with XPSExplorer rights.
In this use case, you save the following four accounting applications in a file for later use:
Export a subset of policy store data using XCart
XPSExplorer
The Main Menu opens and lists vendors, products, and classes.
Note: Only objects in top-level classes can be exported. Top-level classes are marked with asterisks.
The XCart Menu opens.
Example: C:\xcart\accounting.txt
Note: This is where you want the contents of the XCart to be saved.
The specified file name is remembered as the XCart file.
Example: C:\xcart\accounting.txt
Note: The file must exist. If not, L has no effect.
The Class Menu opens.
Example: If the number 15 corresponds to Accounting, enter 15.
The Search Menu opens and the objects in the class are listed.
Example Search Results:
1-CA.SM::Accounting@0e-08c6cadb-e30b-4e06-9e2e-b3d7a866fab8
(I) Name : "Accounts Payable"
(C) Desc : "accounts payable"
2-CA.SM::Accounting@0e-3b0f4ccf-71f3-4968-b095-2b5a830c3244
(I) Name : "Accounts Receivable"
(C) Desc : "accounts receivable"
3-CA.SM::Accounting@03-1c7ac22e-6646-4c61-8f2f-6261a0ef3a92
(I) Name : "General Ledger"
(C) Desc : "general ledger"
4-CA.SM::Accounting@10-8d78bb81-ae15-11d1-9cdd-006008aac24b
(I) Name : "Payroll"
(C) Desc : "payroll"
5-CA.SM::Accounting@@12-88f119a0-3fd1-46d0-b8ac-c1e83f00f97d
(I) Name : "Job Costing"
(C) Desc : "job costing"
Note: An asterisk before an application indicates that it is in the XCart.
XPSExport output_file -xf xcart_file
Specifies the XML file to which the policy store data is exported.
Specifies the path and name of the XCart file containing the identifiers of the objects (XIDs) to export.
Example:
XPSExport accounting.xml C:\xcart\accounting.txt
The policy store data for the accounting applications saved in the XCart file is exported to accounting.xml.
In this use case, you add a fifth accounting application, Job Costing, to the following four accounting applications already in the XCart file, accounting.txt, using the XCart feature of XPSExplorer:
Note: To use XPSExplorer, you must be an administrator with XPSExplorer rights.
Add an application to an XCart file
XPSExplorer
The Main Menu opens and lists vendors, products, and classes.
Note: Only objects in top-level classes can be exported. Top-level classes are marked with asterisks.
The XCart Menu opens.
The specified file name is remembered as the XCart file.
Example: C:\xcart\accounting.txt
The Class Menu opens.
Example: If the number 15 corresponds to accounting, enter 15.
The Search Menu opens and the objects in the class are listed.
Example Search Results:
1-CA.SM::Accounting@0e-08c6cadb-e30b-4e06-9e2e-b3d7a866fab8
(I) Name : "Accounts Payable"
(C) Desc : "accounts payable"
2-CA.SM::Accounting@0e-3b0f4ccf-71f3-4968-b095-2b5a830c3244
(I) Name : "Accounts Receivable"
(C) Desc : "accounts receivable"
3-CA.SM::Accounting@03-1c7ac22e-6646-4c61-8f2f-6261a0ef3a92
(I) Name : "General Ledger"
(C) Desc : "general ledger"
4-CA.SM::Accounting@10-8d78bb81-ae15-11d1-9cdd-006008aac24b
(I) Name : "Payroll"
(C) Desc : "payroll"
5-CA.SM::Accounting@@12-88f119a0-3fd1-46d0-b8ac-c1e83f00f97d
(I) Name : "Job Costing"
(C) Desc : "job costing"
Note: An asterisk before an application indicates that it is in the XCart.
The asterisk before the application indicates that it is in the XCart.
Job Costing is added to accounting.txt.
XPSSecurity is an interactive command-line utility that allows administrators and members of operations to create and delete administrators and edit their rights. To use XPSSecurity, you must be an administrator with XPSSecurity rights.
XPSSecurity has the following format:
XPSSecurity [-?] [-vT | -vI | -vW | -vE | -vF]
[-l log_path] [-e err_path] [-r rec_path]
XPSSecurity includes the following options:
(Optional) Displays help information for this utility.
(Optional) Specifies when to log error information to the error file and how much information to log.
Logs detailed information so that you can TRACE errors.
Logs information in case there is an error.
Logs error information in the event of a WARNING, ERROR, or FATAL error.
Logs error information in the event of an ERROR or FATAL error.
Logs error information in the event of a FATAL error.
(Optional) Outputs logging information to the specified location.
Default: stdout
(Optional) Outputs error information to the specified location.
Default: stderr
(Optional) Outputs a record of the session to the specified location.
A super user is defined when the connection to the external administrator store is configured. The super user is used to create and manage all other administrator accounts. If the super user is unavailable, use XPSSecurity to make any user in the external store a super user.
To make an administrator a super user
Note: If an administrator with XPSSecurity rights is not available, you can log in as one the following:
Specifies the Policy Server installation path.
Note: If the utility is not present, you can find it in the Policy Server installation media available on the Support site.
XPSSecurity
The main menu appears.
The administrator menu lists the CA SiteMinder® administrators in the external store. Each administrator is prefixed with a number.
The administrator menu displays attributes specific to the administrator you chose. Each attribute is prefixed with a number.
The administrator menu updates with flag settings.
The Disabled and Super User flags appear. Each flag is prefixed with a number.
The Super User flag is selected.
The administrator menu displays attributes specific to the administrator. The Flags attribute is set to Super User.
The administrator record is updated.
The administrator menu lists the CA SiteMinder® administrators in the external store. The administrator you chose appears as a super user.
The administrator you chose is a super user. Use this administrator to restore modified or deleted permissions.
XPSSweeper is a command-line utility that can also be run as a batch job. You can use XPSSweeper to synchronize XPS and SiteMinder policy stores. Usually, XPS synchronizes the different policy stores. However, when legacy tools are used, the policy stores may need to be resynchronized using XPSSweeper. In any case, XPSSweeper does not harm the policy stores and can be run as a precaution.
XPSSweeper has the following format:
XPSSweeper [-f] [-s seconds] [-m entries]
[-?] [-vT | -vI | -vW | -vE | -vF]
[-l log_path] [-e err_path]
XPSSweeper includes the following options:
(Optional) Runs XPSSweeper in a loop forever.
Note: Use Control-C to exit.
(Optional) Sleeps for the specified number of seconds between iterations of XPSSweeper.
(Optional) Outputs a milestone message every time the specified number of entries has been logged.
(Optional) Displays help information for this utility.
(Optional) Specifies when to log error information to the error file and how much information to log.
Logs detailed information so that you can TRACE errors.
Logs INFOrmation in case there is an error.
Logs error information in the event of a WARNING, ERROR, or FATAL error.
Logs error information in the event of an ERROR or FATAL error.
Logs error information in the event of a FATAL error.
(Optional) Outputs logging information to the specified location.
Default: stdout
(Optional) Outputs error information to the specified location.
Default: stderr
You can run XPSSweeper as a batch job by setting the following two XPS configuration parameters using XPSConfig:
Specifies whether to run XPSweeper according to the Autosweep schedule or not to run XPSSweeper at all.
Type: Boolean
Specifies the Autosweep schedule in GMT using the following format:
DDD@{HH:MM}[,DDD@{HH:MM}] ... [,DDD@{HH:MM}]
(Optional) Specifies the day of the week:
Sun | Mon | Tue | Wed | Thu | Fri | Sat
Specifies the hour.
Range: 00-23
Specifies the number of minutes past the hour.
Range: 00-59
Every Sunday at 8:30am GMT
Every Tuesday at 2:00pm GMT
Everyday at 3:15pm GMT
Every Sunday at 8:30am, every Tuesday at 2:00pm, and everyday at 3:15pm except Tuesday
Note: Multiple Autosweep times can be separated by commas, spaces, or semicolons.
Policy Servers manage XPSSweeper Autosweep times as follows:
Example: If XPSSweeper is scheduled to run at 2:00pm on Tuesday and daily at 3:15pm, the latter sweep is not run on Tuesdays.
We recommend configuring the XPSSweeper utility to run once every 24 hours. If the XPSSweeper utility does not run often enough, the Policy Server could have trouble starting. Too many tombstone objects in the policy store produce the following error:
LDAP_SIZELIMIT_EXCEEDED
Setting the XPSSweeper utility to run automatically uses the following XPS configuration parameters:
Follow these steps:
XPSConfig
The Products Menu opens and lists the products.
The Parameters Menu opens and lists the XPS parameters.
The Autosweep Parameter Menu opens.
Note: This step specifies running XPSSweeper according to the Autosweep Schedule.
The AutosweepSchedule Parameter Menu opens.
The command prompt appears.
|
Copyright © 2013 CA.
All rights reserved.
|
|