

Configure the <gent> after installation by performing the procedures described in the following process.
The following information must be supplied during Trusted Host registration:
The name of a Policy Server administrator allowed to register the host with the Policy Server.
This administrator should already be defined at the Policy Server and have the permission Register Trusted Hosts set. The default administrator is SiteMinder.
The Policy Server administrator account password.
Specifies a unique name that represents the trusted host to the Policy Server. This name does not have to be the same as the physical client system that you are registering; it can be any unique name, for example, mytrustedhost.
Note: This name must be unique among trusted hosts and not match the name of any other Agent.
The name of the Host Configuration Object in the Policy Server that defines the connection between the trusted host and the Policy Server. For example, to use the default, enter DefaultHostSettings. In most cases, you will have created your own Host Configuration Object.
Note: This value must match the Host Configuration Object entry preconfigured on the Policy Server.
The IP address, or host name, and authentication port of the Policy Server where you are registering the host. The default port is 44442. If you do not provide a port, the default is used.
You can specify a non-default port number, but if your Policy Server is configured to use a non-default port and you omit it when you register a trusted host, the following error is displayed:
Registration Failed (bad ipAddress[:port] or unable to connect to Authentication server (-1)
Note also that if you specify a non-default port, that port is used for the Policy Server’s authentication, authorization, and accounting ports; however, the unified server responds to any Agent request on any port. The entry in the SmHost.conf file will look like:
policyserver="ip_address,5555,5555,5555"
Determines whether the Agent communicates with the Policy Server using certified Federal Information Processing Standard (FIPS) 140-2 compliant cryptographic libraries.
Specifies non-FIPS mode, which lets the Policy Server and the Agents read and write information using the existing CA SiteMinder® encryption algorithms. If your organization does not require the use of FIPS-compliant algorithms, the Policy Server and the Agents can operate in non-FIPS mode without further configuration.
Specifies full-FIPS mode, which requires that the Policy Server and Web Agents read and write information using only FIPS 140-2 algorithms.
Important! A CA SiteMinder® installation that is running in Full FIPS mode cannot interoperate with, or be backward compatible to, earlier versions of CA SiteMinder®, including all agents, custom software using older versions of the Agent API, and custom software using PM APIs or any other API that the Policy Server exposes. You must re-link all such software with the corresponding versions of the respective SDKs to achieve the required support for Full FIPS mode.
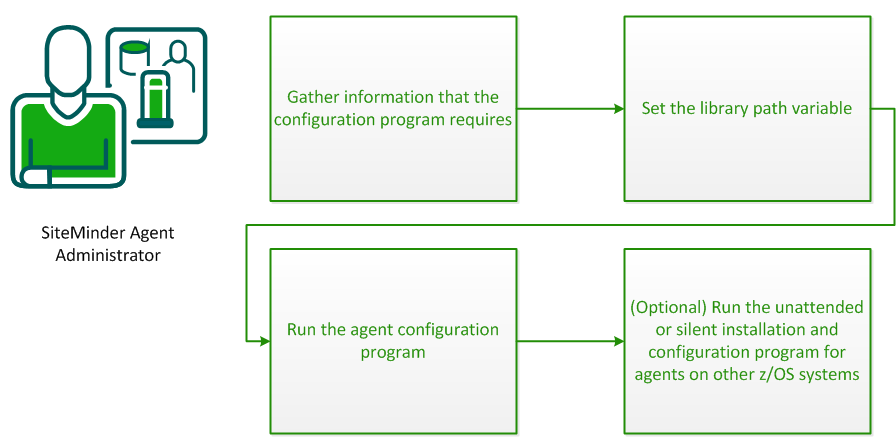
Set the library path variable on z/OS systems before running the agent configuration program.
export LIBPATH=agent_home/bin
Indicates the directory where the SiteMinder WSS Agent is installed on your web server.
Default (Windows 32-bit SiteMinder WSS Agent installations: C:\Program Files\CA\Web Services Security\webagent
Default (Windows 64-bit SiteMinder WSS Agent installations: C:\Program Files\CA\Web Services Security\webagent\win64
Default (Windows 32-bit SiteMinder WSS Agent installations operating on 64-bit systems: C:\Program Files (x86)\CA\Web Services Security\webagent\win32
After gathering the information for your agent configuration, run the agent configuration program. This program creates an agent runtime instance for the web servers running on your computer.
This configuration program is wizard or console based, depending on the option you select. Running the configuration program in the wizard or console mode once creates a properties file. Use the properties file to run unattended configurations on other z/OS systems in the future.
Note: Verify that you have executable permissions. To add executable permissions to the installation media, run the following command:
chmod +x installation_media
Specifies the CA SiteMinder® agent installer executable.
Follow these steps:
WSS_home/install_config_info
Specifies the installed location of the <soasm).
GUI Mode:
ca-wa-config.sh
Console Mode:
ca-wa-config.sh -i console
The agent runtime instance is created for your web servers.
The unattended or silent installation option can help you automate the installation and configuration process. This method saves time if you have a large CA SiteMinder® environment that uses many agents with identical settings.
For example, suppose the Agents in your environment use the same web server version, installation directory, Agent Configuration Object and Policy Servers. Use the installation wizard or console-based installation program for your first installation. Afterwards, you could create your own script to run the installation program with the .properties file the wizard or console-based installation program created.
Follow these steps:
WSS_Home\install_config_info\ca-wss-installer.properties
Note: If the path contains spaces, surround it with quotes.
Specifies the path to where CA SiteMinder® Web Services Security is installed.
Note: To automate this process, create your own customized script to execute these files on your systems. Use any scripting language that you want.
java -jar installation_media -f ca-pepconfig-installer.properties -i silent
Specifies the SiteMinder WSS Agent installer executable.
The SiteMinder WSS Agent is installed and configured on the web server silently.
|
Copyright © 2013 CA.
All rights reserved.
|
|