

This section contains the following topics:
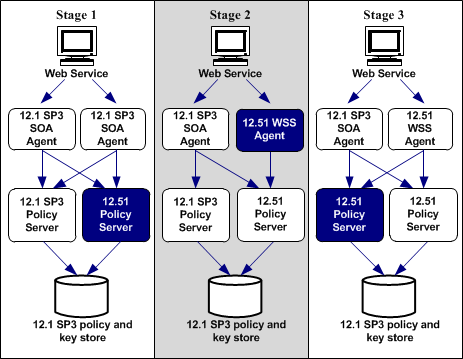
Upgrading a SOA Agent to a 12.52 WSS Agent involves several separate procedures. To upgrade your agent, Follow these steps::
The installation program for the SiteMinder WSS Agent installs the agent on one computer at a time using the Windows operating environment. This installation program can be run in wizard or console modes. The wizard and console-based installation programs also create a .properties file for subsequent installations and configurations using the unattended or silent method with the same settings.
For example, suppose the Agents in your environment use the same web server version, installation directory, Agent Configuration Object and Policy Servers. Use the installation wizard or console-based installation program for your first installation. Afterwards, you could create your own script to run the installation program with the .properties file the wizard or console-based installation program created.
Follow these steps:
executable_file_name.exe -i console
Important! If you are running this wizard on Windows Server 2008, run the executable file with Administrator permissions, even if you are logged into the system as an Administrator. For more information, see the CA SiteMinder® Web Services Security Release Notes.
Use the information that you gathered previously to complete the installation.
Note: The software upgrade occurs in the installed location of the existing SOA Agent.
After gathering the information for your Agent Configuration worksheet, run the Agent Configuration wizard. The configuration wizard creates a runtime instance of the Agent for Web Servers on your web server.
Running the configuration wizard once creates a properties file. Use the properties file to run unattended configurations on other computers with same operating environment and settings.
Note: The configuration wizard for this version of the Agent for IIS does not support console mode.
Follow these steps:
WSS_Home\install_config_info
Specifies the path to where CA SiteMinder® Web Services Security is installed.
Default: C:\Program Files\CA\Web Services Security
Important! If you are running this wizard on Windows Server 2008, run the executable file with Administrator permissions, even if you are logged into the system as an Administrator. For more information, see the CA SiteMinder® Web Services Security Release Notes.
The agent configuration wizard starts.
|
Copyright © 2013 CA.
All rights reserved.
|
|