

A CA SiteMinder® integration with the CA DataMinder Content Classification Service (CCS) lets the Policy Server use CCS content assessments to make content–aware authorization decisions.
Consider the following items before you begin:
Note: For more information, see the CA SiteMinder® Platform Support Matrix.
The purpose of the following diagram is to:
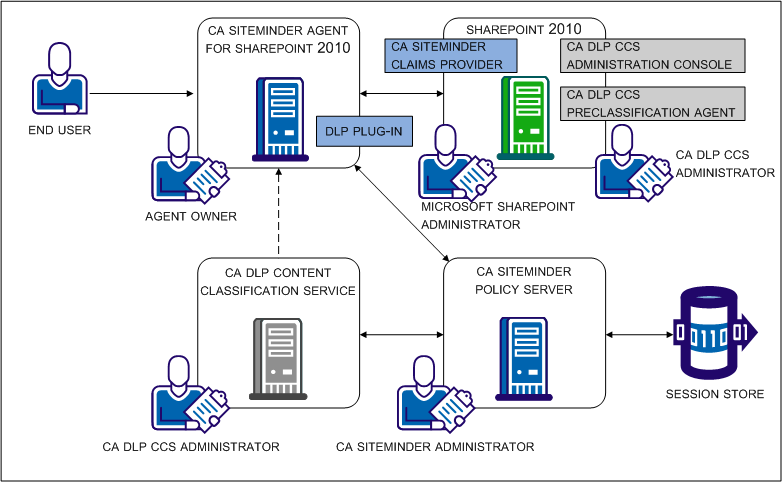
The role of the CCS in the integration is to make available predefined content classifications to the CA SiteMinder® Policy Server. The classifications correspond to document types commonly found in a corporate environment. The Policy Server uses the classifications to make content–aware authorization decisions.
As the dotted line in CA DataMinder Content Classification Service illustrates, if a content classification is unavailable at the time of the Policy Server authorization decision, the CCS can request the resource directly to classify or re–classify it. The CCS:
Note: For more information about the CCS and content classifications, see the CA DataMinder Content Classification Service Integration Guide. The guide is included in the CA DataMinder Content Classification Service bookshelf.
The role of the CA DataMinder CCS preclassification agent in the integration is to scan and classify SharePoint documents offline. Classifying documents offline avoids the need to retrieve a document classification as part of the Policy Server authorization decision.
Note: For more information about the preclassification agent and classification service scans, see the CA DataMinder Content Classification Service Integration Guide. The guide is included in the CA DataMinder Content Classification Service bookshelf.
The role of the CA SiteMinder® Policy Server in the integration is to act as the Policy Decision Point (PDP). The Policy Server:
If configured to do so, the Policy Server can create a single use security token for the CA DataMinder CCS. The CA DataMinder CCS uses the token to request the resource directly. The CCS requests a resource when it must classify or re–classify it as part of the authorization decision.
Note: For more information about applying content classifications to an Enterprise Policy Management application, see the Policy Server Configuration Guide.
The role of the CA SiteMinder® agent for SharePoint in the integration is to act as the Policy Enforcement Point (PEP). The agent for SharePoint:
The role of the CA SiteMinder® session store is to make available single use security tokens to all Policy Servers in a clustered environment. If configured to do so, a Policy Server creates a security token for the CA DataMinder CCS. The token serves as credentials for the CA DataMinder CCS when it requires access to the protected document.
The CA DataMinder CCS requires access to a protected document when it cannot provide the content classification to the Policy Server. Requesting the resource lets the CCS:
As part of the process, the agent for SharePoint returns the token to a Policy Server to validate authenticity. If the agent for SharePoint sends the validation request to a Policy Server that did not create the token and the environment:
The following diagram:
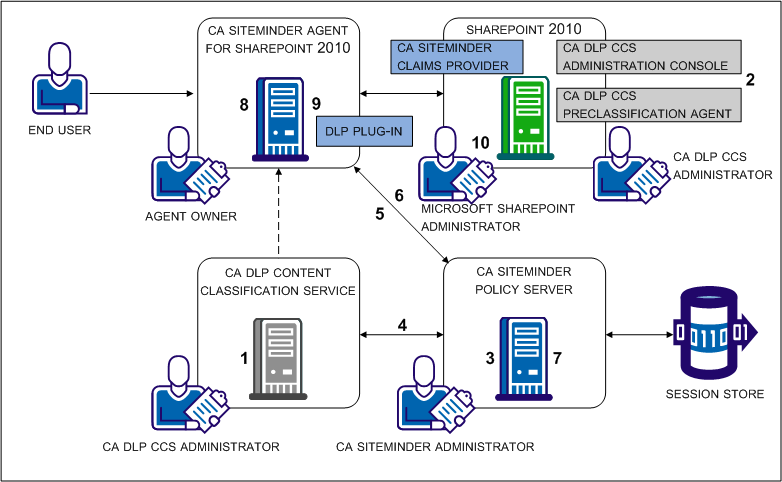
The following table includes each step in the figure and lists the individual responsible for the task.
|
Step |
Action |
Responsibility |
|---|---|---|
|
1 |
Install and configure the CA DataMinder CCS to communicate over SSL. |
CA DataMinder CCS administrator |
|
2 |
Install and configure the CA DataMinder preclassification agent. |
CA DataMinder CCS administrator |
|
3 |
CA SiteMinder® administrator |
|
|
4 |
CA SiteMinder® administrator |
|
|
5 |
CA SiteMinder® administrator |
|
|
6 |
CA SiteMinder® administrator |
|
|
7 |
CA SiteMinder® administrator |
|
|
8 |
SharePoint agent owner |
|
|
9 |
SharePoint agent owner |
|
|
10 |
Provide the CA DataMinder CCS with read access to SharePoint applications. |
SharePoint administrator |
The CA DataMinder CCS administrator is responsible for:
A CA SiteMinder® administrator requires the CCS server certificate file to enable SSL on Policy Server host systems.
Important! Use the same certificate and password for all CCS instances when configuring them to communicate securely.
Note: For more information, see the CA DataMinder Content Classification Service Integration Guide. The guide is included in the CA DataMinder Content Classification Service bookshelf.
The CA SiteMinder® administrator is responsible for enabling the CA SiteMinder® environment for the integration. Complete the integration steps in the following order:
The integration requires that the CA DataMinder CCS and the CA SiteMinder® Policy Server communicate securely.
Follow these steps:
Important! The file must be in PEM format.
axis2.xml
The Policy Server requires a connection to a CA DataMinder CCS to:
Configuring the connection is a local setting. Complete the following procedure for every Policy Server that is protecting the SharePoint documents.
Follow these steps:
Note: For more information about the parameters, click Help.
Modifying the SharePoint agent configuration object configures the agent to extract resource information from the protected document. The agent passes the information to the Policy Server as part of the authorization process.
Follow these steps:
SHAREPOINT
The agent configuration object is enabled for the integration.
The SharePoint 2010 agent configuration object includes the DLP exclusion list parameter. This parameter contains a set of default resources that the Policy Server excludes from CA DataMinder CCS content classifications. Excluding resources from content classifications indicates to SharePoint agents that the resource can be automatically authorized.
The integration requires that you enable the parameter.
Follow these steps:
#DlpExclusionList
Note: Separate the values with a comma.
The agent configuration object is enabled.
By default, when users fail a DLP content check during authorization, they are redirected to a standard HTTP 403 error message.
Enable authorization failure messages to return an alternate, user–friendly message.
Follow these steps:
The HTML file requires these items to prevent Internet Explorer from displaying the standard error message, instead of your custom page.
#DlpErrorFile
Example:
C:\custompages\dlperror.txt
The user–friendly message is enabled.
The CA Agent for SharePoint administrator is responsible for enabling the SharePoint agent environment for the integration. Complete the integration steps in the following order:
If SharePoint is configured for multi–authentication, specific CA SiteMinder® Agent for SharePoint proxy rules are required to ensure that the CA DataMinder CCS classifies your SharePoint resources properly.
Contact the Sharepoint administrator to determine if multi–authentication is configured. If multi–authentication is configured, complete the following procedure.
Important! Do not use any other proxy rule settings when the SharePoint environment is configured for multi–authentication. The CA DataMinder CCS request for resources uses an HTTP header for proper forwarding by the CA SiteMinder® Agent for SharePoint. If the CA SiteMinder® Agent for SharePoint does not properly forward these requests using the following proxy rules, unauthorized access and disclosure of your protected information is possible.
Follow these steps:
Agent-for-SharePoint_home\proxy-engine\conf\proxyrules.xml
proxyrules_xml_default.txt
Agent-for-SharePoint_home\proxy-engine\examples\proxyrules\proxyrules_example2.xml
Agent-for-SharePoint_home\proxy-engine\conf\proxyrules.xml
:///$$PROXY_RULES_DTD$$"
:///C:\Program Files\CA\Agent-for-SharePoint\proxy-engine\conf\dtd\proxyrules.dtd"
http://www.company.com
http:www.example.com
<nete:cond type="header" criteria="equals" headername="HEADER">
<nete:cond type="header" headername="SMSERVICETOKEN">
<nete:case value="value1">
<nete:case value="DLP">
<nete:xprcond>
<nete:xpr>
<nete:rule>^/_login/default.aspx\?ReturnUrl=(.*)</nete:rule> <nete:result>http://sharepoint.example.com:port_number/_trust/default.aspx?trust=siteminder_trusted_identity_provider&ReturnUrl=$1</nete:result> </nete:xpr>
<nete:xpr-default>
<nete:forward>http://sharepoint.example:port_number$0</nete:forward>
</nete:xpr-default>
</nete:xprcond>
<nete:forward>http://home.company.com</nete:forward>
The proxy rules are set.
Enabling the DLP plug–in configures the agent to extract the resource information from the protected document. The agent passes the information to the Policy Server as part of the authorization process.
Important! A separate procedure is required in the application tier to enable the integration. Do not modify the web agent configuration file before the SharePoint agent configuration object is modified. The CA SiteMinder® administrator is responsible for completing the task.
Follow these steps:
Agent-for-SharePoint_Home\proxy-engine\conf\defaultagent
Indicates the directory where the CA SiteMinder® Agent for SharePoint is installed.
Default: (Windows) [32-bit] C:\Program Files\CA\Agent-for-SharePoint
Default: (Windows) [64-bit] C:\CA\Agent-for-SharePoint
Default: (UNIX/Linux) /opt/CA/Agent-for-SharePoint
WebAgent.conf
Example: (Windows [32-bit]) LoadPlugin="C:\Program Files\CA\Agent-for-SharePoint\agentframework\bin\DisambiguatePlugin.dll"
Example: (Windows [64-bit]) LoadPlugin="C:\CA\Agent-for-SharePoint\agentframework\bin\DisambiguatePlugin.dll"
Example: (UNIX/Linux) LoadPlugin="/opt/CA/Agent-for-SharePoint/agentframework/bin/DisambiguatePlugin.so"
The CA SiteMinder® Agent for SharePoint is configured for the CA DataMinder integration.
The SharePoint Administrator is responsible for providing the CA DataMinder CCS with read access to the SharePoint applications that CA SiteMinder® is protecting. The CA DataMinder CCS requires read access to determine the types of content that protected documents contain.
Providing read access to the CA DataMinder CCS is local to each application. Complete the following procedure for every application that CA SiteMinder® is protecting.
Follow these steps:
C:\Program Files\CA\SharePointClaimsProvider\scripts
.\Set-SMClaimProviderConfiguration.ps1 -EnableLoopBackSearch
A list of applications appears.
The Policy for Web Application dialog appears.
The Add Users wizard appears.
The Select People and Groups – Web Page dialog appears.
caservice
caservice
The Add Users dialog appears.
Full Read - Has full read-only access.
The Policy for Web Application dialog appears.
The CA DataMinder CCS has read access to the application.
|
Copyright © 2013 CA.
All rights reserved.
|
|