

This section contains the following topics:
Agent Installation Compared to Agent Configuration
Agent for IIS Installation and Configuration Roadmap
How to Install and Configure a CA SiteMinder® Agent for IIS
How to Configure Certain Settings for the CA SiteMinder® Agent for IIS Manually
The concepts of installation and configuration have specific meanings when used to describe CA SiteMinder® agents.
Installation means installing the CA SiteMinder® agent software on a computer system. For example, installing an agent creates directories and copies the CA SiteMinder® agent software and other settings to the computer.
Configuration occurs after installation and means the act of preparing the CA SiteMinder® agent software for a specific web server on a computer. This preparation includes registering the agent with CA SiteMinder® Policy Servers, and creating a runtime server instance for the web server that is installed on the computer.
Use the wizard-based installation and configuration programs to install and configure your agent on your first web server. The wizard-based programs create a .properties file.
Use the .properties file and the respective executable file to install or configure the agent silently on additional web servers.
The following illustration describes the process installing and configuring a CA SiteMinder® Agent for IIS:
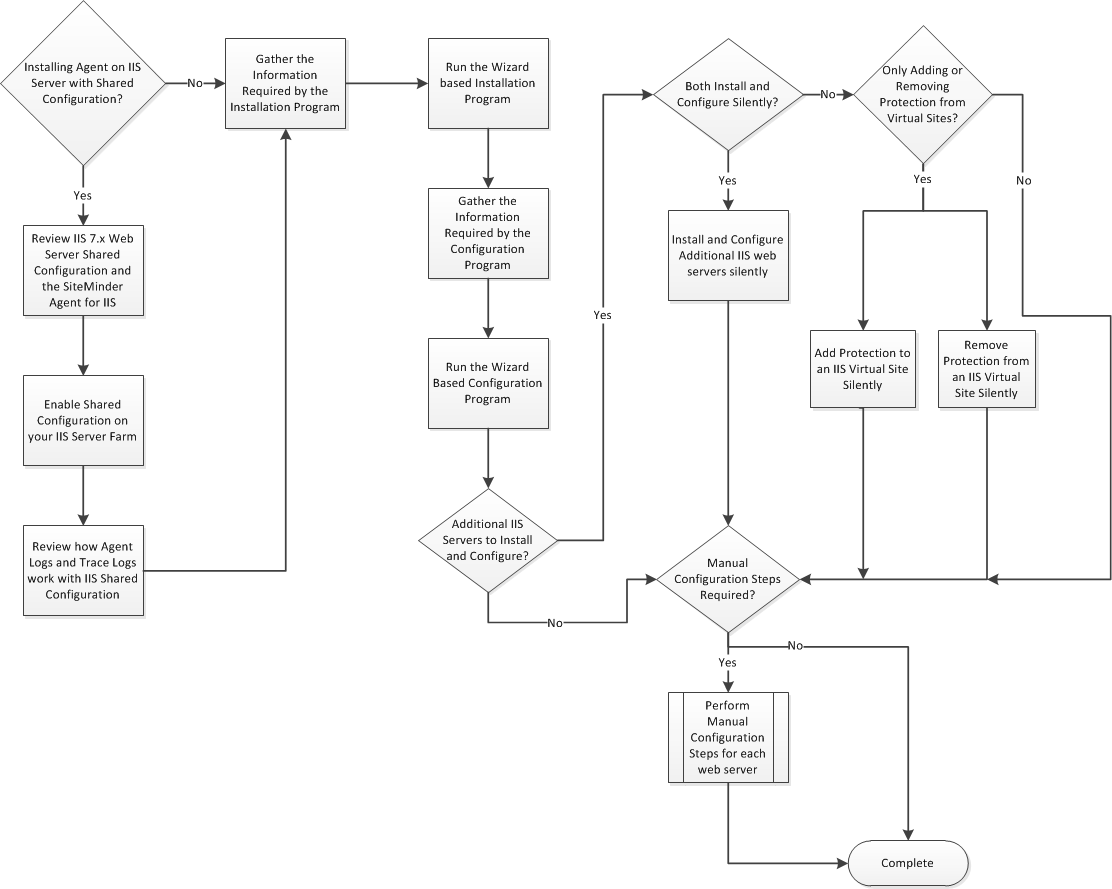
Installing and configuring the CA SiteMinder® Agent for IIS involves several separate procedures. To install and configure the Agent for IIS, use the following process:
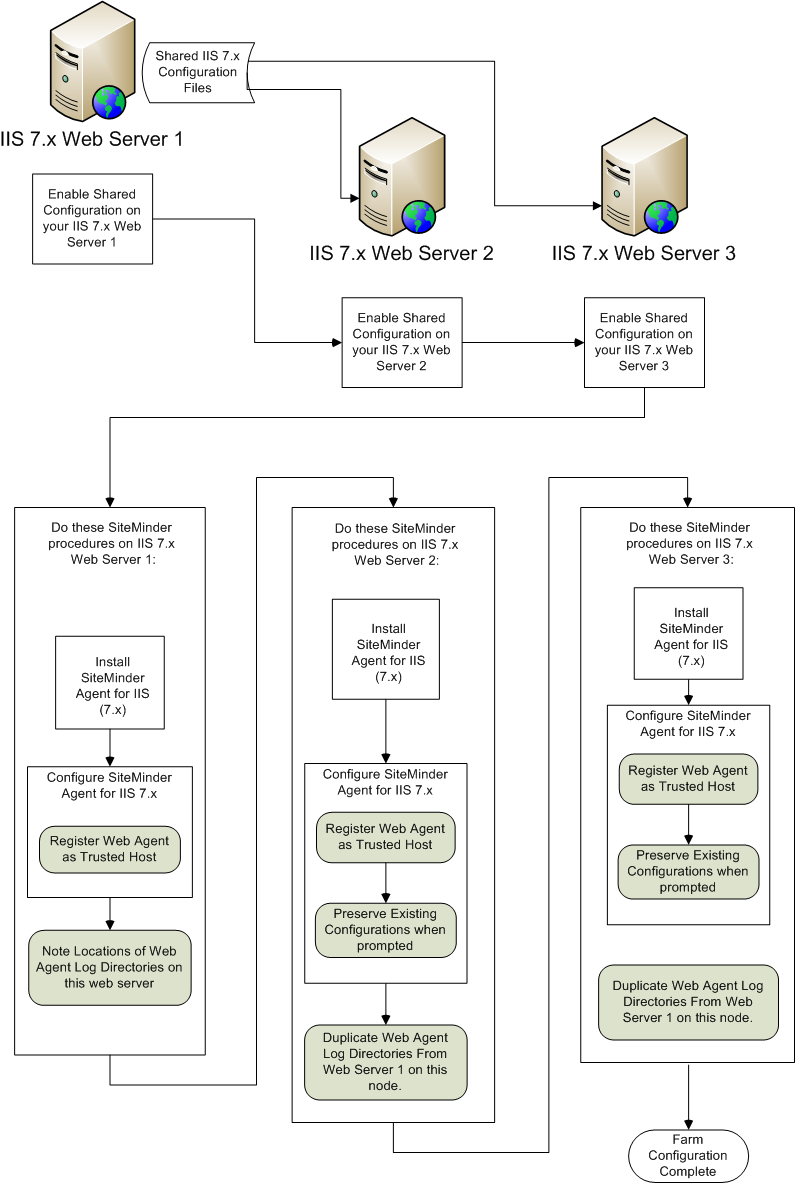
IIS 7.x web servers support shared configurations that streamline the configuration process for an IIS a server farm.
Starting with CA SiteMinder® 12.52, the Agent for IIS can protect resources on IIS server farms that use the shared configuration feature of IIS 7.x.
Note: This feature works only with the CA SiteMinder® 12.52 Agent for IIS 7. Older versions of the CA SiteMinder® Web Agent do not support this feature.
IIS 7.x uses network shares to propagate the configuration information across the server farm. The CA SiteMinder® 12.52 Agent for IIS, however, cannot operate on network shares. Using a CA SiteMinder® 12.52 Agent for IIS on an IIS server farm involves several separate procedures.
For example, suppose you have three IIS 7.x web servers, with all of them using a shared configuration. Web server number one is your primary web server, which contains the configuration information for the farm. Web servers 2 and 3 are nodes that connect to the network share on web server one to read the configuration information.
The entire installation and configuration process for using the CA SiteMinder® Agent for IIS on all three IIS 7.x web servers is described in the following illustration:
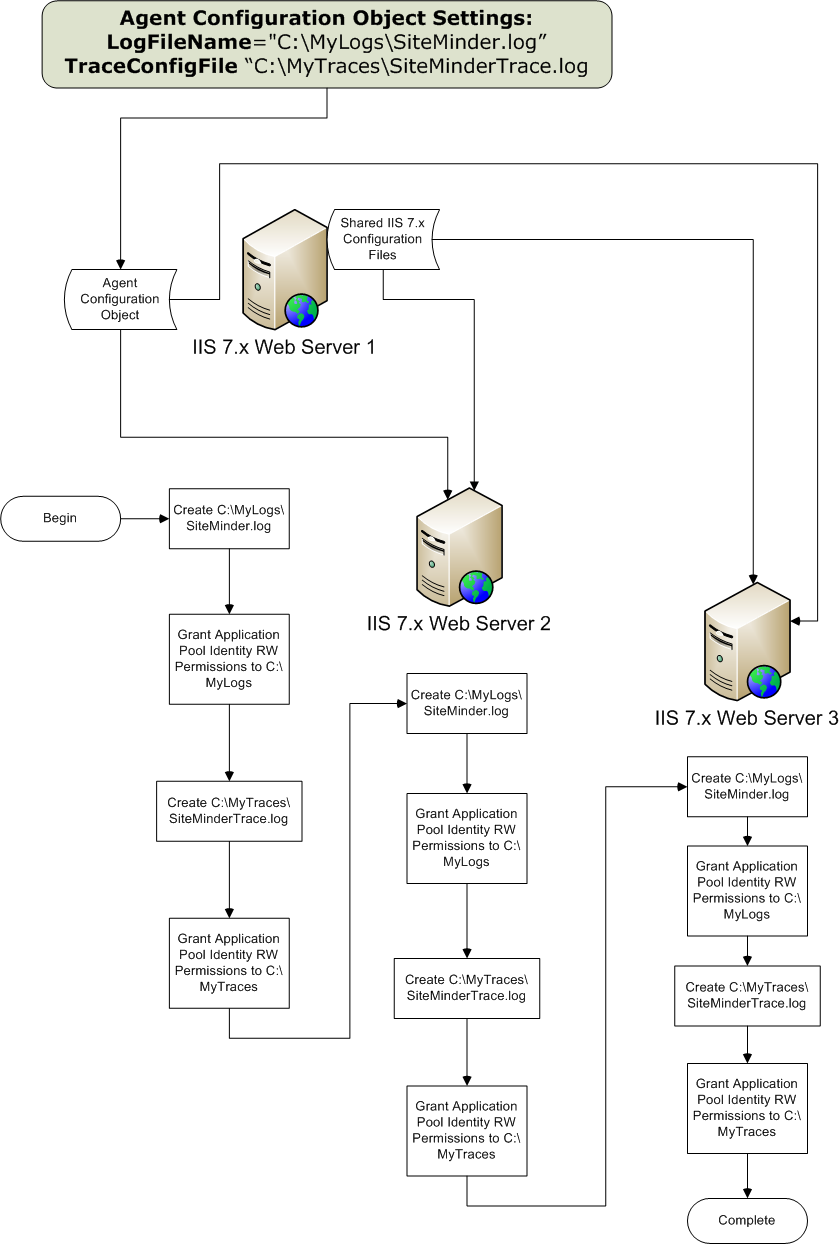
For CA SiteMinder® Agents for IIS running on an IIS server farm, create duplicate log and trace file directories on each node if all the following conditions are true:
If all of the previous conditions exist in your server farm, use the following process to enable your Web Agent logs and trace logs:
For example, suppose you have three IIS 7.x web servers, with all of them using a shared configuration. Web server number one is your primary web server, which contains the configuration information for the farm. Web servers 2 and 3 are nodes that connect to the network share on web server one to read the configuration information.
The entire process for configuring these logs is described in the following illustration:
Before running the installation program for the CA SiteMinder® Agent for IIS on the Windows operating environment, gather the following information about your web server:
Specifies the location of the CA SiteMinder® agent binary files on your web server. The web_agent_home variable is set to this location.
Limit: CA SiteMinder® requires the name "webagent" for the bottom directory in the path.
Specifies the location in your Start menu for the shortcut for the Web Agent Configuration wizard.
The installation program for the CA SiteMinder® agent installs the agent on one computer at a time using the Windows operating environment. This installation program can be run in wizard or console modes. The wizard and console-based installation programs also create a .properties file for subsequent installations and configurations using the unattended or silent method with the same settings.
For example, suppose the Agents in your environment use the same web server version, installation directory, Agent Configuration Object and Policy Servers. Use the installation wizard or console-based installation program for your first installation. Afterwards, you could create your own script to run the installation program with the .properties file the wizard or console-based installation program created.
Follow these steps:
executable_file_name.exe -i console
Before configuring a <stmdnr> Agent on an IIS web server, gather the following information about your CA SiteMinder® environment.
Indicates whether you want to register this agent as a trusted host with a CA SiteMinder® Policy Server. Only one registration per agent is necessary. If you are installing the CA SiteMinder® Agent for IIS 7.x on an IIS server farm, register all IIS agents in the farm as trusted hosts.
Limits: Yes, No
Specifies the name of a CA SiteMinder® user account that has sufficient privileges to create and register trusted host objects on the Policy Server.
Specifies the password that is associated with the CA SiteMinder® user account that has sufficient privileges to create and register trusted host objects on the Policy Server.
Confirms the password that is associated with the CA SiteMinder® user account that has sufficient privileges to create and register trusted host objects on the Policy Server.
Indicates whether the Policy Server generates a new shared secret when the agent is registered as a trusted host.
Specifies a unique name for the host you are registering. After registration, this name appears in the list of Trusted Hosts in the Administrative UI. When configuring a CA SiteMinder® Agent for IIS on an IIS web server farm, specify a unique name for each IIS server node on the farm. For example, if your farm uses six servers, specify six unique names.
Indicates the name of the Host Configuration Object that exists on the Policy Server.
Specifies the IP addresses of any Policy Servers to which the agent connects. Add a port number if you are not using the default port for the authentication server. Non-default ports are used for all three Policy Server connections (authentication, authorization, accounting).
Default: (authentication port) 44442
Example: (IPv4) 127.0.0.1,55555
Example: (IPv6) [2001:DB8::/32][:55555]
Note: If a hardware load balancer is configured to expose Policy Servers in your environment through a single Virtual IP Address (VIP), enter the VIP. For more information, see the Policy Server Administration Guide.
Specifies one of the following algorithms:
Uses algorithms existing in previous versions of CA SiteMinder® to encrypt sensitive data and is compatible with previous versions of CA SiteMinder®. If your organization does not require the use of FIPS-compliant algorithms, use this option.
Allows a transition from FIPS-compatibility mode to FIPS-only mode. In FIPS-migration mode, CA SiteMinder® environment continues to use existing CA SiteMinder® encryption algorithms as you reencrypt existing sensitive data using FIPS-compliant algorithms.
Uses only FIPS-compliant algorithms to encrypt sensitive data in the CA SiteMinder® environment. This setting does not interoperate with, nor is backwards-compatible with, previous versions of CA SiteMinder®.
Default: FIPS Compatibility/AES Compatibility
Note: FIPS is a US government computer security standard that accredits cryptographic modules which meet the Advanced Encryption Standard (AES).
Important! Use a compatible FIPS/AES mode (or a combination of compatible modes) for both the CA SiteMinder® agent and the CA SiteMinder® Policy Server.
Specifies the name of the SmHost.conf file which contains the settings the Web Agent uses to make initial connections to a CA SiteMinder® Policy Server.
Default: SmHost.conf
Specifies the directory where the SmHost.conf file is stored. On Windows 64-bit operating environments, the configuration program creates two separate files. One file supports 64-bit applications, and the other file supports 32-bit applications running on the same web server.
Default: (Windows IIS 7.x 32-bit) web_agent_home\win32\bin\IIS
Default: (Windows IIS 7.x 64-bit) web_agent_home\win64\bin\IIS
Lists the web sites on the IIS 7.x web server that you can protect with CA SiteMinder®.
Appears when the CA SiteMinder® Agent configuration wizard detects one of the following situations:
Select one of the following options:
Replaces the previous configuration of the CA SiteMinder® Agent with the current configuration.
Keeps the existing configuration of your CA SiteMinder® Agent. No changes are made to this web server instance. Select this setting for each web server node if you are configuring the CA SiteMinder® Agent for IIS 7.x on an IIS server farm.
Removes the existing configuration of a CA SiteMinder® Agent from the web server. Any resources are left unprotected by CA SiteMinder®.
Default: Preserve
Important! Do not configure and unconfigure virtual sites at the same time. Run the wizard once to configure the sites you want, and then run the wizard again to unconfigure the sites you want.
Specifies the name of an Agent Configuration Object (ACO) already defined on the Policy Server. IIS web servers in a server farm using shared configuration support sharing a single ACO name with all IIS servers in the farm.
Default: AgentObj
Note: We recommend printing a copy of the CA SiteMinder® Agent Configuration Worksheet to record this information for future reference.
After gathering the information for your Agent Configuration worksheet, run the Agent Configuration wizard. The configuration wizard creates a runtime instance of the Agent for IIS on your IIS web server.
Running the configuration wizard once creates a properties file. Use the properties file to run unattended configurations on other computers with same operating environment and settings.
Note: The configuration wizard for this version of the Agent for IIS does not support console mode.
Follow these steps:
A shortcut to the Web Agent Configuration wizard appears.
Important! If you are running this wizard on Windows Server 2008, run the executable file with administrator permissions. Use these permissions even if you are logged in to the system as an administrator. For more information, see the release notes for your CA SiteMinder® component.
The Web Agent Configuration wizard starts.
Applications running in classic pipeline mode require that the ISAPI filter appears first in the list of ISAPI filters. Verify the position of the ISAPI filter in the list of ISAPI filters on your IIS web server before continuing.
Follow these steps:
The control panel opens.
IIS Manager opens.
handler-wa
The ISAPI filter appears first in the list.
|
Copyright © 2013 CA.
All rights reserved.
|
|