

Part of the single sign-on configuration is to determine how the Identity Provider delivers an assertion to a Service Provider.
Follow these steps:
Note: Click Help for a description of fields, controls, and their respective requirements.
For the HTTP-Artifact binding, configure the back channel settings so the user has access to the protected Artifact Resolution Service. The back channel settings are on the Attributes step in the configuration wizard.
For single sign-on, the values of the Skew Time and the Validity Duration determine how CA SiteMinder® calculates the total time that an assertion is valid. CA SiteMinder® applies the skew time to the generation and consumption of assertions.
Note: In this description, the asserting party is the SAML 1.x Producer, SAML 2.0 Identity Provider, or WS-Federation Account Partner. The relying party is the SAML 1.x Consumer, the SAML 2.0 Service Provider, or the WS-Federation Resource Partner.
In the assertion document, the NotBefore and NotOnOrAfter values represent the beginning and end of the validity interval.
At the asserting party, CA SiteMinder® sets the assertion validity. The validity interval is the system time when the assertion is generated. CA SiteMinder® sets the IssueInstant value in the assertion using this time then subtracts the skew time value from the IssueInstant value. The resulting time is the NotBefore value.
NotBefore=IssueInstant - Skew Time
To determine the end of the validity interval, CA SiteMinder® adds the Validity Duration value and the skew time to the IssueInstant value. The resulting time becomes the NotOnOrAfter value.
NotOnOrAfter=Validity Duration + Skew Time + IssueInstant
Times are relative to GMT.
For example, an assertion is generated at the asserting party at 1:00 GMT. The skew time is 30 seconds and the validity duration is 60 seconds, making the assertion validity interval between 12:59:30 GMT and 1:01:30 GMT. This interval begins 30 seconds before the time the assertion was generated and ends 90 seconds afterward.
At the relying party, CA SiteMinder® performs the same calculations as it does at the asserting party to determine if the assertion it receives is valid.
Calculating Assertion Validity with CA SiteMinder® at Both Sides of the Partnership
If CA SiteMinder® is at both sides of a partnership, the assertion validity is the sum of the validity duration plus two times the skew time. The equation is:
Assertion Validity = 2 x Skew Time (asserting party) + Validity Duration+ 2 x Skew Time (relying party)
The initial part of the equation (2 x Skew Time + Validity Duration) represents the beginning and end of the validity window at the asserting party. The second part of the equation (2 x Skew Time) represents the skew time of the system clock at the relying party. You multiply by 2 because you are accounting for the NotBefore and the NotOnOrAfter ends of the validity window.
Note: For legacy federation, the Validity Duration is only set at the asserting party.
Example
Asserting Party
The values at the asserting party are as follows:
IssueInstant=5:00PM
Validity Duration=60 seconds
Skew Time = 60 seconds
NotBefore = 4:59PM
NotOnOrAfter=5:02PM
Relying Party
The relying party uses the NotBefore and NotOnOrAfter values from the assertion and applies its skew time to those values. This formula is how the relying party calculates new NotBefore and NotOnOrAfter values.
Skew Time = 180 seconds (3 minutes)
NotBefore = 4:56PM
NotOnOrAfter=5:05PM
Based on these values, the calculation for the total assertion validity window is:
120 seconds (2x60) + 60 seconds + 360 seconds (2x180) = 540 seconds (9 minutes).
You can configure indexed endpoints for federated communication. An indexed endpoint is the site where assertions are consumed. In the context of CA SiteMinder®, this endpoint is the Service Provider where the Assertion Consumer Service resides.
Each endpoint you configure is assigned a unique index value, instead of a single, explicit reference to an Assertion Consumer Service URL. The assigned index is added to the assertion request that the Service Provider sends to the Identity Provider.
You can configure indexed endpoints for a CA SiteMinder® Service Provider that has a federated relationship with a third-party Identity Provider that supports indexed endpoints. You can also configure the different protocol bindings (artifact, POST) for the Assertion Consumer Service by assigning more than one endpoint to the service.
Note: If your network contains different CA SiteMinder® versions, you cannot configure indexed endpoints. For example, you cannot configure indexed endpoints if the Service Provider is r12.0 SP 2 and the Identity Provider is r12.0 SP3. Configure only one Assertion Consumer Service for both HTTP bindings.
The following figure shows a network that benefits from indexed endpoints.

The following illustration shows how single sign-on works using an indexed endpoint.
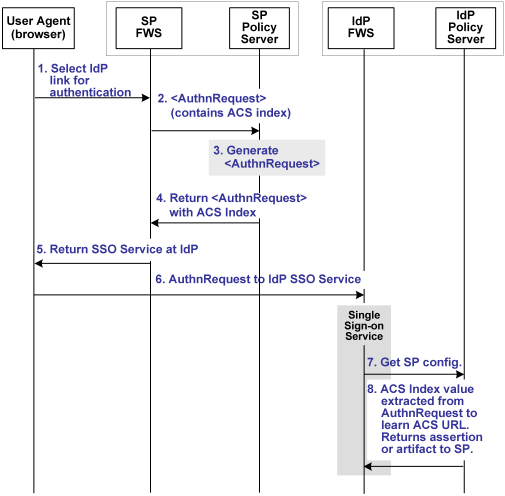
Note: The Web Agent Option Pack or the SPS federation gateway can provide the FWS functionality.
Using indexed endpoints, the sequence of events is as follows:
A protocol binding is not part of the request because the ACS Index and the Protocol Binding parameters are mutually exclusive. The AssertionConsumerServiceIndex is already associated with a binding so there is no need to specify a Protocol Binding value. If the protocol binding and the AssertionConsumerServiceIndex are passed as query parameters, the local Policy Server responds with an error denying the request.
The AuthnRequest service reacts as follows:
The Assertion Consumer URL to send the assertion or artifact to the SP, depending on the single sign-on profile in use.
Note: If the AssertionConsumerServiceIndex parameter is not in the AuthnRequest, the value of the Assertion Consumer Service and the corresponding binding are used by default.
The single sign-on service extracts an ACS Index value from an AuthnRequest. The service compares the index value to its list of index entries and determines the Assertion Consumer Service URL associated with that index value. The single sign-on service then knows where to send the assertion or artifact, depending on the binding that is associated with the index value.
To configure index entries at the Identity Provider
The Assertion Consumer Services page opens.
The Add Assertion Consumer Service page opens.
Note: Click Help for a description of fields, controls, and their respective requirements.
You can assign different index values to the same Assertion Consumer Service URL.
Note: Remember to configure index entries in the SAML 2.0 authentication scheme at the Service Provider.
When a user requests a federated resource, they must have a CA SiteMinder® session. If a user does not have a CA SiteMinder® session, the user is redirected to the Authentication URL to establish a session. The authentication scheme protecting the Authentication URL is configured with a particular protection level. This protection level must be the same or greater than the authentication level you configure for the SAML Service Provider configuration.
If the protection level for the Authentication URL is less than the Authentication Level set in the Administrative UI, CA SiteMinder® does not generate an assertion.
CA SiteMinder® can use a private key/certificate pair to perform various digital signing tasks for federated communication. The private key/certificate pair can sign the following messages:
For single logout, the side that initiates the logout signs the request. The side receiving the request validates the signature. Conversely, the receiving side must sign the SLO response and the initiator must validate the response signature.
The partner responsible for signing gives the certificate (public key) associated with the private key to the partner that verifies the signature. This exchange is done in an independent communication before any transactions occur.
When a CA SiteMinder® IdP sends an assertion to an SP, it includes the certificate in the assertion, by default. However, the SP uses the certificate that it stores at its site to verify the signature.
The configuration options for digital signing include:
To specify signing options from the General or SSO tab
Note: Click Help for a description of fields, controls, and their respective requirements.
The Enhanced Client or Proxy Profile (ECP) is an application for single sign-on. An enhanced client is a browser or some other user agent that supports the ECP functionality. An enhanced proxy is an HTTP proxy, such as a Wireless Access Protocol proxy for a wireless device.
The ECP profile enables single sign-on when the Identity Provider and Service Provider cannot communicate directly. The ECP acts as the intermediary between the Service Provider and the Identity Provider.
In addition to acting as an intermediary, the ECP profile is useful in the following situations:
You are responsible for obtaining or developing an ECP application. CA SiteMinder® only processes ECP requests and only responds to the ECP application in keeping with the SAML requirements.
The flow of the ECP profile is shown in the following illustration.
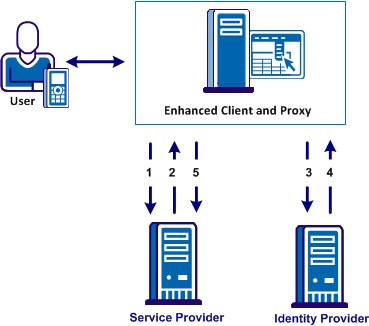
In an ECP communication, a user requests access to an application, for example, from a mobile phone. The application resides at the Service Provider and the identity information for the user resides at the Identity Provider. The Service Provider and Identity Provider do not communicate directly.
The flow of the ECP call is as follows:
The ECP entity is always directly accessible, unlike the Identity Provider.
Single sign-on proceeds and the user gains access to the application.
To configure ECP, enable the feature at the Identity Provider and the Service Provider. The following procedure is for a CA SiteMinder® Identity Provider.
Follow these steps:
The Identity Provider can now process ECP calls.
Your federated partner must also enable ECP. For CA SiteMinder®, enable ECP at the SAML 2.0 authentication scheme.
Note: A single SAML Service Provider object can handle artifact, POST, SOAP, and PAOS bindings for single sign-on requests. SOAP and PAOS are the bindings for the ECP profile. The Identity Provider and Service Provider determine the binding being used based on the parameters in a request.
The SAML 2.0 Allow/Create feature lets an Identity Provider create a user identifier at the request of the Service Provider. For this feature to work, the Service Provider request must include the Allow/Create attribute. Additionally, an administrator must configure the Identity Provider to create an identifier. The Identity Provider generates a unique value that becomes part of the NameID, which is in the assertion returned to the Service Provider.
When the Service Provider receives the assertion, the SAML 2.0 authentication scheme processes the response. The scheme then looks up the user in its local user store. Assuming the user record is located, the user is granted access.
To enable the creation of a new user identifier
Exchanging information about the user authentication context provides each side of a federated partnership a way of communicating about the authentication process.
If a Service Provider requests the authentication context in a request to the Identity Provider, you can configure the Identity Provider to ignore the context.
To ignore the authentication context
In compliance with the SAML 2.0 specification, CA SiteMinder® can enforce the one time use of an assertion. By generating an assertion for one-time use, the relying party knows not to retain the assertion for future transactions. Reusing an assertion beyond its validity results in authentication decisions that is based on out-of-date identity information.
To configure an assertion for one time use
Assertion-based single sign-on can fail at the Identity Provider for various reasons. If an HTTP error occurs, CA SiteMinder® can redirect the user to different applications (URLs) for further processing. Redirection to a customized error page can take place only when the Identity Provider has the necessary information about the Service Provider. If the information is not available, only the HTTP error code is returned to the browser. No redirection occurs.
You can configure redirect URLs for HTTP handling, but they are not required.
To configure optional redirect URLs for error handling
Note: Click Help for a description of fields, controls, and their respective requirements.
Note: These redirect URLs can be used with the CA SiteMinder® Assertion Consumer Plug-in for further assertion processing. If an assertion request fails, the plug-in can send the user to one of the redirect URLs you specify.
When the CA SiteMinder® IdP sends an assertion, by default it includes the SessionNotOnOrAfter parameter in the Authentication statement of the assertion. A third-party SP can use the value of the SessionNotOnOrAfter to set its own timeout values. The timeout values determine when a user session becomes invalid, which sends the user to reauthenticate at the IdP.
Important! If CA SiteMinder® is acting as an SP, it ignores the SessionNotOnOrAfter value. Instead, a CA SiteMinder® SP sets session timeouts based on the realm timeout that corresponds to the configured SAML authentication scheme that protects the target resource.
Note: The SessionNotOnOrAfter parameter is different than the NotOnOrAfter parameter used to determine assertion validity and skew time.
To customize the SessionNotOnOrAfter parameter
The Customize Validity duration dialog displays.
The options are:
Calculates the SessionNotOnOrAfter value that is based on the assertion validity duration.
Instructs the IdP not to include the SessionNotOnOrAfter parameter in the assertion.
Calculates the SessionNotOnOrAfter value that is based on the IdP session timeout. The timeout is configured in the IdP realm for the authentication URL. Using this option can synchronize the IdP and SP session timeout values.
Lets you specify a custom value for the SessionNotOnOrAfter parameter in the assertion. If you select this option, enter a time in the Customize Assertion Session Duration field.
Note: Click Help for a description of fields, controls, and their respective requirements.
|
Copyright © 2013 CA.
All rights reserved.
|
|