

This section contains the following topics:
Perform Authorizations with an Attribute Authority
Flow Diagram for Authorizing a User with User Attributes
How to Configure an Attribute Authority and a SAML Requester
How to Set up a SAML Requester to Generate Attribute Queries
The Policy Server authorizes a user with the following types of information:
The Policy Server also authorizes a user with user attributes that a SAML 2.0 Attribute Authority provides. When a user requests access to a protected resource, the Policy Server, as the authorizing entity, can request more user attributes. The Policy Server evaluates these attributes before granting access to the resource.
The SAML 2.0 Assertion Query/Request profile employs two entities, a SAML Attribute Authority and a SAML Requester.
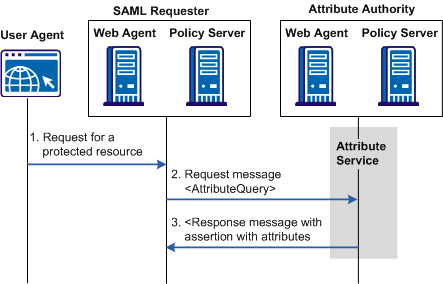
The SAML Attribute Authority relies on an Attribute Service to process a query message and add attributes to an assertion. These assertions contain user attributes that a SAML Requester uses to authorize access to protected resources. The Attribute Service is part of the Federation Web Services application.
When an entity makes a request to an Attribute Authority, the message contains the user attributes that the requester wants to retrieve. The message also contains the Name ID and the Issuer of the request. The Attribute Service uses the NameID to disambiguate the user so it knows what values to return for the requested attributes. The Attribute Service returns a response message that includes an attribute assertion that is wrapped in a SOAP message. This response includes the user attributes.
Note: The user does not need to be authenticated at the Attribute Authority. Also, there is no need for a single sign-on relationship between the Authority and the Requester.
The SAML Requester is a SAML entity that uses the SAML 2.0 Assertion Query/Request profile to request attributes for a user. For CA SiteMinder®, the SAML Requester is not a specific service, but a group of Policy Server features that can produce and process <AttributeQuery> messages. The Requester asks for the user attributes from the Attribute Authority because the protected target resource always resides at the SAML requester. The Requester resolves these attributes into variables that a policy expression uses.
Note: In a CA SiteMinder® federated environment, the SAML Attribute Authority is the Identity Provider and the SAML Requester is the Service Provider. However, this condition does not have to be the case.
To evaluate an authorization request that is based on SAML 2.0 user attributes, add an attribute type named federation attribute variable to a policy expression. The policy protecting the target resource uses this variable. Based on the policy variable, the SAML Requester sends a query message to the Attribute Authority. This query message contains the Name ID for the SAML entity for which the attributes are being requested. The SAML Attribute Authority returns a response message containing assertions with the attribute statements.
A user must have a session at the SAML Requester; however, the user does not have to log in or authenticate at the Attribute Authority.
The following figure shows how an attribute query is processed.
Note: The SPS federation gateway can replace the Web Agent and Web Agent Option Pack to provide the Federation Web Services application functions. For information about installing and configuring the SPS federation gateway, see the Secure Proxy Server Administration Guide.
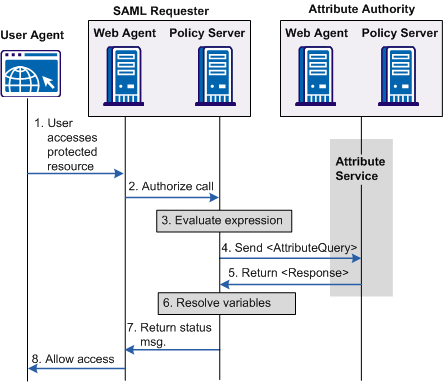
The following flow diagram shows the authorization process with an Attribute Authority.
Note: The SPS federation gateway can replace the Web Agent and Web Agent Option Pack to provide the Federation Web Services application functions. For information about installing and configuring the SPS federation gateway, see the Secure Proxy Server Administration Guide.
The sequence of a user attribute request is as follows:
In a CA SiteMinder® context, the Attribute Authority is the Identity Provider.
To configure CA SiteMinder® to act as a SAML Attribute Authority
In a CA SiteMinder® context, the SAML Requester is the Service Provider.
To configure CA SiteMinder® as a SAML Requester
In a CA SiteMinder® context, the Attribute Authority is the Identity Provider with the Attribute Authority service enabled.
Note: You do not need to configure other Identity Provider features, such as single sign-on to have the Identity Provider act as an Attribute Authority.
To configure an Attribute Authority
The SAML Service Provider page opens.
Modify this setting only if you want the assertion to be valid for longer than 60 seconds.
Note: Click Help for the field descriptions.
Select this option if you want to the Attribute Authority to accept only signed queries from the SAML Requester.
Select one of the options to sign the attribute assertion, the SAML response, both, or neither when they are returned to the SAML Requester.
Enter a namespace attribute that the authentication scheme uses as a search string.
Use %s in the entry as the variable that represents the NameID. For example, the NameID has a value of user1. If you specify Username=%s in the Search Specification field, the resulting string is Username=user1. This string is verified against the user store to find the correct record for authentication.
If you configured SAML 2.0 artifact authentication, you have already configured a password for the back channel. This password can be used for both SSO and the Attribute Authority Service.
Indicate whether the attribute you are configuring is part of a single sign-on request, or an attribute query request. The Retrieval Method field in the SAML Service Provider Attribute dialog determines the attributes function.
To use the same attribute for both services, create two attribute statements that use the same Attribute name and variable. One attribute uses SSO as the retrieval method and one uses Attribute Services as the retrieval method.
To configure an attribute
The configuration process for configuring attributes at the Attribute Authority is the same for configuring attributes for single sign-on assertions.
The Add Attribute page displays.
If an attribute query requests this attribute, selecting Attribute Service as the Retrieval Method marks the attribute for inclusion in the attribute assertion.
For the Attribute Authority Service to respond to requests, you must give the relying partners access to the service. This is a two-step process:
Add the Web Agent that protects the FWS application to the Agent group FederationWebServicesAgentGroup.
Follow these steps:
The Agent Groups dialog opens.
If you are implementing authorizations with an Attribute Authority, the relying party in the partnership needs permission to access the attribute authority service. CA SiteMinder® protects the SAML 2.0 attribute authority with a policy.
When you install the Policy Server, the FederationWebServicesDomain is installed by default. This domain includes the SAML2FWSAttributeServicePolicy for the attribute service.
Grant access for the attribute service policy to any relevant relying partners.
Follow these steps:
A list of domain policies displays.
The Domain Policies page opens.
The User/Groups page opens.
The affiliate domain that you previously configured is listed in the Users/Groups dialog. For example, if the affiliate domain is named fedpartners, the entry is affiliate:fedpartners.
You return to the User Directories list.
You return to the policies list.
The necessary relying partners now have access to the attribute authority service.
For a CA SiteMinder® Service Provider to act as a SAML Requester, configure a SAML 2.0 authentication scheme so that an attribute query can be generated. Complete this configuration at the Service Provider site.
Follow these steps:
Each step is detailed in the following sections.
For a SAML requester to generate attribute queries, enable the attribute query functionality.
Follow these steps:
The Add Attributes page opens.
You return to the Attributes page.
A query message sent to the Attribute Authority includes the Name ID of the user whose attributes it is requesting. The Name ID configuration specifies how the SAML Requester obtains the Name ID. The requester then places the Name ID in the attribute query.
To specify a Name ID
Click Help for the field descriptions.
The attribute query is sent across a secure back channel to the Attribute Authority.
Only one back channel is available between the Service Provider and the Identity Provider. Therefore, the back channel configuration for the attribute query is the same back channel configuration that is used for the SAML artifact profile.
To configure the back channel
Click Help for the field descriptions.
To use a federation attribute variable in a policy expression, first create the attribute variable.
To define a federation attribute variable
The Variables dialog opens.
The first step of the configuration wizard displays the Domain section.
Identifies the variable.
Federation Attribute
Click Help for the field descriptions.
Note: A policy expression can use multiple federation attribute variables; each variable is tied to a SAML 2.0 authentication scheme. Therefore, a single expression can result in many attribute requests sent to many Attribute Authorities.
To use a federation attribute variable as part of the authorization process, add the attribute variable to a policy expression. Associate this policy expression with the policy protecting the target resource at the SAML requester.
For information on creating a policy expression, see the Policies chapter in the Policy Server Configuration Guide.
|
Copyright © 2015 CA Technologies.
All rights reserved.
|
|