

For the Federation Web Services (FWS) application to work with ServletExec, deploy Federation Web Services as a web application for ServletExec. Deploy the FWS application at the asserting and relying party.
Note: CA SiteMinder® 12.51 is shipped with a ServletExec license key file named ServletExec_AS_6_license_key.txt. If you do not have this license key, contact CA Technical Support. From this license file, copy the license key and enter it in the ServletExec License dialog of the ServletExec Administration Console. For instructions on licensing ServletExec, see ServletExec documentation, available at the New Atlanta Communication website.
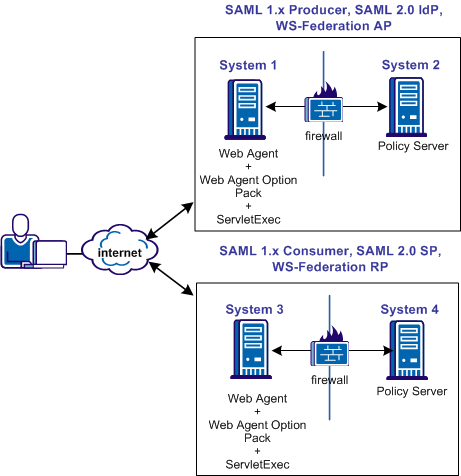
The following illustration shows a sample configuration of CA SiteMinder® and ServletExec. ServletExec, the Web Agent Option Pack, and the Web Agent are installed on the same server; however, this setup is not required.
Important! Apply the most current hot fixes for ServletExec. Federation Web Services requires the hot fixes to work with ServletExec. To obtain the hot fixes, go to the New Atlanta Communication website.
Follow these steps:
The Manage Web Applications dialog opens.
Example:
C:\program files\ca\webagent\affwebservices
After you install the Web Agent Option Pack on a UNIX system, the installation program creates an environment script (ca-wa-opack-env.sh).
Source the environment script so the library path of the application server points to the location of the Web Agent Option Pack /bin directory.
Source the script by entering the following command at the command line:
. ./ca-wa-opack-env.sh
Setting the correct library path lets the option pack and the web or application server to work together.
After you source the script, the library path is set. The variable name for the library path differs depending on the operating system. Example of several library paths:
LD_LIBRARY_PATH=/webagent_option_pack_home/bin
SHLIB_PATH=/webagent_option_pack_home/bin
LIBPATH=/webagent_option_pack_home/bin
Important! The application server startup script can reset the library path. Ensure that the path to the Web Agent Option Pack is the first entry in the path.
The path to the Web Agent Option Pack environment script points to one of the following locations:
If you install the option pack on the same system as the web agent, the script resides in the web agent directory. For any UNIX installation, the default location is /web_agent_home/bin.
The AffWebServices.properties file contains all the initialization parameters for Federation Web Services. For deploying FWS, set only the parameter that specifies the location of the WebAgent.conf file.
To configure the AffWebServices.properties file
C:\\Program Files\\ca\\webagent\\bin\\IIS\\WebAgent.conf
Note: Federation Web Services is a Java component, so the Windows paths must contain double backslashes.
server_home/servers/https-hostname/config/WebAgent.conf
sps_home\\proxy-engine\\conf\\defaultagent\\WebAgent.conf
sps_home/proxy-engine/conf/defaultagent/WebAgent.conf
The IIS server user account must have proper rights for IIS to allow a plug-in to write to its file system. For ServletExec to write to the federation log files, the anonymous user account that is associated with ServletExec must have permissions to write to the file system.
Follow these steps:
The set of applications is displayed in the right pane.
The Authentication Methods dialog opens.
For anonymous access, enter a name and password of a user account that has the permissions to right to the Windows file system. To grant this right to a user account, see Windows documentation. For example, you can use the IUSR Internet Guest account for anonymous access.
The user account that is associated with ServletExec can now write to the IIS file system.
Follow these steps:
The Local Security Settings dialog displays.
The Act as part of the operating system Properties dialog opens.
Optionally, we strongly recommend that you look at the Agent Configuration Object for the Web Agent protecting the IIS Web Server. This object verifies that the SetRemoteUser parameter is set to yes to preventing any anonymous user from writing to the file system.
The Web Agent requires the IIS Web Server to have a Default Web Site for proper installation. The Default Web Site is automatically installed with the IIS Web Server. If this website does not exist, install the CA SiteMinder® virtual directories to a different website on IIS. To install the CA SiteMinder® virtual directories to a different website on IIS, edit the Metabase.
A technical note on the site describes the Technical Support site changes that are needed. To find the note:
The documents are listed in alphabetical order.
|
Copyright © 2015 CA Technologies.
All rights reserved.
|
|