

This section contains the following topics:
Program Flow at the Relying Party Using the Open Format Cookie
Delegated Authentication Using the Open Format Cookie
Federation Manager Java SDK Logging
Java SDK Sample Application Overview
Java SDK Sample Application Deployment
Java SDK Sample Application Execution
Java SDK Sample Application Customization
A brief description of Java SDK program flow at the relying party is following.
See the Javadoc reference for detailed information about these methods.
Delegated authentication lets a third-party access management system authenticate a user and then share the user credentials with SiteMinder deployed at the asserting party. These credentials are shared either through a cookie, or in a query string.
Note: This guide discusses delegated authentication using the cookie and the Java SDK. See the Federation Manager Partnership Federation Guide for information about delegated authentication using a query string.
If the third-party access manager and the asserting party intend to use a cookie to communicate the authenticated user ID, the access control application can follow these steps:
To construct the implementation class, the access control manager must know the cookie zone and password configured in Federation Manager. These values are communicated out-of-band. The third-party access management system must be in the same cookie domain as the asserting party.
The constructor from the IdentityFactory.java class to use when creating a cookie for delegated authentication is listed following.
   /**
    * Gets an implementation of the IFederationOpenIdentity interface.
    *
    * @param cryptoInstance A cryptographic string; supported values are
    *  listed in IdentityCrypto.java.
    * @param bUseHmac A Boolean value that indicates whether to use HMAC.
    */
     public static IFederationOpenIdentity getInstance(cryptoInstance, bUseHmac)
The access control manager can encrypt the cookie itself using password-based encryption, or it can use one of the FIPS-compliant cryptographic strings. If you chose a FIPS-compliant string, use the encryption provided by the Java SDK.
Here is a code snippet example of the cookie creation:
IFederationOpernIdentity openID = IdentityFactory.getInstance(IdentityCrypto.AES128, false);
String domain = ".moon.com";
String zone = "FED";
String name = "CryptoID"
String password = "";

openID.initCookieInfo(domain, zone, name, password);

openID.setLoginID = "TomJones";

openID.createCookie(HttpResponse);
The createCookie method uses the login ID to create a cookie value that is encrypted and added to the HttpSevletResponse object. After the request is redirected, the servlet container automatically passes the cookie.
The default Java SDK logger writes messages to the standard output stream. Logging is disabled by default.
To enable Federation Manager Java SDK logging
Logging is enabled.
The Java SDK sample application simulates a relying party Java application. The application consumes the cookie sent by the Federation Manager deployment running at the relying part of the federation partnership.
The sample application demonstrates how a Java application can get the cookie from the incoming request and extract user identity information and the assertion attributes that are sent to the relying party. The sample application requires that Federation Manager is installed at the relying party and is configured to redirect the user to the URL of the sample application servlet.
Deployment of the Java SDK sample application requires installing Tomcat and Federation Manager at the relying party.
To deploy the Java SDK sample application
Note: The value of FEDSDKROOT points to the location of the SDK directory. Example: C:\Program Files\CA\Federation Manager\sdk.
This environment variable is set automatically on Windows, but must be exported manually on UNIX platforms.
Note: Tomcat must be installed on a different system from the one Federation Manager is installed on.
The sample application is now deployed and ready to run.
After you have installed Tomcat and Federation Manager, you can run the Java SDK sample application.
To run the Java SDK sample application
The sample application decodes the cookie and displays the user identity information.
The sample application can be modified using build.bat or build.sh scripts to regenerate the fedsdksample.jar.
To customize the sample Java application
The customized version of the sample application is ready to run.
Security domains exchange authentication and authorization using data packages named assertions. The Security Assertion Markup Language (SAML) is an open standard that specifies the format of an assertion. A federated partnership consists of an identity provider (producer of an assertion) and a service provider (consumer of an assertion).
An enterprise can modify the content of an assertion based on the business agreements between the federated partners. For example, one partner can require user-friendly name equivalents for the attributes in the assertion. Or, a partner can opt to include the XML-type designation for each attribute in the assertion.
Federation Manager creates SAML assertions with its implementation of the AssertionGeneratorPlugin.java interface. An Application Developer can enhance the contents of the SAML assertion by overwriting the existing implementation class.
The diagram shown following illustrates the process of creating a custom assertion generator plug-in.
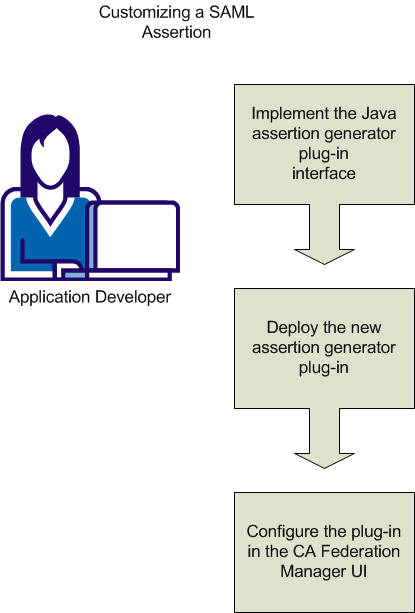
The process of customizing a SAML assertion includes these steps:
You create a custom assertion generator plug-in by implementing the AssertionGeneratorPlugin.java interface. The minimum requirements for the implementation class are listed following.
Follow these steps:
Example
In this example, imagine that the application developer defines handler.updateNameID to create user-friendly name attributes.
/**
     * <p>Performs Assertion Generator callout functionality to customize the
     * SAML assertion in the <code>AssertionGeneratorPlugin</code> object and
     * returns a result.</p>
     * @param apiContext     A context object that provides methods for sending
     *                       log, trace, and error messages to the Policy Server. Use the APIContext.getAttrMap() method to retrieve attributes posted by the application specified in the Application URL.
     * @param userContext    A context object that allows a custom object to set
     *                       and retrieve information about a user in a user
     *                       directory. The information includes user
     *                       attributes and directory attributes associated
     *                       with the user.
     * @param pluginParam    The string for Assertion plug-in parameters.
     * @param inputAssertion    The current XML token representing the SAML Assertion.
     * @param outputAssertion   The final XML token representing the SAML Assertion.
     * @return  0 if assertion is customized successfully, or -1 if no customization or an error occurred.
     * If the method fails, the outputAssertion is ignored.
     * @throws java.lang.Exception For cases when the customization terminates unexpectedly.
     *
     **/
    public int customizeAssertion(APIContext apiContext, UserContext userContext,String pluginParam,
     String inputAssertion, final StringBuffer outputAssertion) throws Exception {
        if (inputAssertion == null || inputAssertion.equals("")) {
            // Indicates non-zero for an error.
            apiContext.trace(PLUGIN_TAG, "Received null or empty response for customization");
            return -1;
        }
        apiContext.trace(PLUGIN_TAG, "Entering customizeAssertion");
        StringBuffer newAssertion = new StringBuffer(inputAssertion);

        try
        {
            Saml1AssertionHandler handler =
                initHandler(apiContext, userContext);
            handler.updateNameID(newAssertion);
            handler.addAttributes(pluginParam, newAssertion);
        }
        catch(Throwable th)
        {
            apiContext.error("SAML1AssertionSample: " + th.getMessage());
            StringWriter writer = new StringWriter();
            th.printStackTrace(new PrintWriter(writer));
            writer.flush();
            apiContext.trace(PLUGIN_TAG,
                             "Error customizing Assertion:\n" + writer.toString());

            apiContext.trace(PLUGIN_TAG, "Done customizeAssertion");
            return -1;
        }

        outputAssertion.append(newAssertion);

        apiContext.trace(PLUGIN_TAG, "Done customizeAssertion");

        // return "success"
        return 0;
    }
Note: The syntax requirements and use of the parameter string that is passed into the customizeAssertion method is the responsibility of the custom object.
After you have coded your implementation class for the AssertionGeneratoPlugin.java interface, compile it and verify that SiteMinder can find your executable file.
Follow these steps:
Windows: build_plugin.bat
UNIX: build_plugin.sh
A compiled sample plug-in, fedpluginsample.jar, is in the directory federation_mgr_sdk_home\jar.
You can place the plug-in jar in any directory and have the JVMOptions.txt file point to it. To use the sample plug-in, modify the classpath to point to fedpluginsample.jar; however, do not modify the classpath for smapi.jar.
Note: To use Apache Xerces or Xalan in your plug-in, use the Xerces or Xalan binary files installed with SiteMinder. The binaries are not installed with the Federation Manager SDK. Using these files is necessary for compatibility reasons.
To configure the assertion generator plug-in, you provide values for settings in the Administrative UI.
Note: Do not configure the plug-in settings until you deploy the plug-in.
Follow these steps:
Specifies the Java class name of the plug-in. Enter a name. This plug-in is invoked at run time.
Example: com.mycompany.assertiongenerator.AssertionSample
The plug-in class can parse and modify the assertion, and then return the result to SiteMinder for final processing. Specify an assertion generator plug-in for each relying party. A compiled sample plug-in is included in the directory federation_mgr_sdk_home/jar.
(Optional). Specifies the string that SiteMinder passes to the plug-in as a parameter at run time. The string can contain any value; there is no specific syntax to follow.
The plug-in interprets the parameters that it receives. For example, the parameter is the name of an attribute, or the string can contain an integer that instructs the plug-in to do something.
The assertion generator plug-in is coded, compiled, and in place. The SiteMinder assertion generator creates enhanced assertions as defined by the federation partners.
|
Copyright © 2012 CA Technologies.
All rights reserved.
|
|