

This section contains the following topics:
How to Configure a Policy Domain
Add CA Identity Manager Environments to a Domain
Disable Global Policy Processing for a Domain
A policy domain is a logical grouping of resources that are associated with one or more user directories. In addition, policy domains require one or more administrator accounts that can change the objects within the policy domain. Policy domains contain realms, rules, responses, and policies (and optionally, rule groups and response groups). An administrator with the appropriate privileges assigns a policy domain to one or more administrators.
The resources in a policy domain can be grouped in one or more realms. A realm is a set of resources with a common security (authentication) requirement. Rules, which are associated with the realm that contains the resource control access to resources. The following diagram illustrates a small policy domain which contains realms and their associated rules, and a rule group, response group, and a pair of responses.
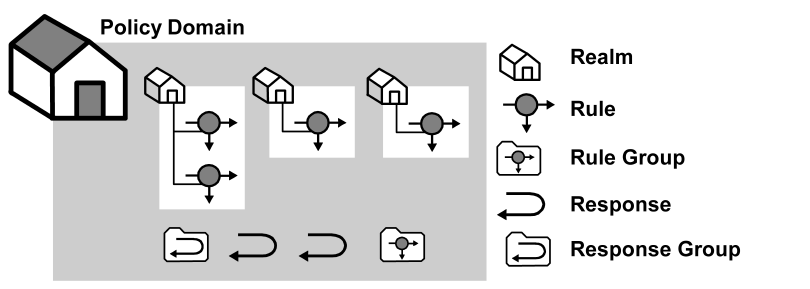
By grouping realms and rules in a policy domain, you can provide organizations with a secure domain for their resources. In the policies section, you learn how to create policies within a policy domain to control access to the policy domain resources.
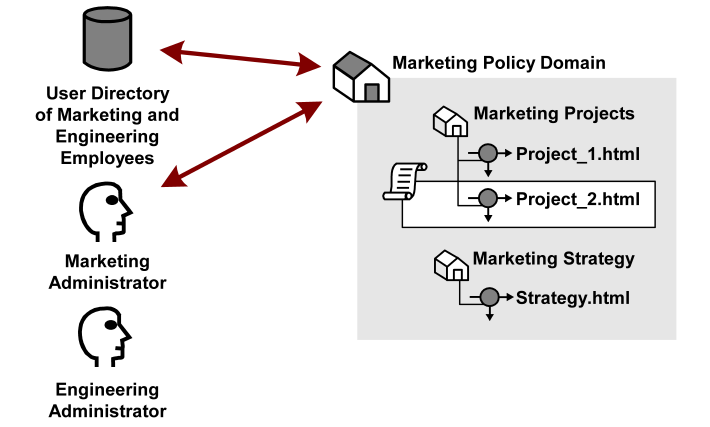
In the sample diagram below, a Marketing policy administrator who is specified in the Marketing policy domain can manage the Marketing Strategy and Marketing Projects realms. The policy domain ensures that the Engineering administrator, who does not have administrative privileges to manage the Marketing policy domain, cannot control resources belonging to the Marketing department. However, the Marketing policy domain is associated with a user directory that contains engineering users.
If the administrator for the Marketing department creates a policy within the Marketing policy domain that allows Engineering staff to access the resource Project 2.html, engineering users can access the resource.
Besides acting as a container for domain objects, policy domains also connect to user directories. The Policy Server authenticates users based on the requirements of the realm in which the target resource resides. In order to authenticate a user, the Policy Server must find the user directory where a user is defined. The Policy Server does this by locating the policy domain to which a realm belongs. From the policy domain, the Policy Server queries the user directories specified in the policy domain’s search order.
The search order is defined when you add user directory connections to a policy domain. The order in which you add directory connections determines the order that the Policy Server uses to search for a user. For example, if you set up policy domain for a company migrating user data from a WinNT directory to an LDAP directory, and you want the Policy Server to search in the new LDAP directory first, then look in the WinNT user directory, add the LDAP directory connection to the policy domain first, then add the WinNT user directory connection.
You configure a domain to create a logical grouping of resources with one or more user directories. Configuring a domain requires you to:
Note: You can edit a policy domain’s properties if you need to add a realm in the future.
The following process lists the steps for configuring a new policy domain:
You create a policy domain to protect logical groupings of resources.
Follow these steps:
You have defined a policy domain.
You can add one or more user directories to a policy domain. The Policy Server authenticates users by comparing the credentials that they enter to the credentials that are stored in the user directories. The Policy Server searches the user directories in the same order that they are listed in the policy domain.
Follow these steps:
A list of domains that match the search criteria appears.
The settings and controls become active.
The Choose user directories page appears.
The user directories are removed from the list of Available Members and added to the list of Selected Members.
Note: To select more than one member at one time, hold down the Ctrl key while you click the additional members. To select a block of members, click the first member and then hold down the Shift key while you click the last member in the block.
The selected user directories are listed under User Directories.
Note: To create a new user directory and add it to the domain, click Create.
The selected user directories are added to the policy domain.
Realms are created in a domain and are associated with a Web Agent. Realms use resource filters to group resources that have similar security requirements and share a common authentication scheme.
When you create a domain, you can create one or more realms in the domain and associate them with a Web Agent or Agent group. Realms group resources that have similar security requirements and share a common authentication scheme.
Follow these steps:
The Realm is created.
When you create a domain, you can create one or more realms in the domain and associate them with a Radius Agent or Agent group. Realms group resources that have similar security requirements and share a common authentication scheme.
Note: The Administrative UI lets you configure realms protected by a RADIUS Agent. These realms do not require all of the same information that is required for a SiteMinder Web Agent realm.
Follow these steps:
The Realm is created and associated with the selected RADIUS Agent or Agent group.
Adding a CA Identity Manager environment and the associated user directories to a domain makes available CA Identity Manager roles to policies.
Follow these steps:
The CA Identity Manager environments are added to the domain. The roles associated with the environments are available to all policies created in the domain.
Global policies let you associate responses with particular resources and events across all domains. By default, global policies apply to all of the resources in a policy domain.
Follow these steps:
Global policies no longer apply to the resources in this domain.
You can change the name, description, user directory connections and administrators associated with a policy or affiliate domain. All other features of a domain are a result of peripheral configuration.
Important! Deleting a domain destroys all of the domain user directories, administrator connections, and objects bound to the domain, such as rules, realms, responses, policies, or affiliates.
It may take a short amount of time for all deleted objects to be removed from caches.
|
Copyright © 2012 CA Technologies.
All rights reserved.
|
|