

|
|
|
Use WSP to modify notebooks and how HTMPL forms appear. For example, you can modify detail_chg.htmpl to change what the end user sees on the form, such as by adding a row and notebook control.
To modify a notebook
The HTMPL file opens.
If you prefer Source view, the notebook area appears between the following line of code:
<PDM_MACRO name=startNotebook hdr=cng_nb>
<PDM_MACRO name=endNotebook>
The following example shows this notebook area in Design view that begins with the numbered label titled 1. Additional Information:
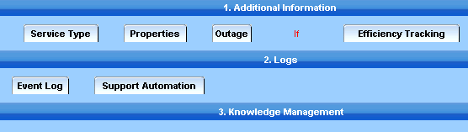
Note: In CA SDM r12.6, a notebook can contain nested tabs. In WSP, a high-level tab (a tab containing other tabs) is named a tab group. WSP displays a tab group as a dark blue solid bar that spans the entire blue notebook area, with a numbered label in its center. A low-level tab (a tab that does not contain other tabs) is named a tab. WSP displays low-level tabs as rectangles with rounded corners.
You can move tabs and tab groups within a notebook using drag-and-drop. Moving a tab group moves all the tabs within the group with it.
If you select Insert Tab or Insert Tab Group, WSP inserts a new tab or tab group to the left of the currently selected control. If you select Insert Control, WSP displays the Insert Control dialog that lets you add the desired control to the form.
Your unpublished changes appear in the web browser.
The notebook is modified.
| Copyright © 2011 CA. All rights reserved. | Tell Technical Publications how we can improve this information |