The transaction launches your web browser and the SOA Management page appears.
The Web Service Administration page appears.
Select /CASD/CO_USD_WEB_SERVICE_SOAP from the list, click Apply Selection.
The Details of Proxy Definition page appears.

The General Configuration Settings page appears.
Enable the Logical Port is Default option.
- New Service Name—Enter zsn_casd.
- New Binding Name—Enter zbn_casd.
- Logical Port Name—Enter CASD_SERVICE_DESK.
Important! The Logical Port Name must be uppercase, such as CASD_SERVICE_DESK.
Click Apply Settings.
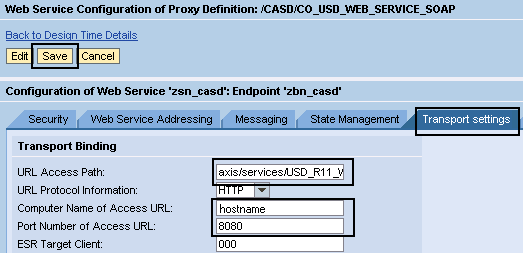
- URL Access Path
Enter axis/services/USD_R11_WebService as the location of the CASD endpoint.
Important! Do not add a slash ("/") to the beginning of the URL Access Path because it causes a save error.
- Computer Name of Access URL
Enter your CA Service Desk Manager server hostname.
- Port Number of Access URL
Enter 8080 as the CA Service Desk Manager port (only if you have a valid CA Service Desk Manager installation).
Note: The default CA Service Desk Manager port is 8080, but we recommend that you consult your CA Service Desk Manager administrator to confirm.
The following example displays the Transport Settings tab:
The logical port is created.