

In CA SDM, the SLA or service type describes the level of service that the service desk analyst provides to the customer. To track your enterprise commitments and schedules (as they relate to specific tickets), events are attached to service types. Events are used to define the condition under which the service type is violated and the actions to be taken after the violation. Each event has three generic behavior characteristics: conditions, actions on true, and actions on false.
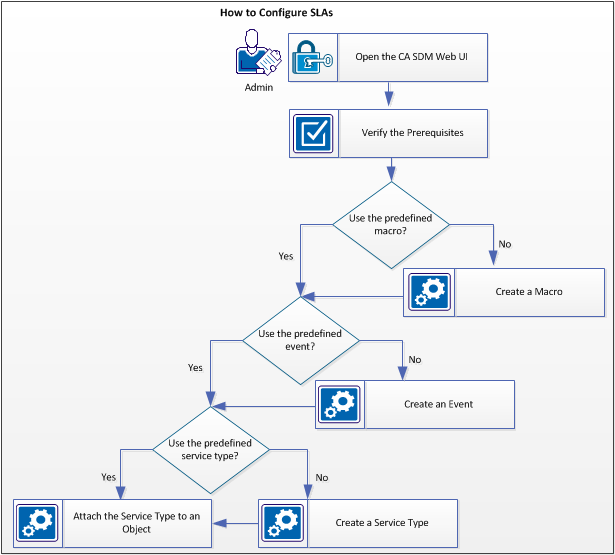
Example: As a system administrator, you want to set up an SLA of 24-hours for a hardware request, failing which an email notification is sent to the Customer Support Manager and the analyst. This example is used throughout the scenario to explain how the email notification is configured for an SLA.
The following diagram shows how to configure the 24 hours. The SLA which sends an email notification, upon violation:
Follow these steps:
Log in to the web UI from the following servers, depending on your CA SDM configuration:
Before you configure the service level agreement, ensure that you have completed the following steps:
SLA Options
Depending on your organization needs, install the SLA options that you require to set up the SLA.
For example, in "classic" SLA processing (enabled if the classic_sla_processing option is installed in Options Manager) only one service type can apply to a ticket at any given time. When different attributes on a ticket have different service types associated with them, the higher ranked service type is used. The rank of a service type is defined when the service type is created, with the highest ranking being 1, the next being 2, and so on. For example, assume that the issue has a service type of 12-hour resolution (ranking 2), was assigned a priority code of 1, which has a service type of 4-hour resolution (ranking 1). The higher ranked service type determines the service behavior for the associated issue. In this example, 4-hour resolution is ranked higher than 12‑hour resolution, so the 4-hour resolution service type is applied to the issue.
The following options can be installed from the Options Manager:
Note: For more information about installing or uninstalling an option, see the Online Help.
|
Option |
Description |
|
change_allow_sla_downgrade
|
Alters the behavior of the chg_sla option by allowing the system to automatically downgrade a change order's Service Type. The chg_sla option selects the best Service Type from among several change order attributes, but cannot replace the change order's current Service Type with one of lesser rank. If this option is installed, the Service Types for all affected attributes are evaluated whenever one of the attributes changes. The change order's Service Type is set to highest ranked Type found, even if the new Service Type is lesser in rank to the change order's current Service Type. The Service Type with the smallest Rank value is considered the best service. If all the Service Types considered are equal in Rank (including Service Types with empty Rank values), the Service Type created first in the database is selected. The chg_sla option must be installed for this option to function correctly. You can install similar option for issue, and request. |
|
ttv_enabled
|
Runs the Time to Violation daemon, which monitors the SLAs for all open tickets and tasks. This process does not set the SLA violation, but records the date the ticket or task is violated in its current state. This projection is updated when the ticket or task is updated. This option must be installed in order for the other Time to Violation options to function correctly. Important! This option does not require you to install the classic_sla_processing option. |
|
set_sla_evt_open_date
|
Uses the open date/time value of a change order, issue, or request as the start date/time of attached events. The attached events are triggered as soon as the ticket is saved. |
Verify the Notification Method for the Recipient
Ensure that the contact to whom you want to send the notification, is assigned to that particular notification method.
Follow these steps:
The Contact Search page opens.
The contact detail page opens.
The notification method for the contact is verified.
Create Message Templates
Create a message template that contains the values to use for the notification message. When you send multiple notification messages, you can use the message templates to simplify your workload.
Note: If multi-tenancy is installed, select the appropriate tenant from the drop-down list. The public (shared) option creates the object for all tenants.
Follow these steps:
The Message Template List page opens.
The Create New Message Template page opens.
Defines a unique identifier for this message template.
Specifies the object type associated with this template. For example, select Request/ Incident/ Problem for any notification related to a ticket.
Specifies the status of the template as either active or inactive. Set the status to Active to use the message template.
Specifies to send the notification associated with this template automatically, when the activity occurs. For example, you set up an initial notification, set up the objects to notify, and set up the message template, but you are not ready to turn on the notifications. In this case, you do not select Auto Notification. When you are ready to start automatic notifications, you select the check box. The notification becomes active and occurs as defined.
Indicates the relative importance of sending this notification. For example, select Emergency if you want to send the email notification to the contact immediately when the associated activity occurs.
Specifies the summary title of the message. You can use variables to insert the incident number in the message title. For example, @{call_req_id.type.sym} @{call_req_id.ref_num} @{type.sym}.
Specifies the content of the message. You can use variables to insert the analyst name, end-user name, and description into the message. For example,
@{call_req_id.type.sym} @{call_req_id.ref_num} @{type.sym}.
Assigned to: @{call_req_id.assignee.combo_name}
Customer: @{call_req_id.customer.combo_name}
Description: @{call_req_id.description}
Click on the following URL to view:
@{call_req_id.web_url}
You can use the ARTIFACT keyword to specify how artifacts are handled in outbound messages, message templates, notifications, and auto-replies. The ARTIFACT keyword uses the following values:
Specifies the HTML message that is displayed to the recipient. If the recipient receives the message on an external device, such as a cell phone or PDA, the message displays in plain text only. Click Edit HTML Message to open the HTML Editor.
Displays the message as it appears to the recipient.
Displays the message in the HTML source code.
The message template is created.
You can create a macro, which can be used to add actions to objects or check for certain characteristics or conditions.
Note: If multi-tenancy is installed, select the appropriate tenant from the drop-down list. The public (shared) option creates the object for all tenants.
Follow these steps:
The Macro List page opens.
The Create New Macro page appears.
Enter a descriptive identifier for the macro.
Select the type for this macro. The macro type that is selected controls the remaining data that needs to be supplied.
Note: The Execute CA IT PAM Action selection is only available when CA IT PAM Workflow is configured with CA SDM. The Execute CA Workflow Action selection is only available when CA Workflow is configured with CA SDM.
Select the type of object on which the macro can be run.
The page fills in with the remaining data needed for the macro that is based on the selected macro type.
Note: According to the example, select Multiple Notification Macro as the macro type to send an email notification upon an SLA violation. For more information about other macro types, see the Online Help.
Multiple Notification Macro
This macro type lets you send a notification to one or more contacts. You can specify the message to send, the recipients of the message, and the urgency level.
Follow these steps:
Note: Use the Update Contacts button that appears on each tab to search for and select more contacts to notify.
Displays the available organizations, vendors, and configuration items for the selected Object type that receive notification about tickets. For example, you can select Affected End User or Affected End User's Org to notify.
Displays the individuals who are added to the notification macro, regardless of their association with the ticket.
Displays the users who are defined within the notification macro with the same classification, such as analyst or customer.
The multiple notification macro is created.
Create an event and attach a marco to this event. This event is executed after certain time is elapsed. If any macro is attached, an action is performed.
Note: If multi-tenancy is installed, select the appropriate tenant from the drop-down list. The public (shared) option creates the object for all tenants.
Follow these steps:
The Event List page opens.
The Create New Event page opens.
Click Save.
The new event is saved.
Event Fields
Complete the following fields to add or edit an event:
The name of the event.
Indicates whether the event is attached to an issue, request, change order, workflow task, knowledge document, knowledge report card, assistance session, or managed survey.
This field can only be edited when creating an event. This field is read-only when you want to update the event.
Indicates whether the event is active or inactive. Only active events can be used.
Configuration Information Fields
Complete the following fields to add or edit the configuration information:
Specifies the time after which the event is triggered.
Specifies the interval of time after which you want the event to be triggered again.
Specifies if a service desk analyst can change the Delay Time. This option must be selected in order for an event to be used as a Service Type event (an event associated with a service level, such as 4-hour resolution.).
Specifies the dates, days, and hours when the service type is in effect.
Specifies the action to take once the event has been completed.
Repeats the event at the specified time interval until the issue is closed.
Records the history of activities taken on the event.
Do not record any history of the event. The event does not appear in the Event History window.
Displays the macro (if associated with the event) indicating the condition checked for by the event.
Defines the event configuration. For some action macros, this field is used for a specific purpose. For example, in the Transfer to Event Contact action macro, it contains the userid of the person to whom you want the ticket to be transferred.
Action Information Fields
Select the actions to be associated with the event as follows:
Note: Specify appropriate macros for true or false condition under the action list to log the SLA violations.
The Macro Search page opens.
The selected macros are added to the list on the right.
The selected macros appear in the Actions on True Macro List.
You can create a service type suits your requirements. You can also modify a predefined service type.
Follow these steps:
The Service Type List page opens.
The Create New Service Type page opens.
Defines a unique identifier for the service type. In this example, you assign the symbol as 24_hr_resolution.
Defines a ranking for the service type. In this example, the hardware request ticket may be associated with multiple service types. The ranking value determines the applicable service type. The service type with low ranking has the highest priority.
Enter 1.
Specifies the dates, days, and hours when the service type is in effect. The following rules apply to workshifts:
Specifies the time zone for the service type. This time zone is used for triggering events in the system if the Use End User's Time Zone option is not selected.
Specifies the timezone of the affected end user to trigger the events.
Specifies the cost that is incurred if the service type time limit is violated.
The service type is saved.
The Create New Service Type Event page opens.
The Event List page opens.
The selected or created event is displayed in the Event field.
The service type detail page is displayed with the attached event.
Service types can be associated with various objects such as contacts, organizations, categories, priority codes. According to the example, you attach the service type to the Incident Area, which is Hardware.
Follow these steps:
The Hardware Update Request/Incident/Problem Area page opens.
The Service Type List page opens.
The Hardware Update Request/ Incident/ Problem Area page opens with the updated service type.
The service type is attached to the Hardware incident area.
|
Copyright © 2013 CA.
All rights reserved.
|
|