

As a system administrator, you configure your live assistance environment to allow guest users to interact with the analysts. You can configure a guest user for a specific tenant or can make the user available to the entire system. Tenant is a user who uses a single instance of a software application that serves multiple customers in a multi-tenancy environment.
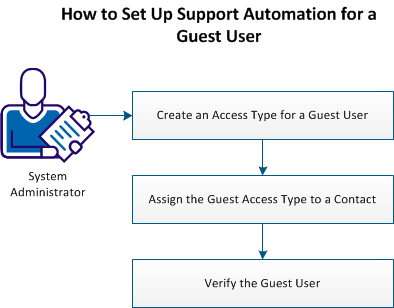
The following diagram illustrates how a system administrator configures the live assistance environment to allow guest users:
Follow these steps:
To let the guest users log in to CA SDM without an authentication, create a specific access type in CA SDM. If you are the service provider, you can create a guest access type for each tenant in your environment.
Follow these steps:
The Access Type List page opens.
The Create New Access Type page opens.
The access type for guest users is created.
The guest access type appears in the list.
Assign the guest access type to a contact after you create an access type so that the guest can use Support Automation live assistance functionality. The guest user uses a web authentication to log in to CA SDM. A contact is a person who uses the system regularly.
Follow these steps:
The Contact Search page opens.
The Create New Contact page opens.
Note: You can also modify a contact.
The guest access type is assigned to the contact.
After you assign the access type, you can verify the existence of the appropriate users in your environment.
Follow these steps:
The Contact Search page opens.
The Contact List page opens.
The contact type and the access type are available on the Contact List page.
This step completes the Support Automation setup for a guest user.
|
Copyright © 2013 CA.
All rights reserved.
|
|