

Product: CA SDM
Release: Release 12.9
OS: Windows and Linux
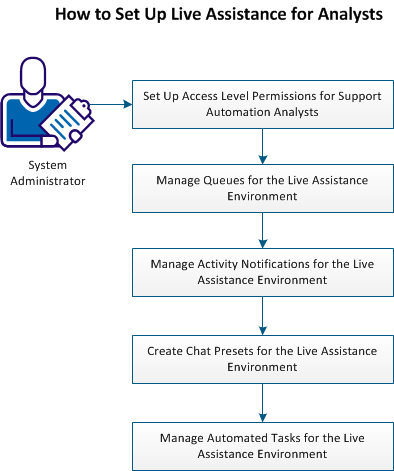
This scenario describes how a system administrator sets up live assistance for Support Automation analysts.
As a system administrator, you can set up the live assistance and can manage access levels to set permissions for tools that the analysts can use. You can enable and disable Support Automation tools for specific tenants. If a tool is disabled for a tenant, analysts cannot use that tool in assistance sessions.
The following diagram illustrates how to set up live assistance for analysts:
Follow these steps:
You can configure the CA SDM roles to have Support Automation permissions. Set role permissions by configuring Support Automation access levels for analysts and privacy levels for end users in your live assistance environment.
The following access levels are available:
Specifies the contact type that provides a live assistance to the end users in your support environment. An access level defines, which queues, automated tasks, and tools are available for the analyst to use.
Specifies the contact type that receives a live assistance from analysts, such as an employee and a customer.
You manage Support Automation access levels from the Administration tab.
Follow these steps:
You create analyst access levels to manage analyst permissions in your system, such as enabling and not enabling the specific Support Automation Analyst Interface tools.
You create privacy levels to manage end-user access levels in your system.
The Role List page appears.
The Role Detail page appears.
The Update Role page appears.
The Role Detail page appears. Verify that the Support Automation access is assigned to the role.
You manage the Support Automation access levels and assign them to the CA SDM roles in your support environment. Support environments vary in size and structure, so your implementation of access levels can vary.
For example, in a small support environment, there can be only one or two analysts that are categorized within a single access level. In a larger support environment, the tenant administrator can set up many analyst access levels, each with different access and support privileges.
Important! In a multi-tenancy environment, analysts that do not belong to the service provider, only have write access to their own tenant and subtenants. You can give the analyst write access to other tenants and subtenants. This access is possible by updating the function access of the accessed tenant to include the non-service provider tenants.
You use queues to route the assistance session requests to the most appropriate analyst. The end user can select a category, or can enter a description of their computer problem, and their ticket (such as an incident) routes to the appropriate queue.
After the initial product installation, the default queue is named Support. You can set up several queues to facilitate the sorting and tracking of different support requests, according to your business needs. You can assign only one default queues per tenant. If you do not assign a default to a tenant queue, or if the default tenant queue is unavailable, the system uses the public default queue. You set the working hours per queue.
The system automatically determines where to place the end user by mapping queues to incident areas. If an area maps to a queue, the end user selects a category and the end user is routed to the appropriate queue. The search capabilities are applied to the description of an incident or issue category to identify relevant queues, and the end user is routed to the best matched queue only.
Follow these steps:
You can activate or deactivate queues, set chat preset, category, queue hours, auto transfers, and specify tenant and analyst permissions.
You can route end users to the default queue when they enter queries that do not match the queues that are configured in your environment. You can also customize queues for tenants in your environment.
Note: If the default tenant queue is missing or unavailable, the public queue is used.
You can manage queues that are based on the availability of users in your support environment, such as enabling Support Automation services during business hours.
Important! You can assign work shifts to both your Support Automation hours and individual live assistance queues. Different work shifts that are assigned to Support Automation hours and individual queues can cause conflicts for analysts and end users in your support environment.
As a system administrator, you can customize how end users and analysts can track and receive notifications when an activity occurs. For example, a notification can be sent when an analyst ends an assistance session. You create email notifications to alert analysts when they get an assistance session request in their queue.
Select any of the following default notifications (as they are inactive), as appropriate to your environment:
Notifies the analyst when an end user joins an assistance session queue and when the assistance session is transferred to another queue.
Notifies the analyst when end-user queue wait time expires. The event of expiration is recognized with a CA SDM Event conditional macro.
Notifies the end user when the analyst invites them to an incident or request assistance session.
Notifies the end user when the analyst invites them to an issue assistance session.
Notifies the system when the assistance session ends.
Important! If you want to use the Support Automation functionality with an external system such as Star, the System_SA_User contact is set to the Session Ended Notification rule by default.
Follow these steps:
The Activity Notifications page opens.
The notification is selected and you can use that notification.
You can create common responses to frequently asked questions. Instead of repeatedly typing the same response, you can save a response and can reuse it in other chat sessions. These saved responses are named chat presets.
You can send the presets to the end users at the beginning of each session automatically, such as a greeting. You can also automatically populate the presets with information specific to the current session, such as the analyst name.
You can use the following presets types in a live assistance session:
Identifies a commonly used text response to an end-user question.
Identifies a commonly used URL that the end user can access.
You can localize each chat preset. The chat preset is synchronized with the end-user localization so that the end user receives correct localized presets. You can use predefined responses to commonly asked questions and situations.
Follow these steps:
The Chat Text Presets List page appears.
The Create New Chat Text Preset page appears.
Specifies the tenant.
Select to define as the default Chat Preset for Session Join.
Specifies the text preset group.
Specifies the text preset name.
Specifies the text of the preset.
Click Save.
The text chat preset is created.
The Update Chat Text Preset page appears.
The Chat Text Preset Localization Detail page appears.
The Update Chat Text Preset Localization page appears.
The localized text for the text chat preset is added.
You must install and configure the Automated Tasks Editor to manage the automated tasks that the Support Automation analysts use to provide support for end users. The end user can launch an automated task from a knowledge document and the self-service interface, or an analyst executes an automated task during an assistance session. The automated tasks provide analysts the detailed information about an end-user computer. You create self-service automated tasks that interact with the end user and process their input. These tasks can change the file system, registry, download install software, and so on.
Follow these steps:
Use the following location and launch the installer on the installation media from the DVD:
casd.nt\SAScriptWriter
Note: In your support environment, you can also copy and deploy the installer to the appropriate users. The Automated Task Editor is installed and creates a shortcut on your desktop.
The Server Configuration dialog appears.
Default: 8070
The tool tries to access the Service Desk application using the webservices call and verify if the application exists and is able to access it using the credentials.
The automated tasks are created and uploaded to your server.
You can upload public tasks or can assign them to specific tenants and subtenants.
Important! Only the roles from the Service Provider tenant with the Update Public flag enabled can upload tasks and libraries to the server. All task library content and static content are stored as public data.
The setup is completed and analysts can use this setup to help the users. Support Automation analysts monitor and manage multiple end-user requests in the live assistance sessions. Analysts use Support Automation tools to interact with end users and provide the live assistance. Analysts access the interface from a CA SDM ticket, such as an incident, or the Support Automation tab and initiate a session.
|
Copyright © 2013 CA.
All rights reserved.
|
|