

管理指南 › 安装和配置 Active Directory 和 Exchange Server AIM › 如何配置 Active Directory 和 Exchange Server 监控 › Active Directory 和 Exchange Server AIM 的工作原理
Active Directory 和 Exchange Server AIM 的工作原理
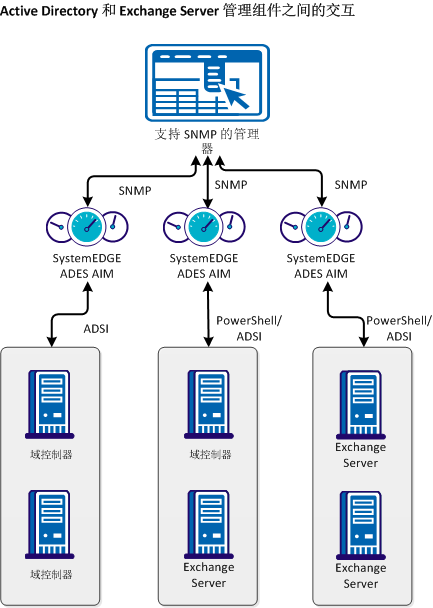
下图说明了 ADES AIM 体系结构:
以下过程说明了 ADES AIM 的工作方式:
- ADES AIM 通过搜索域控制器发现主机。 ADES AIM 收集有关以下内容的信息:
- Active Directory 服务器角色,如域控制器和全局目录。
- Exchange Server 角色,如集线器传输、邮箱和客户端访问服务器。
注意:统一的消息和边传输角色不支持监控。
- 当发现主机时,AIM 将发送消息,以便从以下项收集数据:
- 使用 ADSI 调用的域控制器
- 使用 PowerShell 命令的 Exchange Server
- AIM 将针对 SystemEDGE 代理接收数据并更新 MIB 表。
- 管理器(如 CA eHealth 和 CA Spectrum)将轮询 SystemEDGE 主机并收集要显示的数据。
- AIM 将持续轮询受管主机(为监控设置的 Active Directory 和 Exchange Server 主机)并更新其 MIB 表。
版权所有 © 2013 CA。
保留所有权利。
|
|