

The tenant administrator decides on the credential types and the corresponding advanced authentication flows that must be used to protect access to the tenant’s resources. The tenant administrator sends this information as a configuration request to the hosting administrator. As the hosting administrator, you configure Advanced Authentication according to the requirements specified in the configuration request.
The following diagram outlines the steps that are involved in configuring Advanced Authentication:
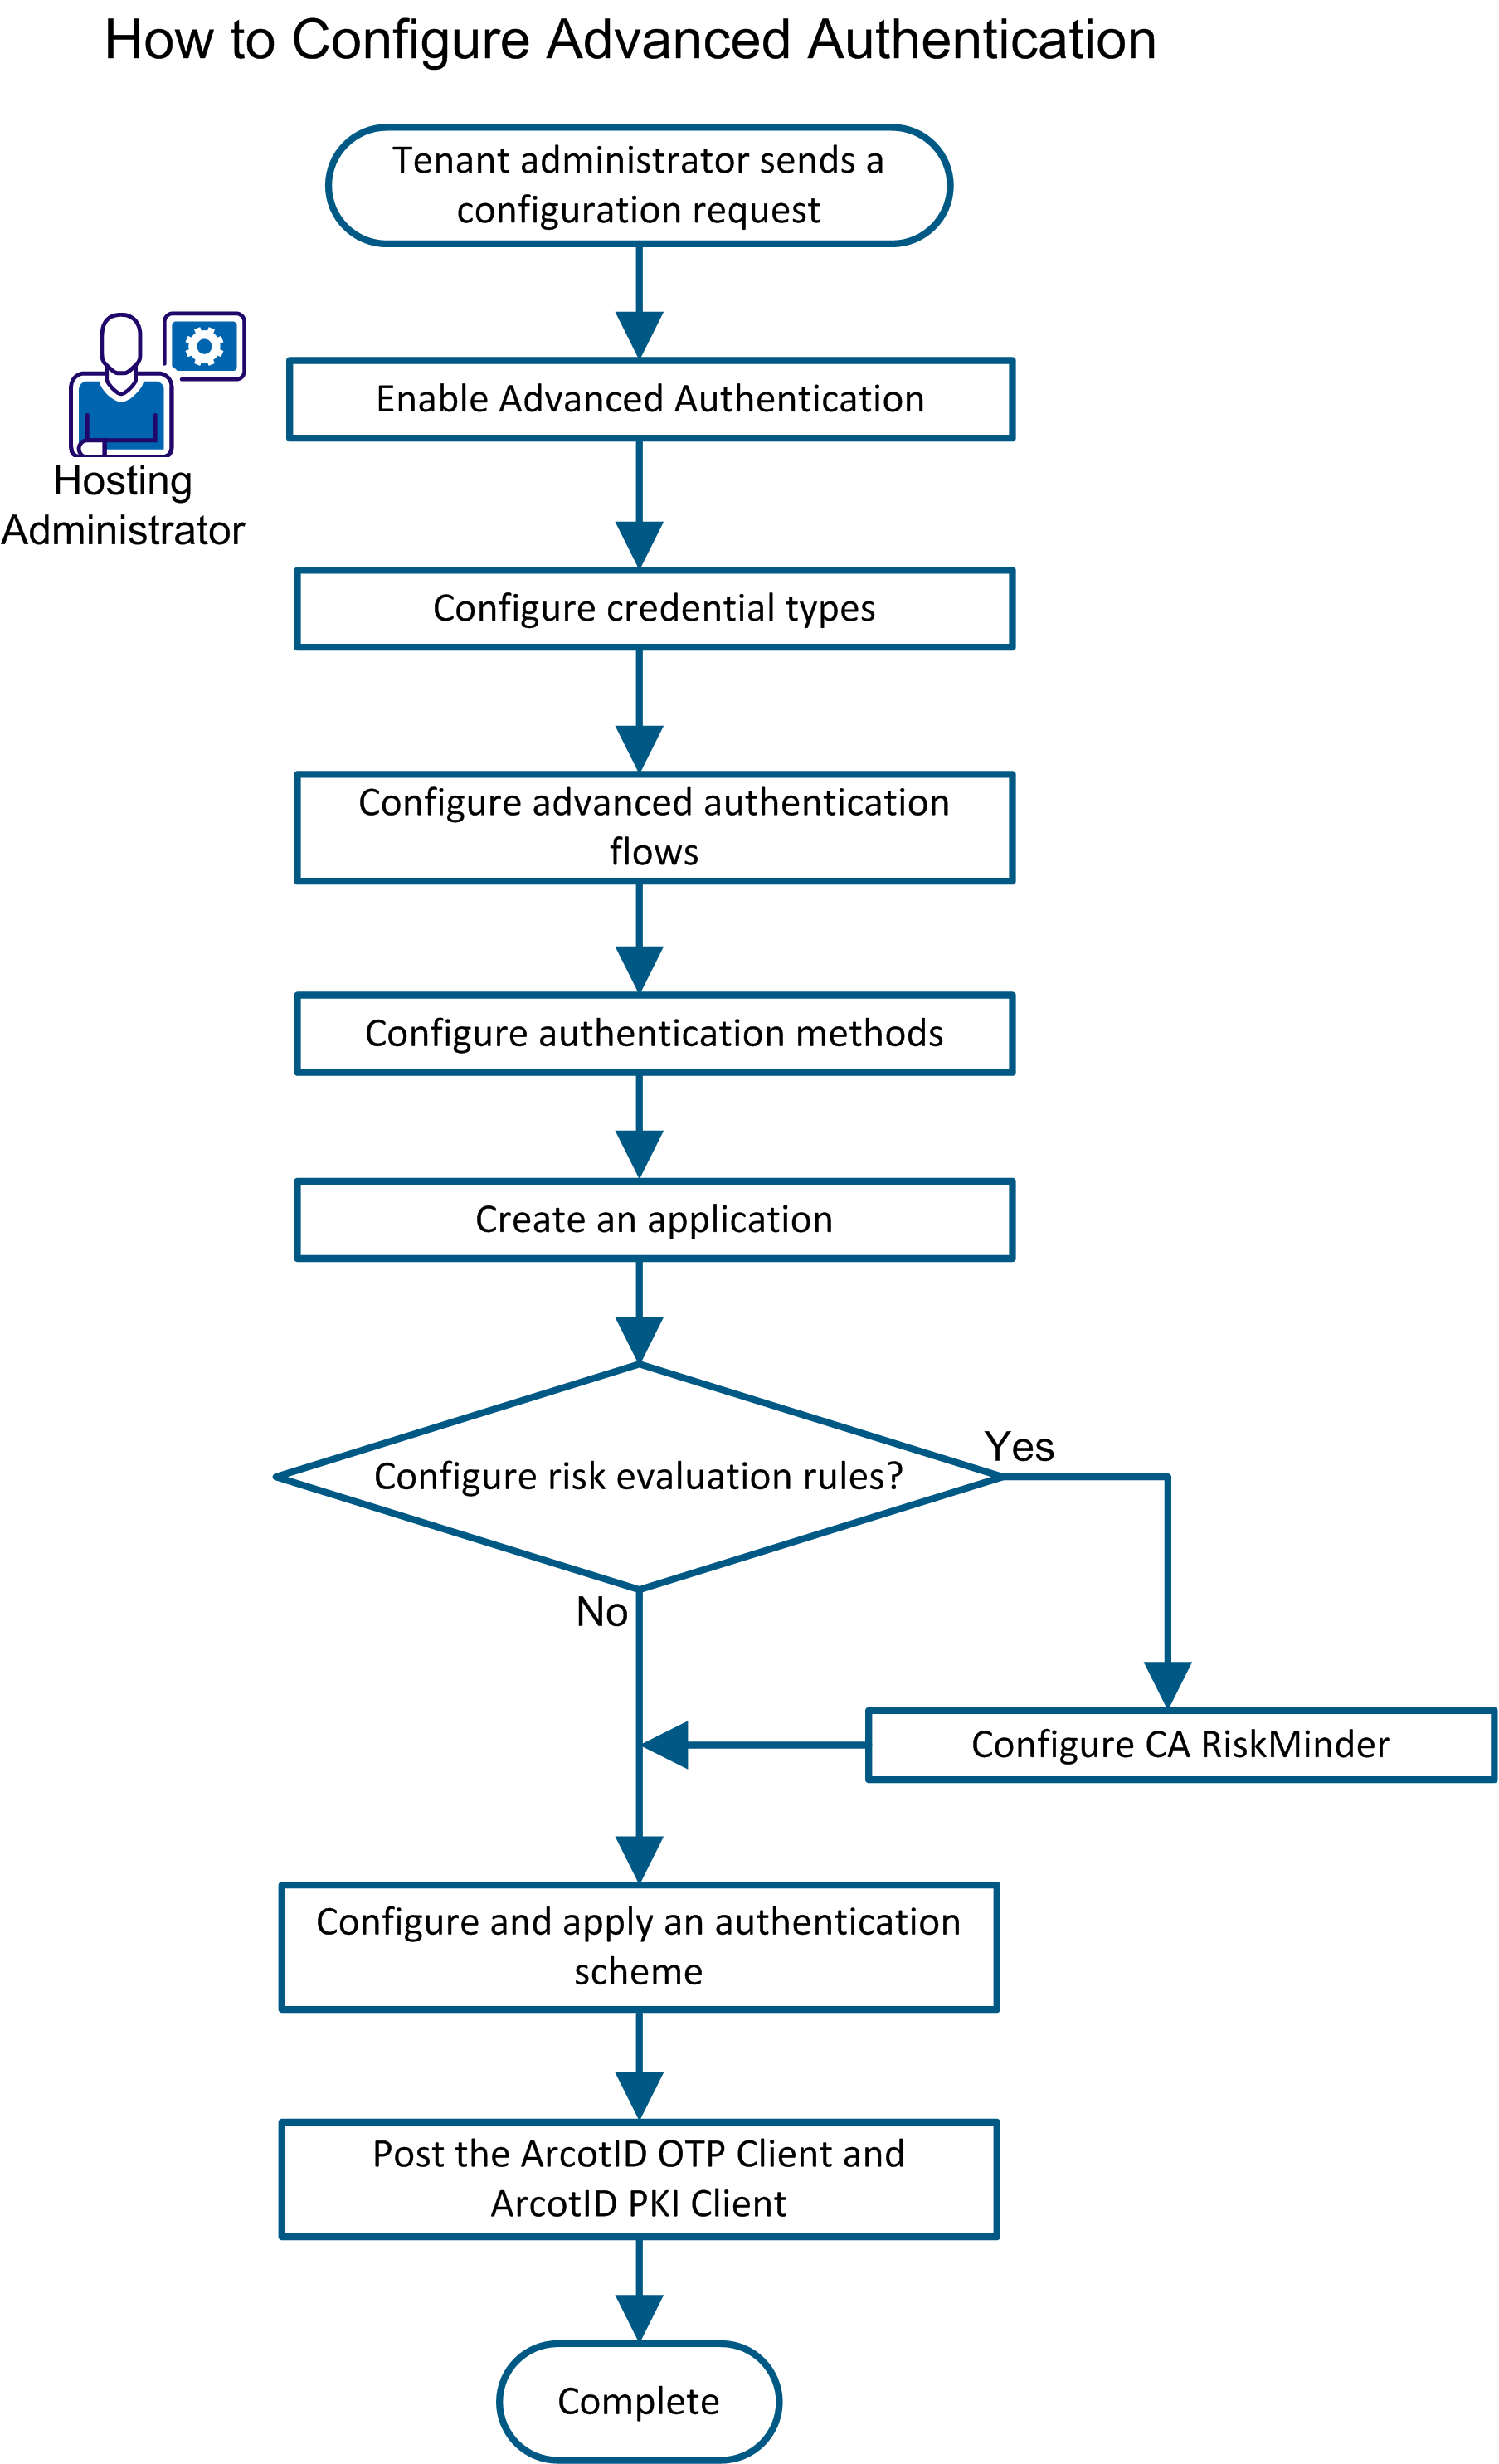
To configure Advanced Authentication, complete the following steps:
The credential types form the basis of the advanced authentication flows. To configure a credential type, you enable the credential type and then set values for the attributes of the credential type. The values that you set are specified in the configuration request that is sent by the tenant administrator.
Note: For information about managing credentials after they are assigned to end users, see the CA Arcot Administration Console documentation.
Follow these steps:
The Configure Credential Types: Credential Type screen opens.
The Configure Credential Types: Configure Enabled Credentials screen opens.
You can configure any combination of the following credential types:
Specifies the minimum length of the PIN.
Specifies the expiry date for the credential.
In addition, specify values for the fields of the activation OTP profile:
Indicates whether the activation OTP is numeric or alphanumeric.
Specifies the length of the activation OTP.
Specifies the period for which the activation OTP is valid.
Specifies the number of times for which an activation OTP can be used.
Specifies the length (in bits) of the credential.
Indicates that authentication using the ArcotID PKI mobile client is enabled.
Note: If you select this option, when configuring Advanced Authentication flows, you must configure at least one secondary authentication mechanism each for the expiry and roaming scenarios that use the ArcotID PKI mobile client. For more information, see Configure Advanced Authentication Flows.
Specifies the expiry date for the credential.
Specifies the order of preference for ArcotID PKI clients. During enrollment, the Advanced Authentication server uses the first client in the order of preference to deliver and interact with the credential on the end user’s device. If the attempt to use the first client fails, then the server uses the second client, and so on. During authentication, the client that is available (in the order of preference) on the end user’s device is used to sign the challenge in the challenge-response transaction between the browser and Advanced Authentication server.
Specifies whether the cookie that stores risk-related information on the end user's device must be a Flash-based cookie or an HTTP-based cookie.
Defines the number of days after which the HTTP cookie must automatically expire. This field is displayed only after you select HTTP cookie from the Risk cookie type list.
Note: Security Code is used during the secondary authentication process.
Specifies whether the security code is only numeric or alphanumeric.
Specifies the length (in characters) of the credential.
Specifies the period for which the security code is valid.
Specifies the number of failed attempts after which the credential is locked.
Enable
Indicates that the Security Code over Email credential type must be enabled.
From
Defines the sender’s email address to be shown in the email that is sent to end users. If the email sent to the end user does not reach the end user for any reason, email notification is automatically sent to this email address.
Subject
Defines the subject line to be shown in the email that is sent to end users.
Email template
Defines the message to be shown in the email that is sent to end users. The security code is inserted in this message. The following is a sample message:
User [[USERNAME]], your Security Code is [[SECURITYCODE]].
In this example, [[USERNAME]] and [[SECURITYCODE]] are variables that are replaced at run time by actual values.
Enable
Indicates that the Security Code over SMS credential type must be enabled.
SMS Template
Defines the template of the SMS message that is sent to end users. The security code is included in this message. The following is a sample message:
User [[USERNAME]], your Security Code is [[SECURITYCODE]].
In this example, [[USERNAME]] and [[SECURITYCODE]] are variables that are replaced at run time by actual values.
SMS Provider Post URL
Defines the URL from where the SMS service can be accessed.
Username
Defines the user name of the SMS account that has been created for the tenant.
Password
Defines the password of the SMS account that has been created for the tenant.
App ID
Specifies the unique identifier of the SMS API that handles the SMS request sent from CA CloudMinder.
From
Defines the string or number that must be displayed in the From field of the SMS message that is sent to end users.
Enable
Indicates that the Security Code over Voice credential type must be enabled.
Client ID
Specifies the client ID that has been assigned to the tenant.
Country ID
Specifies the ISO country ID of the tenant’s organization.
The Confirmation: Task Completed message appears after you click Submit. In addition, the current date and time are displayed in the Last Configured Date column for each credential type that you configure.
The Refresh Cache screen opens.
A message stating that the request was submitted successfully appears.
The Search Cache Refresh Request screen opens.
The status of the refresh request is displayed. The SUCCESS message in the Status column indicates that the configuration changes made in the credential types are now effective.
The advanced authentication flows that you can enable and configure are based on the credential types that you have enabled. You configure the advanced authentication flows that are requested by the tenant administrator.
Follow these steps:
The Select Flow Types screen opens.
The Enabled Flow Types screen opens.
The Flow Configuration screen displays a list of the different scenarios in which the end user is prompted for secondary authentication.
Note: An end user forgetting the password is an example of a use case in which the end user is prompted for secondary authentication. For information about all such use cases, see the Getting Started Guide for Advanced Authentication.
Depending on the advanced authentication flow type that you are configuring, you can select any one or a combination of the following secondary authentication methods:
Note: Consider the following when selecting these mechanisms:
As secondary authentication is invoked when performing sensitive tasks, such as resetting passwords or authenticating roaming users, it is recommended that a combination of authentication mechanisms be chained together. Chaining of secondary authentication mechanisms provides a higher level of security.
Note: Consider the following when selecting this option:
The current date and time is displayed in the Last Configured Date column.
The configured advanced authentication flows are now available for use in authentication schemes that can be configured for the tenant’s resources.
An authentication method represents how an application is protected. After you configure an authentication method, you assign it to the application you want to protect. Multiple applications can use the same authentication method. A single application can reference multiple authentication methods.
Configure an authentication method that satisfies the protection requirements for an application.
Note: The system creates authentication methods corresponding to each of the advanced authentication flows. If you are configuring Advanced Authentication for the tenant, do not create an authentication method. Modify the existing authentication method as described in this procedure.
Follow these steps:
Enter a string that identifies the authentication method you are configuring.
Enter a description for the authentication method. The login page displays this description as a label.
Select this check box to make the authentication method immediately available.
When the authentication method is associated with an application, the authentication service appends the redirect URL for the application.
Note the following variables in the URLs:
cloud_host is the CA CloudMinder system.
local_entity_ID is the name of the local entity that is specified in the IdP-to-SP partnership, which is configured at the CSP console.
remote_entity_ID, consumer_entity_ID or resource_partner_ID is the name of the remote entity that is specified in the configuration of the asserting-to-relying party partnership. The partnership is configured at the CSP console.
Represents a form-based authentication scheme that uses the basic credentials of a user name and a password. The basic authentication method corresponds to the HTML Forms authentication scheme in the CSP console.
Enter the authentication URL of the following format:
http://cloud_host:port/chs/redirectservlet/tenant_tag/forms
tenant_tag is a unique identifier for a tenant. You specify the tag when deploying a tenant environment in the CSP console. To view a list of tags, select the Tenants tab.
Represents a third-party identity provider (IdP) that authenticates users. Social media sites, such as Google or Facebook can serve as external IdPs. Other federated partners that support the SAML and WS-Federation protocols can also serve as external IdPs.
If Google or Facebook is acting as the third-party IdP, specify the OpenID or OAuth authentication method. Each site supports both protocols.
Enter the relevant URL for the protocol, as shown:
OpenID
http://cloud_host:port/affwebservices/tenant_tag/duplicate_openid_file.jsp
When configuring the OpenID authentication scheme at the CSP console, the default openid.jsp file is copied and given a unique name, such as openid-google.jsp. Having a unique jsp file is necessary to distinguish OpenID configurations.
The default JSP file is located in the directory /opt/CA/secure-proxy/Tomcat/webapps/affwebservices/redirectjsp.
OAuth
http://cloud_host:port/affwebservices/tenant_tag/duplicate_oauth_file.jsp
When configuring the OAuth authentication scheme in the CSP console, the default oauth.jsp file is copied and given a unique name, such as oauth-google.jsp. Having a unique jsp file is necessary to distinguish OAuth configurations.
The default JSP file is located in the directory /opt/CA/secure-proxy/Tomcat/webapps/affwebservices/redirectjsp.
tenant_tag is a unique identifier for a tenant. You specify the tag when deploying a tenant environment in the CSP console. To view a list of tags, select the Tenants tab.
Select Other when a SAML or WS-Federation-compliant partner is the IdP. The federation profiles SAML 1.1, SAML 2.0, and WS-Federation 1.2 are all supported.
Enter the relevant URL for the protocol, as shown.
For SAML 1.1 transactions http://cloud_host.domain:port/affwebservices/public/intersitetransfer?CONSUMERID=consumer_entity_ID&TARGET=http://consumer_site/target_url
For SAML 2.0 SP-initiated transactions
http://cloud_host.domain:port/affwebservices/public/saml2authnrequest?ProviderID=local_entity_ID&RelayState=http://sp_site/target_url
For SAML 2.0 IdP-initiated transactions
http://cloud_host.domain:port/affwebservices/public/saml2authnrequest?SPID=remote_entity_ID&RelayState=http://sp_site/target_url
For WS-Federation IP-initiated transaction
http://cloud_host.domain:port/affwebservices/public/wsfeddispatcher?wa=wsignin1.0&wtrealm=resource_partner_ID&wctx=target_url
Represents one of the authentication protocols that the CA CloudMinder Advanced Authentication Service provides.
Select one of the following options and the URL is entered automatically:
For ArcotID PKI Only
For environments created in CA CloudMinder 1.51 or later:
https://cloud_host:port/chs/redirectservlet/tenant_tag/arcotid
For environments created before CA CloudMinder 1.51:
https://cloud_host:port/affwebservices/<tenant-name>/arcotid.jsp
For ArcotID PKI with Risk
For environments created in CA CloudMinder 1.51 or later:
https://cloud_host:port/chs/redirectservlet/tenant_tag/arcotidrisk
For environments created before CA CloudMinder 1.51:
https://cloud_host:port/affwebservices/<tenant-name>/arcotidrisk.jsp
For ArcotID OTP Only
For environments created in CA CloudMinder 1.51 or later:
https://cloud_host:port/chs/redirectservlet/tenant_tag/arcototp
For environments created before CA CloudMinder 1.51:
https://cloud_host:port/affwebservices/<tenant-name>/arcototp.jsp
For ArcotID OTP with Risk
For environments created in CA CloudMinder 1.51 or later:
https://cloud_host:port/chs/redirectservlet/tenant_tag/arcototprisk
For environments created before CA CloudMinder 1.51:
https://cloud_host:port/affwebservices/<tenant-name>/arcototprisk.jsp
tenant_tag is a unique identifier for a tenant. You specify the tag when deploying a tenant environment in the CSP console. To view a list of tags, select the Tenants tab.
The authentication method is available to protect an application.
In the User Console, an application represents the resource that the tenant administrator wants to protect. An application defines the type and level of security that end users encounter when they try to access the resource. You can apply any one or a combination of the authentication methods that you define to protect access to the application.
When a tenant is created in CA CloudMinder, the following applications are automatically created for the tenant:
You configure both applications according to the tenant’s requirements. In addition, you can create applications to secure other resources of the tenant.
After an application is configured, the application icon is displayed on the home page of the User Console. Users can click the icon to access the application. As an administrator, you can also give end users access to the application by inserting a link to the application in any web page. For example, you can insert an icon on your corporate web portal that links to the application.
Note: This section describes the steps to modify an application. These are very similar to the steps to create an application. There are differences only in the first few steps of the procedure.
Follow these steps:
The Modify Application screen opens.
The list of applications whose names meet the search criteria is displayed. If this is the first time you are performing this procedure, the search results display only the two preconfigured applications that are mentioned earlier in this section.
A launch URL is the fully qualified domain name of the software resource you want to make available to users. Enter the fully qualified domain name of the software resource in the following format:
https://resource-domain-name
Example: https://forward-inc.com
Note: Forward, Inc. is a fictitious company name that is used strictly for instructional purposes only and is not meant to reference an existing company.
If you are creating an application for the User Console, enter a launch URL in the following format:
https://SPS-hostname/iam/im/tenant-name/
Example: https://forward-inc.com/iam/im/forward01/
This is the icon for the application that appears in the User Console home page. Users can click the icon to access the software resource.
Note: You can also give users access to the application by inserting a link to the application on a web page.
When users click any link you provide to the application, a login screen opens. The welcome message appears at the top of the login screen.
With a self-registration task specified, end users who do not have an account can register themselves with the application. You can select one of the following self-registration tasks:
Presents a simple registration form. When this form is submitted, a user account is created.
Presents a simple registration form. When this form is submitted, the request for creating a user account is forwarded to one or more approvers. The account is created on approval of the request.
Presents a simple registration form. When this form is submitted, the user's email domain is compared with the tenant email domain. If the domains match, a confirmation email is sent to the user. The account is created upon user confirmation.
Note: The tenant email domain is specified in the User Console, under Tenant Administration, Tenant Settings.
Do not select this self-registration task in the context of application access. This task is intended for a different purpose.
The Select Authentication Methods screen displays a list of the authentication methods available in the tenant environment.
The Create Application screen appears, updated with the list of authentication methods that you select.
The application is created.
CA RiskMinder is one of the components of Advanced Authentication. When a tenant is created, an organization representing the tenant is automatically created in CA RiskMinder. The Risk Evaluation credential type is based on the predefined risk evaluation rules in CA RiskMinder. If the tenant administrator wants to use the Risk Evaluation credential, the tenant administrator sends the configuration settings for the risk evaluation rules as part of the configuration request. You can apply these configuration settings for the risk evaluation rules. See Configure risk evaluation rules for detailed information.
Note: For detailed information about the procedure to configure CA RiskMinder, see the CA Arcot RiskMinder Administration Guide.
CA RiskMinder supports risk evaluation requests coming from multiple channels. By assigning channels to the organization that represents the tenant, you specify the type of risk evaluation requests that must be processed.
When a tenant is created, channels are automatically assigned to the tenant. In addition, a default channel is assigned to the tenant. Perform the procedure that is described in this section only if the tenant administrator requests any changes or additions to these default assignments.
Important! Configuring channels is expected to be a one-time configuration. You can add a channel to your existing deployment, but removing support for a channel and changing the default channel requires careful consideration. If you want to change these settings in a production environment, contact CA Support to understand the implications.
Follow these steps:
Channels are assigned to the organization.
Some of the predefined risk evaluation rules have default values. The tenant administrator can specify that these defaults values must be accepted. Alternatively, the tenant administrator can specify the values that they want to set. You set these values to configure the risk evaluation rules.
Follow these steps:
The Create Ruleset screen opens.
The ruleset is created.
The Rules and Scoring Configuration screen opens.
The Rules and Scoring Management screen opens.
Note: Some of the rules are not configurable.
The Migrate to Production screen opens.
The Migrate to Production screen opens.
The request to migrate the updated ruleset to production is sent to RiskMinder Server.
The Refresh Cache screen opens.
A confirmation message appears.
A message displaying the request ID for the refresh request appears.
The Search Cache Refresh Request screen opens.
The View Cache Refresh Request screen opens. Use the information that is displayed on this screen to verify that the cache has been refreshed.
The risk evaluation rules are configured.
Authentication schemes corresponding to the advanced authentication flows are preconfigured in the CSP Console. These authentication schemes are as follows:
You establish a one-to-one correspondence between an authentication method configured in the User Console and an authentication scheme in the CSP Console. The authentication method and authentication scheme work together to protect access to the specified application.
The authentication scheme protects the authentication URL that is specified for a given authentication method. To apply the authentication scheme, you assign the authentication scheme to a realm and then include the realm in a policy.
Important! You can also use these steps to apply an authentication scheme for protecting the User Console.
Follow these steps:
A realm groups resources that have similar security requirements and share a common authentication scheme. In the tenant domain, create a realm for each authentication scheme that the tenant administrator wants to use.
Note: The following procedure assumes that you are creating an object. You can also copy the properties of an existing object to create an object.
Follow these steps:
The Realms screen opens.
Note: The tenant domain name is in the tenant-tagDomain format.
Specify a name that indicates that the realm is for an authentication URL.
For environments created in CA CloudMinder 1.51 or later:
/chs/redirect/tenant_tag/arcototp
For environments created before CA CloudMinder 1.51:
/affwebservices/<tenant-name>/arcototp.jsp
For environments created in CA CloudMinder 1.51 or later:
/chs/redirect/tenant_tag/arcototprisk
For environments created before CA CloudMinder 1.51:
/affwebservices/<tenant-name>/arcototprisk.jsp
For environments created in CA CloudMinder 1.51 or later:
/chs/redirect/tenant_tag/arcotid
For environments created before CA CloudMinder 1.51:
/affwebservices/<tenant-name>/arcotid.jsp
For environments created in CA CloudMinder 1.51 or later:
/chs/redirect/tenant_tag/arcotidrisk
For environments created before CA CloudMinder 1.51:
/affwebservices/<tenant-name>/arcotidrisk.jsp
tenant_tag is a unique identifier for a tenant. You specify the tag when deploying a tenant environment in the CSP console. To view a list of tags, select the Tenants tab.
Protected
Select the authentication scheme that corresponds to the resource filter.
The Create Rule screen opens.
The rule is created.
Note: Click Help for information about these properties.
The realm is configured.
Rules indicate which resources are part of a policy and whether to allow or deny access to the resources when the rule fires.
Note: Add at least one rule or rule group to a policy.
Follow these steps:
The Domains screen opens.
The Available Rules pane opens.
The rule is added to the tenant policy.
The tenant-tag_ims_realm realm represents the User Console. To secure access to the User Console, one of the steps that you perform is to apply the required authentication scheme to this realm. The remaining steps are performed in the User Console itself.
Note: Perform this procedure only for the User Console. You need not perform this procedure for any other application.
Follow these steps:
The Realms screen opens.
The authentication scheme is applied for securing access to the User Console.
The native clients for ArcotID OTP and ArcotID PKI are available in the Support section of the CA Technologies website. If the tenant administrator wants to enable their end users to use these clients, inform the tenant administrator about the location from where they can download these clients. The tenant administrator can then post these clients on their website and make the clients available to their end users for download and installation.
|
Copyright © 2015 CA Technologies.
All rights reserved.
|
|