CA Repository Exchange for UDB (UDB for z/OS) › About the CA Repository Exchange for UDB Interface
About the CA Repository Exchange for UDB Interface
The CA Repository Exchange for UDB interface is made up of menus, dialogs, a status bar, and a tool bar.
Menus
The CA Repository Exchange for UDB Menus are as follows:
- File—Open a Datasource, generate an output file, exit the GUI
- Edit—Select and unselect, highlight and unhighlight items, perform search and trace functions
- View—Display or hide Tool and status bars
- Help—Display the Help file or information about the CA Repository Exchange for UDB
Toolbar
The following buttons are available on the Toolbar:
 Open Datasource Displays the Open Datasource Dialog. Provide the following: Datasource name, Username, and Password of the data source you want to access.Note that the connections to the data source must have been previously established. See the Installation Guide for more information.
 Select All Places a checkmark next to every item in the listNote that you can also manually check (or uncheck) individual items.
 Unselect All Removes the checkmarks next to all the items in the list (to unselect them).
 Select Highlighted Places a checkmark next to all highlighted objects. This targets the objects for the output file Use standard Microsoft Windows selection techniques to highlight objects.
 Unselect Highlighted Removes the selection checkmark next to all the highlighted items in the list.
 Write Output File Displays the Select Output File Name Dialog Enter a new file name or browse for an existing file name to overwrite.
 Find Displays the Find dialog where you can enter the character string you want to locateNote: Be sure to use the correct case (upper, lower, or mixed) of the string you are trying to find.
 Help Displays the Help file
Open Datasource Dialog
The Datasource drop-down list contains only those UDB databases that have been made available for ODBC access.
Choose a datasource name from the drop-down list, and enter a password that has the authority to access that database and read the catalog views.
Note: If no name was entered in any of the text areas, and you are presented with the Select Data Source dialog, simply cancel out of this dialog and return to the Open Datasource dialog and supply the required values.
Select Output File Name Dialog
This dialog allows you to one of the following:
- Enter a new Output Filename and create the file.
- Select an existing file and overwrite it with the extracted data. You can use the Browse function to locate the existing file.
Once you click OK, the status of your data transfer is displayed in the progress bar.
Note that the resulting file can be copied up to your mainframe and input to the CA Repository.
Select a Scan Level Dialog
Use this dialog to select the level of data that is to be retrieved from the catalog tables:
- Database selects everything in the database. No further choice is appropriate, so nothing will appear in the main window.
- Schema selects everything within a particular schema. A list of schemas in the database will be presented from which you can choose one or more to be extracted.
- Tables presents a list of the available tables. Select the ones that are to be extracted.
You can combine the following options.
Use the information boxes as follows:
- Include System tables—The system tables are identical in all UDB databases, so this information should be loaded only once into the mainframe repository, if at all.
- Exclusion List group—This enables you to choose any objects that you do not want processed. For example, If Trigger is checked, triggers will not be processed.
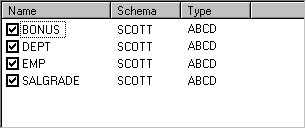
- Where Clause—Once you have selected a scan level, you can insert an SQL where clause into this field to focus your search. For example, if you click the Table checkbox, you might then enter owner = 'ABCD' into the Where text box to produce the following result:
Status Bar
The Status bar displays a message to indicate the action that is about to be executed or that the system is ready for input.

File Menu
The File menu contains the following commands:
- Open Datasource—Displays the Open Datasource Dialog. Provide the Datasource name, Username, and Password of the data source you want to access.
Note that the connections to the data source must have been previously established. See the CA Repository for zOS Installation Guide for more information.
- Write Output File— Displays the Select Output File Name Dialog. Enter a new file name or browse for an existing file name to overwrite.
- Exit—Exits the application.
Edit Menu
The Edit menu contains the following commands:
- Select All—Places a checkmark next to every item in the list. Note that you can also manually check (or uncheck) individual items.
- Unselect All—Removes the checkmarks next to all the items in the list (to unselect them).
- Select Highlighted—Places a checkmark next to all highlighted objects; this targets the objects for the output file Use standard Microsoft Windows selection techniques to highlight objects.
- Unselect—Highlighted Removes the selection checkmark next to all the highlighted items in the list.
- Find—Displays the Find dialog where you can enter the character string you want to locate Note: Be sure to use the correct case (upper, lower, or mixed) of the string you are trying to find.
- Trace—Gathers information about the internal operations of the program. Note: This command generates diagnostics for use by Computer Associates Technical Support personnel. We recommend that you do not issue this command unless you are instructed to do so.
View Menu
The View menu contains the following commands:
- Toolbar—Toggles the Toolbar at the top of the main window on or off
- Status Bar—Toggles the status bar at the bottom of the main window on or off
Help Menu
The Help menu contains the following commands:
- Contents—Displays the Help file.
- About CA Repository Exchange for UDB—Displays product version and copyright date.