| Copyright © 2014 CA Technologies. All rights reserved. |
|
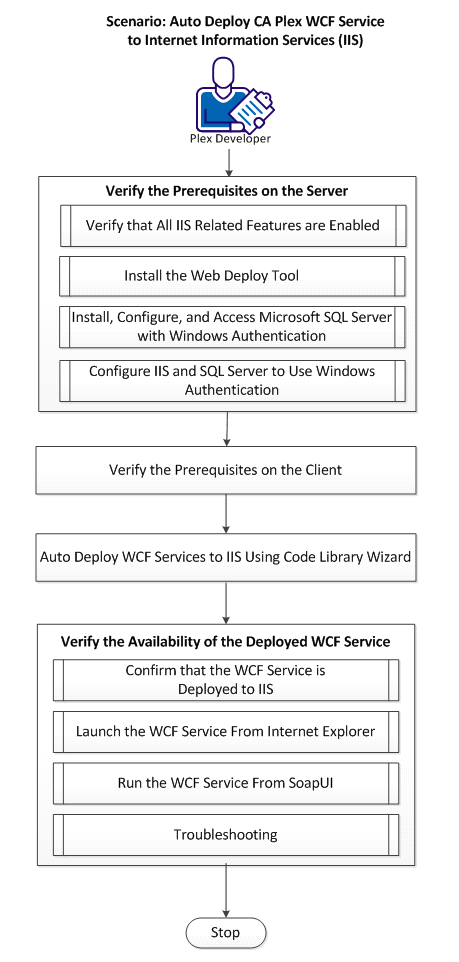
1.0 Verify the Prerequisites on the Server
1.1 Verify that All IIS Related Features are Enabled
1.2 Install the Web Deploy Tool
1.3 Install, Configure and Access Microsoft SQL Server With Windows Authentication
1.4 Configure IIS and SQL Server to Use Windows Authentication
2.0 Verify the Prerequisites on the Client
3.0 Auto Deploy WCF Service to IIS Using the Code Library Wizard
4.0 Verify the Availability of the Deployed WCF Service
4.1 Confirm that the WCF Service is Deployed to IIS
4.2 Launch the WCF Service From Internet Explorer
This scenario discusses how CA Plex developers can configure the environment for deploying CA Plex WCF Service to Internet Information Services (IIS) using CA Plex Code Library Wizard. This scenario also covers the runtime configuration to allow IIS deployed WCF Service to access SQL Server databases with Windows Authentication. .
Note: This documentation assumes that there are two machines, one used for the IIS with Microsoft SQL Server installed in it (referred as Server) and the other running CA Plex (referred as Client).
Follow these steps to complete this scenario:
Internet Information Services (IIS) can be installed as part of most versions of the Windows operating system. The version of IIS that can be installed on each operating system is listed in Microsoft Support knowledge base article KB224609. We recommend that you use at least IIS 7.5 running on Windows 7 /2008 R2.
Following are the prerequisites for the Server (IIS Machine):
For IIS 8.5 on Windows 8.1—Click Start, Control Panel, Programs and Features, and select Turn Windows Features on or off. Make sure that ALL of the features in the following list are enabled in the Turn Windows Features on or off dialog and click OK to confirm your selection.
.NET Extensibility 3.5
.NET Extensibility 4.5
Application Initialization
ASP
ASP.NET 3.5
ASP.NET 4.5
ISAPI Extensions
ISAPI Filters
Server-Side Includes
WebSocket Protocol
Default Document
Directory Browsing
HTTP Errors
Static Content
Custom Logging
HTTP Logging
Logging Tools
Static Content Compression
Basic Authentication
Request Filtering
Windows Authentication
Note: Do not modify the settings for other features that have been previously enabled in the Turn Windows Features on or off dialog.
Windows proceeds to install and configure the necessary components based on your selection. Reboot, if required.
For Windows Server 2008 R2, follow these steps:
HTTP Activation
Message Queuing (MSMQ) Activation
Windows proceeds to install and configure the necessary components based on your selection.
Use the following procedure to install the Web Deploy Tool to deploy WCF service to IIS.
Follow these steps:
Use the following procedure to install and access Microsoft SQL Server with Windows authentication.
Follow these steps:
The Login - New dialog opens.
You must allow your IIS to access SQL Server configuration using a known, trusted Windows credential. Proceed to the next section to understand how to configure IIS and SQL server configuration.
Note: Alternatively, you can change your connection string to use SQL authentication.
Complete the following tasks:
Use the following procedure to configure IIS.
Note: You must have administrator access to your computer to configure IIS.
Follow these steps:
Note: To open IIS console, click Start, Run, type inetmgr and click OK.
The Internet Information Services Manager window opens.
By default, you must be using an application pool called DefaultAppPool.
The Application Pool Identity dialog opens.
The object entry now changes to an underlined NETWORK SERVICE entry, indicating that the credential is available.
The Permissions dialog opens.
Use the following procedure to configure SQL Server.
Follow these steps:
You have successfully configured the NETWORK SERVICE credential to be used for running the IIS default application pool and also to be accepted as a valid Windows credential by your SQL Server instance.
Following are the prerequisites on the Client (machine on which CA Plex is installed):
Note: This prerequisite is needed ONLY if Visual Studio 2010 is not installed on the Client.
If Visual Studio 2010 is not installed, the following error message is displayed when you run Code Library Wizard:
error MSB4019: The imported project "C:\Program Files (x86)\MSBuild\Microsoft\VisualStudio\v10.0\WebApplications\Microsoft.WebApplication.targets" was not found. Confirm that the path in the <Import> declaration is correct, and that the file exists on disk.
To troubleshoot, search and download Microsoft Visual Studio 2010 Shell (Isolated) Redistributable Package from Microsoft Download Center (http://www.microsoft.com/en-us/download) and continue with the download.
If Web Deploy 3.5 is not installed on the Client, the following error message is displayed when you deploy WCF Service to IIS.
error MSB4057: The target "Package" does not exist in the project.
To troubleshoot, search and download Web Deploy 3.5 from Microsoft Download Center.
This section discusses how to auto deploy WCF Services to Internet Information Services (IIS) using the Code Library Wizard.
Follow these steps:
Important! You must start with a fully functioning Plex client-server application so that the functions you want to expose as service operations execute in the Plex environment correctly.
Do the following:
Follow the steps as outlined in the sample model ‘Dot NET Support and Code Libraries’.
The sample models are available in the following directory:
Note: To understand and learn about WCF service and required modeling concept, refer the sample model ‘Dot NET WCF Support’.
You must run the Code Library Wizard to deploy Order Code Library with OrderService Package deployed to IIS:
The IIS deployment process gets triggered. The process includes the following steps:
Note the Code Library Creation page display a message to indicate that the Code Library creation is complete.
If you receive any error, see Troubleshooting.
Do the following tasks:
Use the following procedure to confirm if the WCF Service is available in IIS.
Follow these steps:
You can see OrderService deployed under Default Web Site as follows:

Use the following procedure to confirm if the WCF Service is actually deployed.
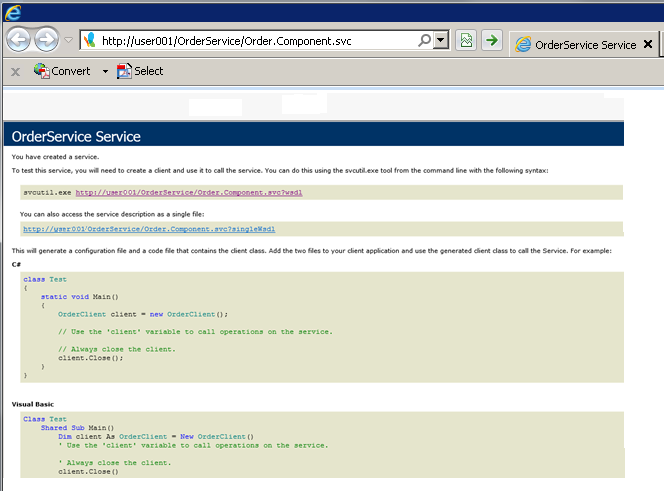
Follow these steps:
http://<Your Server Name>/OrderService/Order.Component.svc
The web page for the WCF Service is displayed:
There are various way to test Soap based Web Service. This section discusses how to test using SoapUI 5.1.
Use the following procedure to confirm if the WCF Service actually runs.
Note: Instructions to download and additional information about SoapUI are available at http://www.soapui.org/.
Follow these steps:
The New Soap Project dialog opens. Project Name is automatically filled; you may change it if you want.
http:// <Your Server Name>/OrderService/Order.Component.svc?wsdl
A new Soap project is created.
Process of requesting a service operation includes the following:
The right pane shows the requested service.data as follows:.

See Troubleshooting if the requested service data is not returned.
This section lists the error messages and action to be taken against each message under the following topics:
Code Library Wizard Error messages
Cause:
Indicates that a wrong Server name is entered, for example Server does not exist.
Solution:
Enter a correct Server Name and run the Wizard again.
Cause:
The Target Server does not have IIS running. (The server exists but IIS is not set up.)
Solution:
Make sure IIS is set up on the target server and run the Wizard again.
Cause:
An incorrect Web Site name is entered.
Solution:
Make sure to enter correct Web Site Name and run the Wizard again.
Cause:
You entered wrong User Name or Password OR the User you entered does not have required Authority to do remote IIS deployment.
Solution:
Make sure enter correct User Name and password OR If the User Name and Password is correct, make sure the User is a part of administrator group on the IIS server machine. And run the Wizard again.
Runtime Troubleshooting
Also, you may see the following message in the WCF Service runtime application log:
Cause:
Your SQL Server database did not authorize the Windows user credentials hosting the IIS process.
Solution:
Make sure that you follow and complete the steps described in Install, Configure and Access Microsoft SQL Server With Windows Authentication and Configure Internet Information Services (IIS) and SQL Server to Use Windows Authentication.
If your sample data includes more than six orders and you have successfully called the GetOrderHeaders SOAP operation passing ‘Y’ in the Control<Position> field and retrieving the first 6 orders, you can subsequently pass ‘N’ in Control<Position> to get the next set of records. However, calling GetOrderHeaders a subsequent time does not return any data. Also, Environment<*Returned status> will be set to INF.
Cause:
The WCF Service Connector is hosted using a binding protocol (basicHttpBinding) that does not support sessions to be stored in IIS for a client. Hence, the SQL result sets created by the CA Plex .NET runtime for the Order.Header.BlockFetch function are not stored between client calls.
Solution:
The solution depends on whether the overhead of introducing session management for your WCF Service Connector is acceptable to you or not.
Perform one of the following steps to resolve this problem:
This Documentation, which includes embedded help systems and electronically distributed materials, (hereinafter referred to as the “Documentation”) is for your informational purposes only and is subject to change or withdrawal by CA at any time. This Documentation is proprietary information of CA and may not be copied, transferred, reproduced, disclosed, modified or duplicated, in whole or in part, without the prior written consent of CA.
If you are a licensed user of the software product(s) addressed in the Documentation, you may print or otherwise make available a reasonable number of copies of the Documentation for internal use by you and your employees in connection with that software, provided that all CA copyright notices and legends are affixed to each reproduced copy.
The right to print or otherwise make available copies of the Documentation is limited to the period during which the applicable license for such software remains in full force and effect. Should the license terminate for any reason, it is your responsibility to certify in writing to CA that all copies and partial copies of the Documentation have been returned to CA or destroyed.
TO THE EXTENT PERMITTED BY APPLICABLE LAW, CA PROVIDES THIS DOCUMENTATION “AS IS” WITHOUT WARRANTY OF ANY KIND, INCLUDING WITHOUT LIMITATION, ANY IMPLIED WARRANTIES OF MERCHANTABILITY, FITNESS FOR A PARTICULAR PURPOSE, OR NONINFRINGEMENT. IN NO EVENT WILL CA BE LIABLE TO YOU OR ANY THIRD PARTY FOR ANY LOSS OR DAMAGE, DIRECT OR INDIRECT, FROM THE USE OF THIS DOCUMENTATION, INCLUDING WITHOUT LIMITATION, LOST PROFITS, LOST INVESTMENT, BUSINESS INTERRUPTION, GOODWILL, OR LOST DATA, EVEN IF CA IS EXPRESSLY ADVISED IN ADVANCE OF THE POSSIBILITY OF SUCH LOSS OR DAMAGE.
The use of any software product referenced in the Documentation is governed by the applicable license agreement and such license agreement is not modified in any way by the terms of this notice.
The manufacturer of this Documentation is CA.
Provided with “Restricted Rights.” Use, duplication or disclosure by the United States Government is subject to the restrictions set forth in FAR Sections 12.212, 52.227-14, and 52.227-19(c)(1) - (2) and DFARS Section 252.227-7014(b)(3), as applicable, or their successors.
Copyright © 2014 CA. All rights reserved. All trademarks, trade names, service marks, and logos referenced herein belong to their respective companies.