

You can define properties to the fields in an entity. Properties provide information about the type of data each field stores.
To define the properties of Project’s fields
This changes the Model Editor source object type to Field, and changes the verb list so that only verbs appropriate for fields are contained in it.
Note: The cursor changes to a closed parcel icon when you drag an object. It changes to an open parcel icon when it is over a location where you can drop the object:
The following table shows the closed and open parcel icons:
|
Closed Parcel Icon |
Open Parcel Icon |
|
|
|
Note: You have to scroll down the Object Browser to find the FIELDS/Identifier field. You can use the filter box at the top of the Object Browser to only show some of the library items. In this case, you could type *Identifier* to display only FIELDS/Identifier. Remember to set the filter back to * when you are done.
You just created the triple Project ID is a FIELDS/Identifier.
Click the Refresh button on the Object Browser.
The Project ID field has a plus sign (+) to the left, indicating that it now has scoped objects.
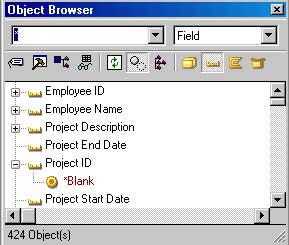
You can see that Project ID now has the value *Blank, but you cannot tell much else about what it inherited from FIELDS/Identifier. Values are another type of CA Plex object.
When you drag one or more objects to the body of the Model Editor, the display changes to show you only the triples that define those objects. This is called focusing the Model Editor. When you drag the Project ID field to the Model Editor, it focuses on this field, showing the triple Project ID is a FIELDS/Identifier. This still does not give you much information.
The Model Editor shows another level of detail.
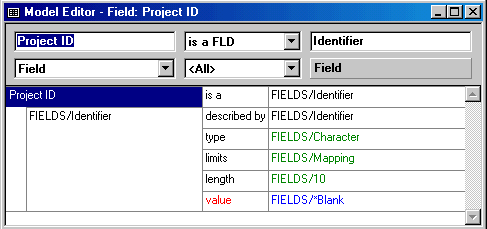
Now you can see that Project ID has inherited a data type of character and length of 10, along with the value *Blank (which you saw in the Object Browser in Step 7).
Note: In Step 5, you dragged the library object FIELDS/Identifier from the Object Browser to the target object box in the Model Editor. You can enter the name of the object into the target object box (without the library name) to accomplish the same thing. In Step 5, you would have entered Identifier.
Important! If you entered a wrong object name, you could create a new object with the wrong name. If this happens, find the erroneous object in the Object Browser and delete it, selecting the Ripple Delete check box on the Delete dialog.
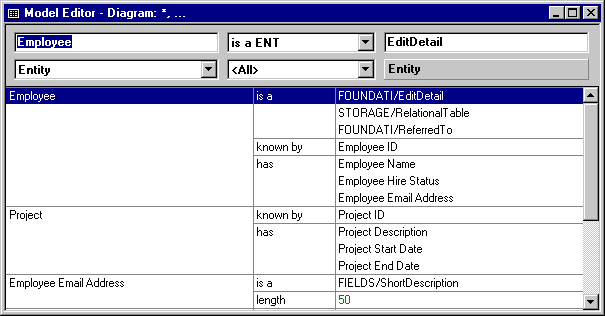
All of the triples appear in the model again.
Note: If your Model Editor displays many more triples than shown in the previous graphic, then you have your model set to display library objects. If this is the case, click the Show/Hide Library Objects toolbar button.
The Model Editor displays the triple as:
Project Description is a FIELDS/ShortDescription
This indicates that you correctly spelled the name of the pattern library field.
Note: If you create a new object for a model, and it happens to share the name of a library object, you must rename your object or delete it (if you did not intend to create it).
Project Start Date is a DATE/CheckedDateISO
Project End Date is a DATE/CheckedDateISO
Project Description Length NBR 255
Your Model Editor should look like this:
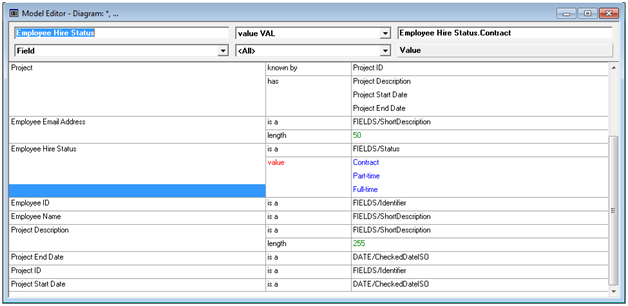
Inheriting from DATE/CheckedDateISO gives the fields functionality to ensure that end users enter valid dates.
|
Copyright © 2014 CA.
All rights reserved.
|
|

