

To change the collection definitions, enter any of the following parameters:
The box in the upper left-hand corner contains the names of the current collection definitions. When you click an entry, the parameters for that collection definition appear.
The Collection name is a text field that shows the name of the definition currently displayed. When creating a new definition, use this field to enter the name. Names can be up to 20 characters in length.
Enter the working set quota. This value is a decimal number greater than 1024 that sets both the working set quota and the working set extent if the value is higher than the default values. By default, the working set quota is 2048 and the working set extent is 20K. You can override this default by specifying values for individual nodes.
Enter the minimum number of blocks of free disk space needed on each database disk for each node in the definition. Data collection suspends recording if there are fewer blocks of free disk space available. You can override this default by specifying values for individual nodes.
The default database path for all nodes in the collection definition. You can override this default by specifying values for individual nodes.
This displays the nodes in a collection definition. Default values are displayed. Although the changes that you make appear as they are made, they are not applied to the collection definition until you click the Create or Modify buttons at the bottom of the window.
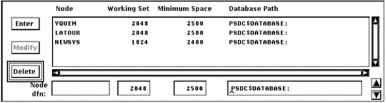
To add a node, enter the name and make any modifications you want to the default values shown to the right. Then press Return or click Enter.
To modify a node entry, double-click it. The definition appears under the list. Make the changes you wish and then press Return or click Modify to the left of the box.
To delete one or more nodes, click the entries in the list, and then click Delete to the left of the box.
To change the order of the nodes in the list, click the node to be moved, and then the arrows in the right-hand corner. Only one node can be moved at a time.
The changes you make in the node definition section do not modify the collection definition until you click Create or Modify to update the entire collection definition.
Enter lets a new node to be added to the node list. When you type in a new node name, you can click Enter or press Return to add it to the list.
Modify takes changes you make to a node definition and puts the changes into the list. Modify is disabled until you have selected a node from the list by double-clicking on the node. Changes to the collection definition take effect when you click Modify at the bottom of the window.
Delete removes any selected, or highlighted, nodes from the list. The nodes are removed from the collection definition when you click Modify at the bottom of the window.
To enable hot file collection in the CPD collection definition, the toggle button to the left must be on. This lets you specify the queue length in the text entry box. This pertains only to the CPD collection definition because only the primary data collector collects hot file data.

Enter the minimum average queue size that a disk must have to start collecting the hottest files for that disk. This value is a decimal number less than 100.00 and greater than or equal to 0.00. The default is 0.33.
If the toggle button is off, no hot file data is collected.
If the toggle button is on, you must specify a queue length or accept the default value.
The Collection interval specifies the number in seconds in a sampling interval. At the end of this time period, data is recorded into an interval record.
The CPD collection definition has an interval of 120 seconds which cannot be modified.
You can specify an interval from 1 to 3600 seconds for other definitions.
Enter the number of days that data is to be retained. The default is seven days for the primary data collector. Data files are automatically deleted from the database when they are older than the specified number of days.
For alternate data collectors, the default is 99,999 days which lets you control the how long data files are retained.
This value should be coordinated with any data archiving and the amount of free space required for the database area. For information on archiving, see the Performance Agent Administrator Guide.
The date and time on which the collection definition goes into effect. A data collection process will hibernate until this date and time. The formatting is as follows: DD-MMM-YYYY HH:MM
The date and time on which a data collection process Is to terminate. The formatting is as follows: DD-MMM-YYYY HH:MM
A 24-hour clock is displayed. A bar on the right side of the clock lets you scroll to each day of the week. By default, data collection is set ON for each hour of the day, every day of the week.
To set the clock:
To turn off data collection for a specific hour, point to the hour on the clock and click MB1. Holding MB1 down and dragging the pointer around the clock will set data collection to the value of the initial hour setting for a series of hours.
To duplicate a day's schedule
The Class Coverage section lets you specify which major areas of performance data should be collected. While the CPD can not be limited, other collection definitions can be limited to only those classes of data needed for special-purpose analysis.
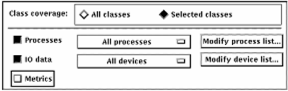
The toggle buttons enable you to choose all or selected classes.
Turn on this toggle button to collect all classes of data.
Turn on this toggle button to choose which classes of data you wish to collect: processes; IO data; or metrics.
Turn on this toggle button to collect Process data or to collect process data for specified processes.
Turn on this toggle button to collect IO data or to collect IO data on specified devices.
The Metrics field lets you choose whether or not to collect a summary set of system metrics including such data items as memory utilization, CPU, and I/O parameters.
When you select the collection of process data, the All Processes option is collected by default. If you have modified the process list, the menu is revised to reflect the type of coverage list (include or exclude) and the count of specified processes. Clicking on this menu will display the correct list. This menu provides a convenient way to view the coverage list.
Click this button to specify a list of processes in the Collection Coverage List box. You specify a list of processes to be included in collection or excluded from collection.
When you select the collection of IO data, the All Devices option is collected by default. If you have modified the device list, the menu is revised to reflect the type of coverage list (include or exclude) and the count of specified devices. Clicking on this menu will display the correct list. This menu provides a convenient way to view the coverage list.
Click this button to specify a list of devices in the Collection Coverage List box. You specify a list of devices to be included in collection or excluded from collection.
For Process and Disk classes, you can collect data for specific lists of items or exclude lists of items.
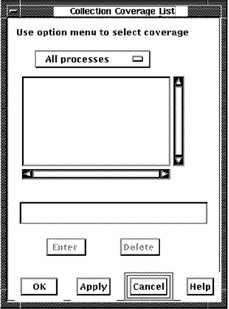
To create a list of processes, push down and hold on the uppermost box in this window, which displays All processes or one of the other options. When the menu appears, pull down to the menu item you want and release.
Click the text entry field to activate the cursor.
To add a process name, enter a name and press Return or click the Enter button. The name will appear in the list box and be cleared from the text entry field.
To delete a name, click the name in the name list box, then click the Delete button. The name is removed from the list box. To remove multiple names, click the names and then click the Delete button.
To create a list of devices, push down and hold on the uppermost box in this window, which displays All devices or one of the other options. When the menu appears, pull down to the menu item you want and release.

Click the text entry field to activate the cursor.
To add a device name, enter a name and press Return or click the Enter button. The name will appear in the list box and be cleared from the text entry field.
To delete a name, click the name in the name list box, then click the Delete button. The name is removed from the list box. To remove multiple names, click the names and then click the Delete button.
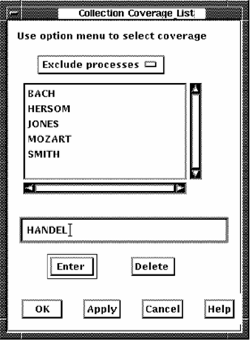
The following sample Collection Coverage List box shows a list of processes for which no data is to be collected.
The type of list being managed cannot be converted. For example, an include processes list cannot become an exclude processes list. All list entries must be deleted before the coverage list type can be changed.
|
Copyright © 2008 CA.
All rights reserved.
|
|