Previous Topic: Add Managed Items to a Group ManuallyNext Topic: Glossary


Add Managed Items to a Group Using Rules

It can be difficult to keep custom groups up-to-date when systems and networks change. Therefore, you can use rules to populate your custom groups. Newly discovered items that meet rule specifications are added to groups. Similarly, if they do not meet rule requirements or are no longer monitored, items are removed.

Follow these steps:

  1. Log in to CA Performance Center.
  2. Select My Settings, and click My Custom Groups.

    The My Custom Groups page shows a tree view of group structure and a tabbed view of group properties.

  3. Expand nodes in the Groups tree to locate and select the group to which you want to add managed items.

    If items have already been added to this group, they appear in the right pane.

  4. Click the Properties tab in the right pane.
  5. Click the Rules tab on the Properties page, and then click Add Rule.

    The Add Rule dialog opens.

  6. Supply a name for the rule.
  7. Select the type of managed item that you would like to add to the group from the Add list.

    Available options vary based on the data sources registered with CA Performance Center.

  8. Click Add Condition.

    A row of drop-down lists and fields appears.

    A row of fields appears when you add a filter to a group rule.

  9. Select a method for identifying managed items. For example, select Device Type. The options include item description, name, type, and IP address.

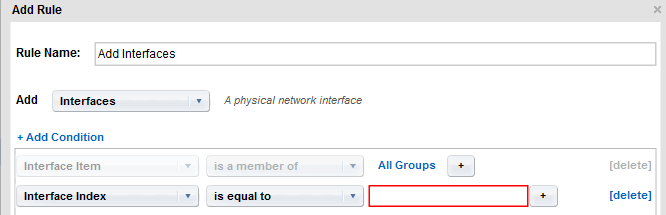
    The remaining lists are updated to match the type of item selected.

  10. Select a method for matching from the second list. For example, select 'is equal to'.

    Important! Use CIDR notation for the IP addresses that you supply for the 'is in subnet' and 'is not in subnet' options. Use dotted-decimal notation for the IP addresses that you supply for the 'is between' and 'is not between' options.

  11. (Optional) Enter a text string to match in the remaining condition field. For example, to add all routers and servers in the Southwest region, supply a string that corresponds to the appropriate naming convention, such as "sw*".

    Note: Wildcard characters are accepted in this field, such as an asterisk (*) for a multicharacter match.

  12. (Optional) To add 'OR' matches, click + at the end of the condition.

    An 'OR' drop-down list appears.

  13. (Optional) To add 'AND' matches, click Add Condition.

    Three more dropdown lists appear.

    Note: An 'AND' condition indicator does not appear. By contrast, an 'OR' indicator appears when you select an 'OR' operator.

  14. Click Preview Results to confirm that the new rule is including the items you want.

    The results are shown in the Group Rules Preview window. You can expand each item type to see the specific items added.

  15. (Optional) Click +Add Rule to add other item types to the group.

    Each item type requires its own rule.

  16. When you have finished creating rules, you can click Save or Save and Run Rules: