

How to Set up the Cluster Environment
How to Set up the Cluster Environment
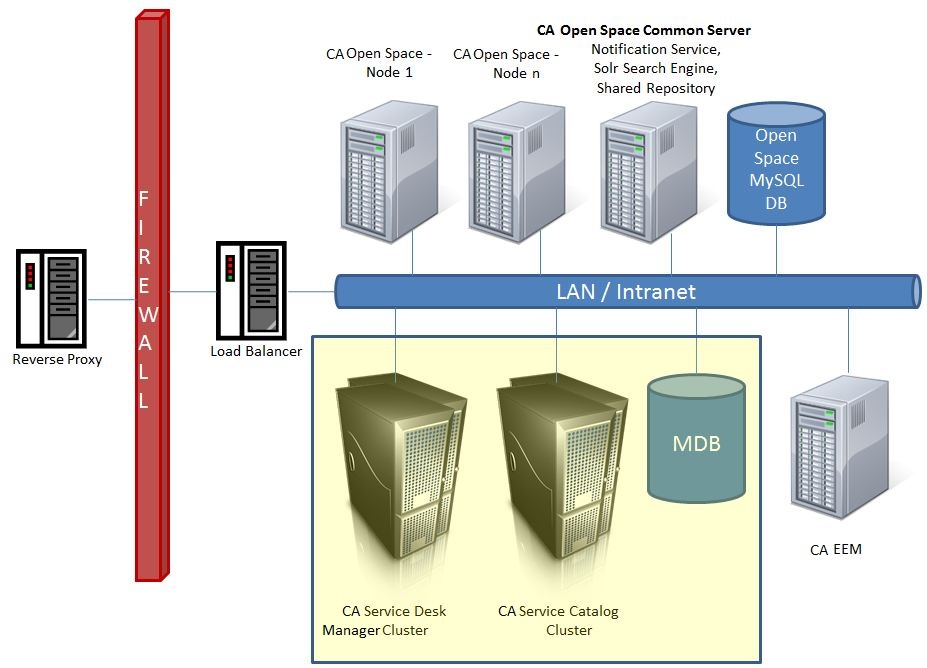
For the optimal performance, set up CA Open Space on a cluster environment. In an ideal cluster environment, multiple server instances with identical configuration span across multiple nodes. All instances in a cluster work together to provide high availability, reliability, and scalability.
You need the following minimum requirements for the cluster environment:
- 2 machines to set up the CA Open Space nodes
- 1 machine to set up Solr 1.4.1, Notification Server, and Shared Repository
- 1 machine for MySQL Database server
- 1 machine for Load Balancer
- Following software:
- Liferay 6.1 CE GA 1 - Standard Requirement
- MySQL Community Edition Server 5.5 - Standard Requirement
- EEM, if you plan to set up the ITSM environment.
The following diagram shows an ideal cluster environment for CA Open Space:
Follow these steps:
- Set up and Configure Node 1
- Set up and Configure Node 2
- Configure the Load Balancer
Set up and Configure Node 1
Set up CA Open Space on node 1 and configure it for the cluster environment.
Follow these steps:
- Install CA Open Space on a machine or node 1. Ensure that you give the Database Host as the machine name.
- After the installation, add all schema privileges for the root user by clicking Add Entry from the Schema Privileges tab in Mysql Workbench. Ensure that you have checked the Grant option.
- Onboard a tenant and configure the CA SDM data source. For more information, see the Administration Guide.
- Shutdown CA Open Space in services.msc.
- Open the portal-ext.properties file located in the OSOP folder of the CA Open Space installation directory.
- Append the file with the following lines:
#cluster
cluster.link.enabled=true
ehcache.cluster.link.replication.enabled=true
lucene.replicate.write=false
net.sf.ehcache.configurationResourceName=/custom-ehcache/hibernate-clustered.xml
ehcache.multi.vm.config.location=/custom-ehcache/liferay-multi-vm-clustered.xml
- Download the custom-ehcache.zip file from the OSOP\tools folder of the CA Open Space installation directory.
- Extract the zip file in the OSOP\tomcat-7.0.23\webapps\ROOT\WEB-INF\classes\ folder of the CA Open Space installation directory.
Important! Ensure that after the extraction, the custom-ehcache folder is created in the same path as the hibernate-clustered.xml and liferay-multi-vm-clustered.xml files.
- Open the server.xml file from the OSOP\tomcat-7.0.23\conf\ folder of the CA Open Space installation directory.
- Replace <Engine name="Catalina" defaultHost="localhost"> with <Engine name="Catalina" defaultHost="localhost" jvmRoute="node1">.
- Restart CA Open Space services.
- Install and Configure Apache Solr and Configure Liferay to use Sorl for Searching.
- Configure the common repository for attachments on the CA Open Space common server. For more information, see the Liferay documentation.
- Copy the OSOP\jetty-7.2.2.v20101205 folder from the CA Open Space installation directory to the CA Open Space common server to configure the notification server on the common CA Open Space server.
- Configure the notification server on the CA Open Space node:
- Open portal-ext.properties file and search for cometd.
- Replace localhost with the hostname or IP address of CA Open Space common server and port with the port number on which Jetty is running. For example,
#cometd configurations begin
cometd.enable=true
cometd.contextPath=/notification-server
#internal properties are used by java client
cometd.internal.host=localhost
cometd.internal.port=18686
cometd.internal.protocol=http
#external properties are used by jquery clients
cometd.external.host=localhost
cometd.external.port=18686
cometd.external.protocol=http
#cometd configurations end
- Stop CA Open Space Jetty server from service.msc.
CA Open Space node 1 is configured.
Install and Configure Apache Solr
-
Install the Apache Solr on the CA Open Space common server.
Follow these steps:
- Download Solr 1.4.1 on the CA Open Space common server. For more information, see any Solr website, example, http://archive.apache.org/dist/lucene/solr/1.4.1.
-
From the Solr distribution, copy example folder so that CA Open Space is also at the same level.
- Define the environment variable as the location for Solr to store the search index.
Example: $SOLR_HOME=/openspace/solr
Note: This environment variable can be defined on the start up sequence of the operating system, in the environment for the user who is logged in, or in the start-up script for your application server. If you are using Tomcat to host Solr, modify setenv.sh or setenv.bat and add the environment variable there.
- Use this environment variable as a parameter for JVM during the start up configuration of the application server.
Note: If you are using Tomcat, edit catalina.sh or catalina.bat and add the -Dsolr.solr.home=$SOLR_HOME to the $JAVA_OPTS variable.
- Install Solr on the CA Open Space common server. For more information, see http://lucene.apache.org/solr.
Note: Install the Solr search engine on a separate machine from Liferay. To integrate Solr search engine with Liferay, restart the application server.
- Shut down Solr.
- From the Solr distribution, copy solr.war to the webapps directory of your servlet container.
- Start Solr on the Jetty server:
- Go to $SOLR_HOME on the command prompt.
- Run java -Dsolr.solr.home=/openspace/solr -jar start.jar to set the java system property solr.solr.home.
Configure Liferay to use Solr for Searching
Do not run Liferay and Solr search engine on the same machine.
Follow these steps:
- Install the Solr Liferay plugin on CA Open Space node 1.
- Copy solr-web.war file from OSOP\tools to the OSOP\deploy folder of the CA Open Space installation directory.
- Open solr-spring.xml from the WEB-INF/classes/META-INF folder.
- Modify the following value to point to the server where Solr is up and running:
<constructor-arg type="java.lang.String" value="http://localhost:8080/solr" />
- Save the solr-spring.xml file and place it back in the plugin archive.
- Copy the schema.xml file from the extracted solr-web folder (docroot/WEB-INF/conf) to $SOLR_HOME/conf folder of the CA Open Space common server.
- Restart Solr on the CA Open Space common server.
Liferay server search is now upgraded to use Solr.
- Select Control Panel, Server, Server Administration.
- Click Execute button next to reindex all search indexes at the bottom of the page.
Liferay will begin sending indexing requests to Solr for execution. Once Solr has indexed the data, a search server runs independently of all the CA Open Space nodes.The CA Open Space search now uses the Solr as the search index. This is ideal for a clustered environment, as it allows all the CA Open Space nodes to share one search server and one search index, and this search server operates independently of all the nodes.
Set up and Configure Node 2
Set up and configure CA Open Space on node 2 for the cluster environment.
Follow these steps:
- Stop the CA Open Space services on node 1.
- Create backup of node 1:
- (Windows) Run TakeBackup.bat from the bin folder of the CA Open Space installation directory.
- (Linux) Run TakeBackup.sh
Backup is created in CA Open Space_installation\CAOpenSpaceBackup.car file of the CA Open Space installation directory.
- On node 2, install the similar configuration CA Open Space as set up in node 1:
- Select Use existing database option.
- Ensure that you use the same database host name as used during the CA Open Space node1 setup.
- Select node1 backup CAOpenSpaceBackup.car.
Note: Ensure user has all the privileges according to the basic installation.
- Ensure that you extracted the custom-ehcache.zip file in the OSOP\tomcat-7.0.23\webapps\ROOT\WEB-INF\classes\ folder of the CA Open Space installation directory.
Important! Ensure that after the extraction, the custom-ehcache folder is created in the same path as the hibernate-clustered.xml and liferay-multi-vm-clustered.xml files.
- Open the server.xml file from the OSOP\tomcat-7.0.23\conf\ folder of the CA Open Space installation directory and replace <Engine name="Catalina" defaultHost="localhost"> with <Engine name="Catalina" defaultHost="localhost" jvmRoute="node2">.
After the successful configuration, two CA Open Space nodes run with the same database in a cluster.
Configure the Load Balancer
Configure the load balancer to increase scalability and to maintain performance.
Follow these steps:
- Download and install Apache HTTP server 2.2.
- Download mod_jk.so and copy it to APACHE_HOME\modules\ directory.
- Modify the APACHE_HOME\conf\httpd.conf file:
- Append the file with the following lines:
JkWorkersFile conf/workers.properties
JkLogFile logs/mod_jk.log
JkLogLevel info
JkLogStampFormat "[%a %b %d %H:%M:%S %Y]"
JkMount /* loadbalancer
- Add the following entry in the httpd.conf file (if not added ):
# Load the mod_jk connector
LoadModule jk_module modules/mod_jk.so
- Define the IP addresses of node1 and node 2 in the APACHE_HOME\conf\workers.properties file:
worker.node1.host = <IP ADDRESS OF NODE1>
worker.node2.host = <IP ADDRESS OF NODE2>
- Start load balancer.
- On the client machine (from where you are accessing CA Open Space) modify C:\Windows\System32\drivers\etc\host file to point to the IP address of the Load Balancer. For example, if you on boarded a tenant with virtual host as test.openspace.com and the IP address of the Apache server is 10.11.12.13, then you have to add 10.11.12.13 test.openspace.com line in the host file. This allows access to the virtual host from the client machine.
Load balancer is configured.
- Stop the CA Open Space services on node 1 and verify that requests are getting mapped to node 2 even if node 1 is down.
Copyright © 2013 CA.
All rights reserved.
|
|