Customizing CA Network Flow Analysis › Create Time Filters
Create Time Filters
Create time filters to help users create reports that contain streamlined data. For example, suppose that your users need some reports that describe network traffic during business hours. You create a time filter for Monday through Friday from 8:00 A.M. to 5:00 P.M. You may also want to create time filters for the timeframes of specific operations that occur in your environment, such as automated backups.
You can also use the time filters that you create to configure traps on the Trap Configuration page.
Note: For additional information about the use of time filters, see the topic Create Traps.
The custom time filters are available to users in Time Filter option lists in the following locations:
- Specify Schedule page of the Custom Report wizard or Analysis wizard.
- Options that operators display by clicking the time period setting in a drilldown interface report of any of the following types: Overview, Protocols, ToS, Hosts, Conversations, Flows, Utilization, and AS Numbers.
Follow these steps:
- Select Administration from the NFA console menu.
The Administration page opens.
- Select Time Filters under the Administration: Reporting label in the Administration menu.
The Time Filter Configuration page opens and displays a list of the currently configured time filters.
- Click Add.
The Time Filter Configuration page displays options for adding a time filter.
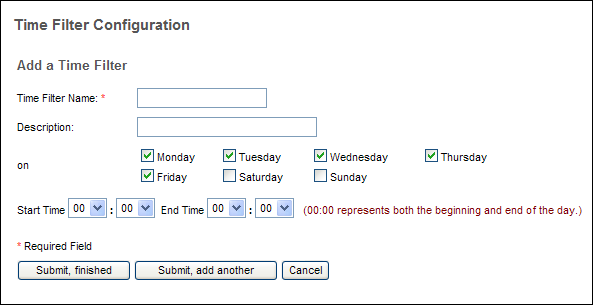
- Enter values for the following options:
- Time Filter Name: Define the time filter identifier, which appears in the following lists:
- Time Filter Configuration page list (for administrators)
- Time Filter options that are available on the Specify Schedule page of the Custom Report wizard
- Time Filter options that are available when a user or administrator clicks the time period setting in a drilldown interface report of any of the following types: Overview, Protocols, ToS, Hosts, Conversations, Flows, Utilization, and AS Numbers
- Description: (Optional) Add information to identify the time filter, which appears in the list of time filters on the Time Filter Configuration page.
- on: Accept the default settings (Monday through Friday) or select other days for collecting report data.
- Start Time and End Time: Accept the default settings for the start and end of the daily time span or select custom settings, using the 24-hour clock system. The default setting of 00:00 and 00:00 includes data for all 24 hours of the day.
For example, to restrict the reporting period to business hours, select 08:00 as the start time and 17:00 as the end time. To set up a filter for backups that run from 11 P.M. Tuesday to 3:00 A.M. Wednesday, select Tuesday, then select 23:00 and 03:00.
- Save the time filter by clicking one of the following buttons:
- Submit, finished: Save the time filter and return to the time filter list.
- Submit, add another: Save the time filter and keep the Add options open so you can configure another time filter.
Note: To delete a time filter, select it from the list of available time filters, click Delete, then confirm the deletion when prompted. To edit a time filter, select it from the list of available filters, change any of the options that are displayed, then click Submit.

