

You can install a downloaded product through the Software Catalog, Base Install Packages section. The process starts a wizard that guides you through the installation. At the end of the wizard, a task dynamically invokes the SMP/E and other utilities required to install the product.
Note: If your site uses only one file system (for example, only zFS or only HFS), you can configure CA MSM to use this file system for all installed products regardless of the file system that the product metadata specifies. The settings are available on the System Settings, Software Installation page. The file system type that you specify will override the file system type that the product uses.
Any USS file system created and mounted by CA MSM during a product installation is added in CA MSM as a managed product USS file system. CA MSM lets you enable and configure verification policy that should be applied to these file systems when starting CA MSM. For verification results, review CA MSM output.
These settings are available on the System Settings, Mount Point Management page.
During installation, you select the CSI where the product is to be installed, and specify its zones. You can either specify target and distribution zones to be in the existing CSI data sets, or create new data sets for each zone.
Note: While you are working with a particular SMP/E environment, the SMP/E environment is locked and other CA MSM users cannot perform any action against it. When the task finishes, or when you log out from CA MSM, or when your CA MSM session is inactive for more than 10 minutes, the lock releases.
Follow these steps:
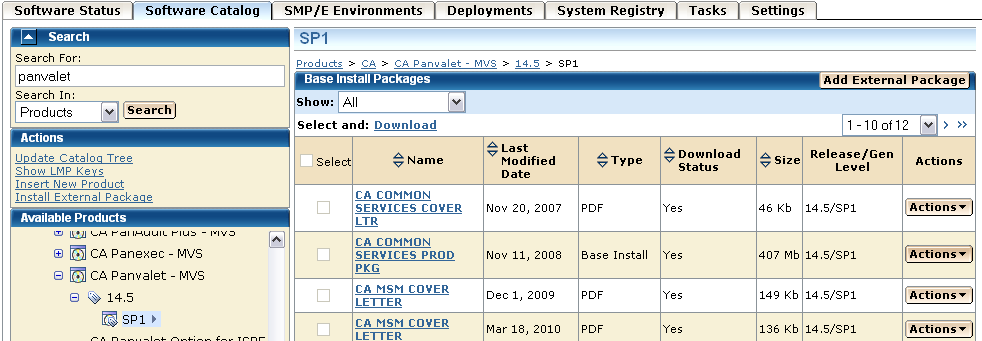
Information about the product appears in the Base Install Packages section at the right, for example:
Note: If a product is acquired external to CA MSM, you can install the product using the Install External Package link. The process starts the wizard.
or
The Introduction tab of the wizard appears.
Note: An information text area can appear at the bottom of the wizard. The area provides information that helps you progress through the wizard. For example, if a field is highlighted (indicating an error), the information text area identifies the error.
Note: If the license agreement appears for the product that you are installing, scroll down to review it, and accept it.
You are prompted to select the type of installation.
(Optional) If you select Custom Installation, you are prompted to select the features to install. Select the features, and click Next.
A summary of the features to install appears, with any prerequisites.
You are prompted for the CSI to use for this installation.
You are prompted to locate the installed prerequisites. If an installed prerequisite is in more than one CSI or zone, the CSI and Zone drop-down lists let you select the specific instance. After you make the selections, click Next.
You are prompted for the CSI to use for this installation.
Note: You can click Custom Installation to select only those features that have the required prerequisites. You can click Back to return to previous dialogs.
If you select Create a New SMP/E CSI, you are prompted to specify the CSI parameters.
If you select an existing CSI, the wizard guides you through the same steps. Allocation parameters that you specify for work DDDEFs are applied only to new DDDEFs that might be created during the installation. The existing DDDEFs if any remain intact.
Note: Only CSIs for the SMP/E environments in your working set are listed. You can configure your working set from the SMP/E Environments tab.
After you select a CSI or specify a new CSI, you are prompted for the target zone to use.
Note: If you select Create a New SMP/E Target Zone, you perform additional steps similar to the steps for the Create a New SMP/E CSI option. The target zone parameters are pre-populated with the values that are entered for the CSI. You can change them.
If you want the target zone to be created in a new data set, select the Create New CSI Data Set check box and fill in the appropriate fields.
After you select or specify a target zone, you are prompted for the distribution zone to use.
Note: If you selected to use an existing target zone, the related distribution zone is automatically selected, and you cannot select other distribution zone. If you selected to create a new target zone, you create a new distribution zone, and you cannot select existing distribution zone.
After a distribution zone is selected or specified, a summary of the installation task appears.
Note: If you select Create a New SMP/E Distribution Zone, you perform additional steps similar to the steps for the Create a New SMP/E CSI option. The distribution zone parameters are prepopulated with the values that are entered for the target zone. You can change them.
A dialog that shows the progress of the task opens. When the task completes, you can click Show Results on the Progress tab to close this dialog. The task output browser opens and you can view the action details. Click Close to close the task output browser.
Note: While a task is in progress, you can perform other work. You can click Hide to exit the dialog and view the task status later on the Tasks tab.
|
Copyright © 2010 CA.
All rights reserved.
|
|