

This section describes how to install CA GTS and ChekPlex in a Sysplex environment.
CA GTS installs during the CA JCLCheck installation; CA GTS resides on the CA JCLCheck distribution tape. During the CA JCLCheck installation, you have the option of not installing CA GTS if it is already installed with another product. If CA GTS (FMID CD51C00) is not installed, you can use the installation procedures in the CA GTS User Guide to install it from the CA JCLCheck product tape.
CA GTS must be configured for use with CA JCLCheck. You decide on which systems you want to run ChekPlex. You can run CA GTS on every system in your environment, but in some cases this is not necessary. Generally, you will need a ChekPlex node for each unique environment where you want to remotely check JCL. Additionally, ChekPlex needs to be available on the systems where you will be requesting the remote validation.
Example of a Sysplex Environment
In the example environment, a job that runs on SYSPLEX1 usually has the same resources (DASD, files, proc libraries, and security environment) available regardless of the LPAR the job runs on. Generally, this is also true for SYSPLEX2. Therefore, the JCL can be checked on any of the LPARS in the Sysplex with the same results.
If you do not want to have remote validation originate from these systems because they are production Sysplex environments, then ChekPlex and CA GTS only need to run on one LPAR in each of the Sysplex environments.
On SYSPLEX3, the development environment, ChekPlex would most likely be run on both LPARS since the requests for validation could be from either LPAR.
The configuration that is best for you depends on your environment.
Each ChekPlex runs within a CA GTS started task. CA GTS provides the communications infrastructure for ChekPlex.
Before you can implement ChekPlex, you need to configure CA GTS. A GTS to GTS connection needs to be defined between each CA GTS that you run in your network. A unique name is required for each CA GTS node.
Note: For information on how to implement a CA GTS system, see Configuration and Security in the CA GTS User Guide. CA GTS connections are discussed in the topic Defining GTSPLEX Connections.
Important: Configure CA GTS before proceeding.
ChekPlex registers with the General Transaction Server (GTS) to provide services related to JCL validation. ChekPlex shares the CA GTS network architecture. CA GTS must be setup to have communication paths to all servers participating in the validation process.
The CA GTS load library must be present in STEPLIB concatenation for every job using ChekPlex remote validation, or the load library needs to be in linklist. JCLCheck does not support ISPLLIB.
The following diagram shows a ChekPlex environment registered to one General Transaction Server.
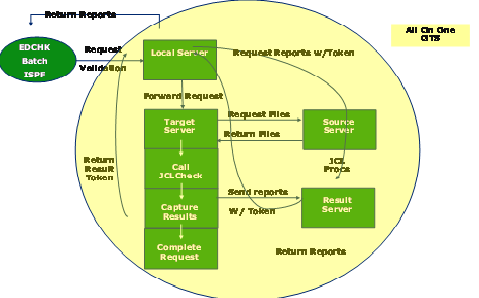
Note: For a description of the ChekPlex process, see ChekPlex Overview.
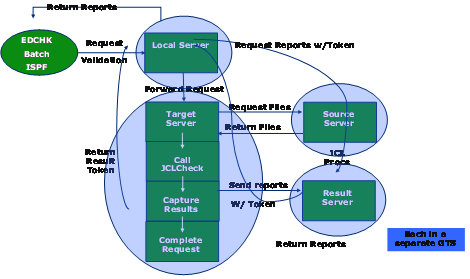
The following diagram shows a ChekPlex environment registered to multiple, General Transaction Servers. Each ChekPlex server is defined to a separate GTS.
All CAGSPARM members support the following TSO style syntax:
Perform the following steps to add a ChekPlex subsystem to CA GTS:
The CLIENT00 file must contain the following line:
PRODUCT(IDENTITY(CP) MODULE(CAGSCPLD))
Note: For information on CA GTS syntax and additional parameters, see the CA General Transaction Server User Guide.
LOGDD(ddname ddname ddname …) TIMESTAMP(YES)
These ddnames are defined in the PARMCP00 startup deck. If you use the default names provided in PARMCP00, the statement should look like the following:
LOGDD(CPDEBUG CPERROR CPLOGSS CPLOGTS CPLOGRS) TIMESTAMP(YES)
Note: For information on CA GTS syntax and additional parameters, see the CA General Transaction Server User Guide.
//CPDEBUG  DD SYSOUT=*,DCB=(LRECL=180,RECFM=F)
//CPERROR  DD SYSOUT=*,DCB=(LRECL=180,RECFM=F)
//CPLOGSS  DD SYSOUT=*,DCB=(LRECL=180,RECFM=F)
//CPLOGTS  DD SYSOUT=*,DCB=(LRECL=180,RECFM=F)
//CPLOGRS  DD SYSOUT=*,DCB=(LRECL=180,RECFM=F)
|
Copyright © 2014 CA.
All rights reserved.
|
|