Previous Topic: Test the Default Multicast AddressNext Topic: Create the Master Node for JBoss 6.1


Create the Master Node for JBoss 5

You begin creating the JBoss 5 cluster by creating the master node, the first node in the cluster.

Note: On Windows, IPv6 is not supported for a JBoss cluster with JDK 1.6, the JDK that works with JBoss 5. Each node must be an IPv4 system or part of an IPv4/IPv6 stack.

To create the master node for JBoss 5

  1. Install JBoss and the JDK on the computer.
  2. Start the CA IdentityMinder installation program.

    release represents the current release of CA IdentityMinder.

    Important! Make sure that you have the collected the information needed by the installer, such as user names, host names, and ports.

    Be sure to provide the existing CA IdentityMinder database credentials during the install and that all values from the previous release of CA IdentityMinder are replaced with 12.6.2 values. If you are upgrading from CA Identity Manager r12 and you have different database stores for task persistence, workflow, audit, and reports, you will need to update the data sources manually after installation to point to the separate stores.

    Note: If you see options to upgrade the workflow database and migrate task persistence data during the installation, enable those options. They appear in some situations when your previous installation was CA Identity Manager r12.
  3. Complete the Select Components section by including the CA IdentityMinder Server and any other components that you need on this system.
  4. Complete the other sections based on your requirements for the installation.
  5. When you enter any password or shared secret in the installation, be sure to provide a password that you can recall when needed.

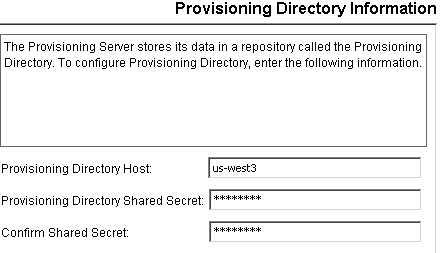
    The user enters Provisioning Directory information.

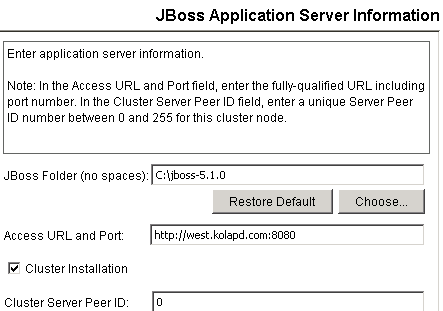
  6. Complete the JBoss Application Server Information page as follows:
    1. Enter the Access Server URL and port with the URL and port number of the web server used for load balancing.
    2. Select Cluster Installation.
    3. Enter a Peer ID, a unique number between 0 and 255. Make a record of the Peer ID, so that you use a different number for other nodes.

    The user enters JBoss information.

  7. If the multicast address test failed, perform one of the next two steps for Windows or Solaris.
  8. On a Windows system, edit run.bat in the jboss_home\bin directory:
    1. Locate the line that begins as follows:
      ARGS="${ARGS}
      
    2. Add a multicast address preceded by the -u argument as follows:
      ARGS="${ARGS} -g IdmPartition -Djboss.messaging.ServerPeerID=PeerID -u multicast-address"
      
    3. If you are installing on a system that supports IPv6/IPv4, uncomment the IDM_OPTS entry:
      set IDM_OPTS=%IDM_OPTS% -Djava.net.preferIPv4Stack=true
      
  9. For a Solaris system, edit run.sh in the jboss_home\bin directory:
    1. Locate the line that begins as follows:
      ARGS="${ARGS}
      
    2. Add a multicast address preceded by the -u argument as follows:
      ARGS="${ARGS} -g IdmPartition -Djboss.messaging.ServerPeerID=PeerID -u multicast-address"
      
    3. If you are installing on a system that supports IPv6, modify one of the following properties in the IDM_OPTS entry:
      • For IPv6 only systems, uncomment the following entry:
        	IDM_OPTS="$IDM_OPTS -Djava.net.preferIPv6Addresses=true"
        
      • For IPv6/IPv4 systems, uncomment the following entry:
        	IDM_OPTS="$IDM_OPTS -Djava.net.preferIPv4Stack=true"
        

If any issues occur during installation, inspect the installation logs.