

|
|
|
Advanced authentication requires you to use a SiteMinder Policy Server in your implementation. The application server hosting the CA IdentityMinder Server is on a different operating environment from Web Server. To provide forwarding services, the Web Server requires:
The Web Agent controls the access of users who request CA IdentityMinder resources. Once the users are authenticated and authorized, the Web Agent allows the Web Server to process the requests.
When the Web Server receives the request, the application server plug-in forwards it to the application server hosting the CA IdentityMinder Server.
The Web Agent protects CA IdentityMinder resources that are exposed to users and administrators.
When the policy administrator and the identity administrator work together to integrate SiteMinder into an existing CA IdentityMinder installation, the CA IdentityMinder architecture expands to include the following components:
Protects the CA IdentityMinder Server. The Web Agent is installed on the system with the CA IdentityMinder Server.
Provides advanced authentication and authorization for CA IdentityMinder.
The following figure is an example of a CA IdentityMinder installation with a SiteMinder Policy Server and Web Agent:
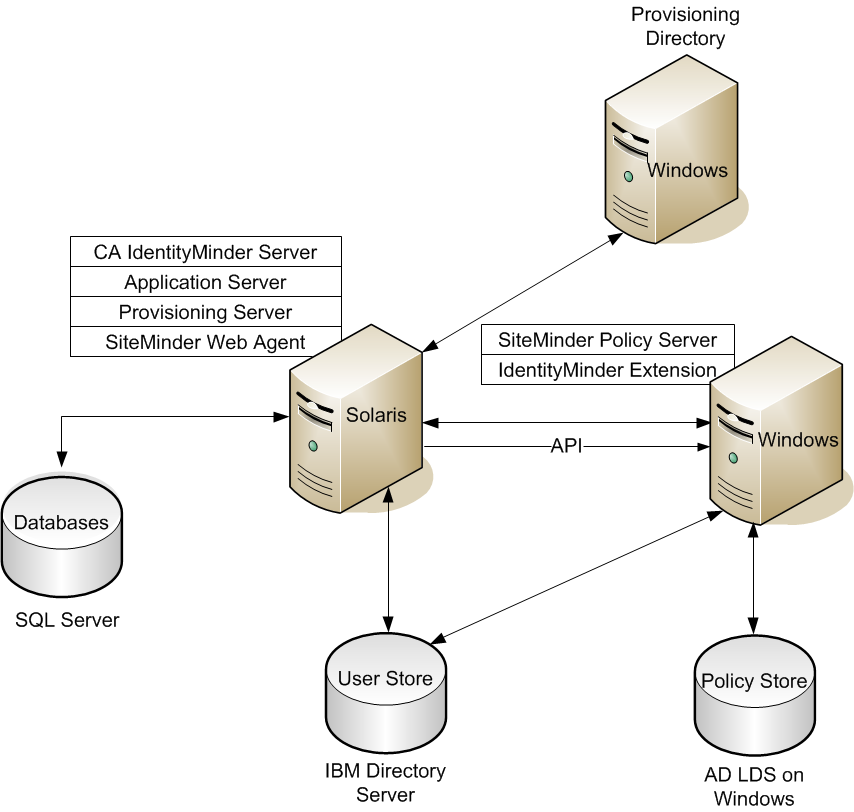
Note: The components are installed on different platforms as examples. However, you can choose other platforms. The CA IdentityMinder databases are on Microsoft SQL Server and the user store is on the IBM directory Server. The SiteMinder Policy Store is on AD LDS on Windows.
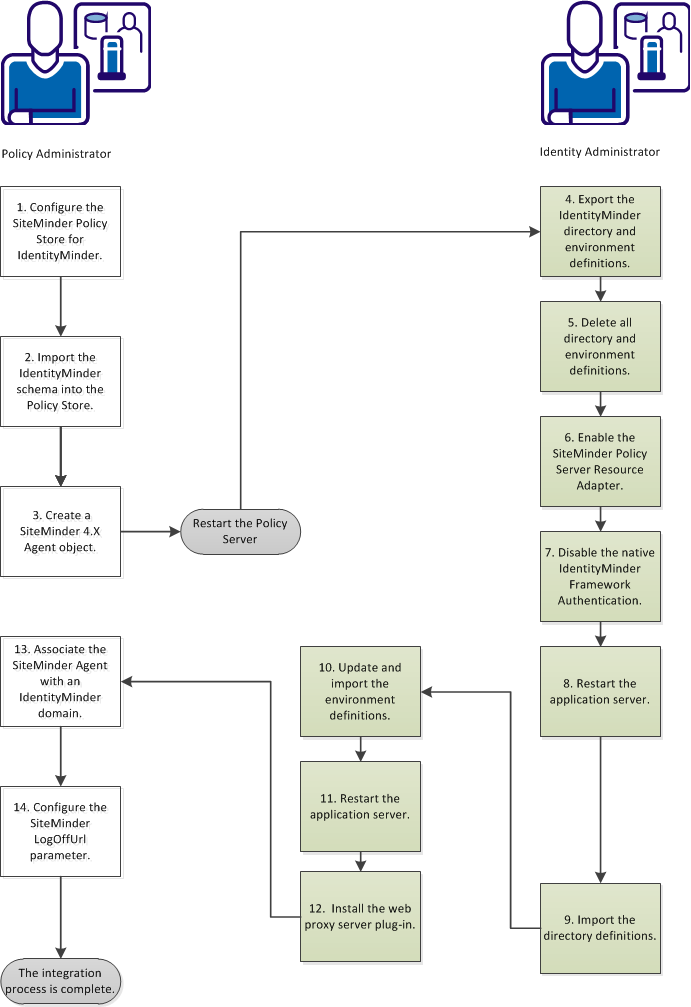
Completing this process requires two roles: the CA IdentityMinder identity administrator and the SiteMinder policy administrator. In some organizations, one person fills both roles. When two people are involved, close collaboration is required to complete the procedures in this scenario. The policy administrator begins and ends this process; the identity administrator does all the steps in the middle.
Important! For CA IdentityMinder installations starting with Release12.5 SP7, the Java Cryptography Extension Unlimited Strength Jurisdiction Policy Files (JCE libraries) are required. Download these libraries from the Oracle Web site. Load them into the following folder: <Java_path>\<jdk_version>\jre\lib\security\.
The following diagram illustrates the complete process of integrating SiteMinder into CA IdentityMinder:
Follow these steps:
As a policy administrator you use the CA IdentityMinder Administrative Tools to access the SQL scripts or LDAP schema text to add the IMS schema to the policy store. The identity administrator will have installed these tools in the Admin Tools folder. Follow one of the following procedures to configure the policy store:
Configure a Relational Database
Configure Sun Java Systems Directory Server or IBM Directory Server
Configure Microsoft Active Directory
Configure Novell eDirectory Server
Configure Oracle Internet Directory (OID)
After configuration, you can use your relational database as a SiteMinder policy store.
Follow these steps:
Note: For configuration instructions, see the SiteMinder Policy Server Installation Guide.
The preceding paths are default installation locations. The location for your installation may be different.
To configure a Java or IBM directory server you apply the appropriate schema file.
Follow these steps:
Note: For configuration instructions, see the CA SiteMinder Policy Server Installation Guide.
Adding the following schema files for your directory:
IBMDirectoryServer\V3.identityminder8
SunJavaSystemDirectoryServer\sundirectory_ims8.ldif
To configure a Microsoft Active Directory policy store, you apply the activedirectory_ims8.ldif script.
Follow these steps:
Note: For configuration instructions, see the CA SiteMinder Policy Server Installation Guide.
C:\Program Files\CA\Identity Manager\IAM Suite\Identity Manager\tools\policystore-schemas\MicrosoftActiveDirectory
The root organization must match the root organization that you specified when you configured the policy store in the Policy Server Management Console.
For example, if the root is dc=myorg,dc=com, replace
dn: CN=imdomainid6,CN=Schema,CN=Configuration,{root} with dn: CN=imdomainid6,CN=Schema,CN=Configuration,dc=myorg,dc=com
To configure a Microsoft ADAM policy store, you apply the adam_ims8.ldif script.
Follow these steps:
Note: For configuration instructions, see the CA SiteMinder Policy Server Installation Guide.
Make note of the CN value (the guid).
C:\Program Files\CA\Identity Manager\IAM Suite\Identity Manager\tools\policystore-schemas\MicrosoftActiveDirectory
For example, if the guid string is CN={39BC711D-7F27-4311-B6C0-68FDEE2917B8}, then replace every cn={guid} reference with CN={39BC711D-7F27-4311-B6C0-68FDEE2917B8}.
To configure a CA Directory server you create a custom schema file. In the steps that follow, dxserver_home is the directory where CA Directory is installed. The default source location for this file on Windows is C:\Program Files\CA\Identity Manager\IAM Suite\Identity Manager\tools\policystore-schemas\eTrustDirectory.
Follow these steps:
Note: For configuration instructions, see the CA SiteMinder Policy Server Installation Guide.
# Identity Manager Schema
source "etrust_ims8.dxc";
set max-op-size=5000
Note: Upgrading CA Directory overwrites the limits.dxc file. Therefore, make sure that you reset max-op-size to 5000 after the upgrade is completed.
# schema
source "company_name-schema.dxg";

#service limits
source "company_name-limits.dxc";
where dsa_name is the name of the DSA using the customized configuration files.
dxserver stop dsa_name
dxserver start dsa_name
To configure a Novell eDirectory Server policy store, you apply the novell_ims8.ldif script.
Follow these steps:
Note: For configuration instructions, see the CA SiteMinder Policy Server Installation Guide.
ldapsearch -h hostname -p port -b container -s sub
-D admin_login -w password objectClass=ncpServer dn
For example:
ldapsearch -h 192.168.1.47 -p 389 -b "o=nwqa47container" -s sub -D "cn=admin,o=nwqa47container" -w password objectclass=ncpServer dn
The default location for novell_ims8.ldif on Windows is:
C:\Program Files\CA\Identity Manager\IAM Suite\Identity Manager\tools\policystore-schemas\NovelleDirectory
For example, if the DN value is cn=servername,o=servercontainer, you would replace every instance of NCPServer with cn=servername,o=servercontainer.
See the Novell eDirectory documentation for instructions.
To configure an Oracle Internet Directory you update the oracleoid ldif file.
Follow these steps:
Note: For configuration instructions, see the CA SiteMinder Policy Server Installation Guide.
install_path\policystore-schemas\OracleOID\
See the Oracle Internet Directory documentation for instructions.
To verify the policy store, confirm the following points:
*** IMS NO SCHEMA BEGIN
This warning appears only if you have installed the Extensions for the SiteMinder Policy Server, but you have not extended the policy store schema.
The policy administrator imports the CA IdentityMinder schema into the policy store. This task lets CA IdentityMinder create, update, and delete policy objects. Examples include directory objects, domains, realms, rules, policies, and the policy objects that enable access roles and tasks.
Follow these steps:
The policy administrator creates a SiteMinder 4.x Web Agent. This task enables communication between SiteMinder and CA IdentityMinder. The identity administrator references this agent during the CA IdentityMinder configuration.
Follow these steps:
The relevant tabs for your administrator privileges appear.
The Create Agent dialog appears.
The Create Agent dialog appears.
Note: Use a name that you can easily associate with the corresponding SharePoint Connection Wizard.
The trust settings fields appear.
IP Address
Specifies the IP Address of the Policy Server.
Shared Secret
Specifies a password that is associated with the 4.x Agent object. The SharePoint Connection Wizard also requires this password.
Confirm Secret
Confirms a password that is associated with the 4.x Agent object. The SharePoint Connection Wizard also requires confirmation of this password.
The Create Agent Object task is submitted for processing and the confirmation message appears.
The integration process removes all of the current environment and directory definitions. To help ensure that this information is maintained, the identity administrator exports the environments using the CA IdentityMinder Management Console. After you complete the integration, these definitions restore the directories and environments.
Follow these steps:
Note: This process can take a few minutes for each environment.
To prepare for SiteMinder to protect CA IdentityMinder, the identity administrator deletes the directory and environment definitions using the CA IdentityMinder Management Console.
Follow these steps:
Note: Delete your environments before deleting your directories because the environments reference the directories.
The identity administrator enables the SiteMinder Policy Server Resource Adapter. The purpose of the adapter is to validate the SMSESSION cookie. After validation, SiteMinder creates the user context.
Follow these steps:

The SiteMinder Policy Server Resource Adapter is enabled.
With the SiteMinder adapter in place, the Framework Authentication Filter is no longer needed. The identity administrator can disable the filter.
Follow these steps:
If you are using CA IdentityMinder r12.5 SP7 or later, verify that the Java Cryptographic Extension Unlimited Strength Jurisdiction Policy Files (JCE) are downloaded into \<Java_path>\<jdk_version>\jre\lib\security in the CA IdentityMinder environment. These files enable CA IdentityMinder to connect to SiteMinder.
If the JCE libraries are installed, you see the following messages during CA IdentityMinder application startup:
2012-07-06 11:23:56,079 WARN  [ims.default] (main) * Startup Step 2 : Attempting to start PolicyServerService
2012-07-06 11:23:56,081 WARN  [ims.default] (main) Unlimited Strength Java Crypto Extensions enabled: TRUE
Otherwise, the value is false for the "Unlimited Strength Java Crypto Extensions enabled" entry. CA IdentityMinder fails to connect to the Policy Server.
The restart refreshes the application server with the changes. The identity administrator validates that the switch was successful and that a proper connection to the SiteMinder Policy Server exists.
Follow these steps:
If your CA IdentityMinder environment uses a relational database for its identity store, the identity administrator is required to complete an additional process on the SiteMinder Policy Server. SiteMinder requires a local data source to communicate with the database.
Follow these steps:
To prepare for importing the environments, the identity administrator imports the directories that the environments reference. Importing the directory definition in CA IdentityMinder also adds the directory information to the SiteMinder policy store.
Follow these steps:
The identity administrator imports the updated environments back into CA IdentityMinder.
Follow these steps:
Based on which application is installed, the identity administrator installs one of the following plug-ins that the web server uses to forward requests to the application server:
| Copyright © 2013 CA. All rights reserved. |
|