

In earlier releases of Connector Xpress mapping a group object type implicitly created the association between groups and accounts. However, in this release of Connector Xpress, you have fine-grained control over the associations between accounts and groups on the endpoint system. To define groups and define group membership, you explicitly create associations between classes. You can create direct, reverse, or indirect associations. Creating an association between classes defines the class as a group class.
For JNDI connecters, the group class member attribute is hardwired to contain values of type DN (Distinguished Name). Values of this type are expressed relative to the root of the endpoint directory and enumerate the accounts belonging to each group.
The member attribute for the group class is virtual, meaning that its value is expensive to retrieve, as it has to be computed from group.member rather than being directly looked up. We therefore recommend that you request it with caution.
Some JNDI vendors, notably Novell eDirectory, actually expose the account.memberOf attribute in their schema. However to guarantee consistent behavior across all vendors, you are prohibited from mapping it explicitly. Instead, CA IAM Connector Server implements it as a virtual attribute.
Mappings consist of the following:
Connector Xpress supports multi-attribute (many-to-one) mappings, which means you can map a native attribute to multiple provisioning attributes. The LDAP DYN template contains an example of multi-attribute mapping. In the template, the account class has both Common Name and Account ID mapped to the endpoint's cn attribute. This is useful because the Common Name is a common LDAP attribute that you should include in the account object and Account ID is the provisioning naming attribute required by the CA Identity Manager common attribute set.
Also, the Account ID and uid are both ambiguously mapped to the endpoint's uid attribute in the template.
Duplicate mappings to a native attribute within the same class are not allowed. For example, if cn is mapped you cannot map cn again. However you can map cn again as part of an ambiguous mapping. For example, together with uid as shown in the LDAP DYN template.
Note the multi-mapping of accountname, cn, uid, and a separate mapping directly to cn is required to fully manage JNDI endpoints. This allows either cn or uid to be used in the naming attribute, and satisfies the condition where cn is also required on an endpoint even when uid is used as the naming attribute.
Because JNDI endpoints can contain accounts named using cn or uid attributes, we recommend that you do the following:
Follow these steps:
Connector Xpress automatically creates a user account provisioning class node in the Mapping tree when you create a project.
The Select Data Source for new project dialog appears.
The Endpoint Types dialog appears.
Note: These fields are for descriptive purposes only.
The Map Attributes dialog appears.
The Attribute list appears.
The Attribute list appears.
To support ambiguous (one-to-many) mappings, you can map one provisioning attribute to multiple native attributes.
Follow these steps:
Connector Xpress automatically creates a user account provisioning class node in the Mapping tree when you create a project.
The Select Data Source for new project dialog appears.
The Endpoint Types dialog appears.
Note: These fields are for descriptive purposes only.
The Map Attributes dialog appears.
The Attribute list appears.
You can create the following types of associations in Connector Xpress:
Note: Reverse associations are not supported for associations between compound classes and user account classes when creating multitable support JDBC connectors.
A direct association is an association between any two classes of objects where the association values are stored on one of the objects directly.
A direct association can be in the forward direction, that is from group to account, and in the reverse direction, that is, from account to group. Creating a direct association in the forward direction lets you manage the accounts that belong to a group from the group side of the association. Creating a direct association in the reverse direction, that is a reverse association, lets you manage the association from the account side of the relationship.
Direct associations in the forward direction coincide with the natural representation of the associative information about the endpoint objects, that is, where the group stores account members. Direct associations in the reverse direction are the reverse of this representation, as they define groups to which an account belongs, even if the native system does not store such information.
Typically, it is common to establish both directions of an association at the same time, that is, both the direct and reverse associations. You can use the Direct Association dialog to create and edit both associations at the same time.
In a direct association, a group directly stores the directory-relative DNs of the accounts which belong to it. Therefore you create a direct association between classes when you map groupOfNames.member to inetOrgPerson.cn.
Note: Both of these objectclasses are part of the inetOrgPerson schema. They differ only in minor implementation details on the endpoint, that is, groupOfUniqueNames stores its members as a set rather than a list helping ensure that the associated entries are unique.
In direct associations, references are persisted directly into a multivalued attribute on the endpoint. For example, in LDAP, a group's member attribute directly stores reference to the accounts it contains.
When creating associations between classes for JDBC connectors, we recommend that you use direct associations for one to one, and one to many relationships. For many to many relationships (for example, the relationship between Account’s memberOf and Group’s members), use an a indirect association instead of a direct association.
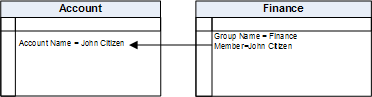
Example: Direct Association
The following example shows a direct association that has been mapped between an account class and a finance class. The finance class stores the accounts that belong to it in its member attribute.
A reverse association is a direct association between two classes of objects of the type from Class1 to Class 2 (the direct association) and from Class 2 to Class 1 (the reverse association). Reverse associations are by definition bi-directional.
Typically, most endpoints only let you manage only one side of the association between accounts and groups from the group side of the association. For example, you can manage the accounts that belong to a group from the group side of the association. Creating a reverse association lets you provision and manage which groups an account is a member of, from the account side of the association.
As most bi-directional associations have a physical attribute on one class and a virtual attribute on the other class, we recommend that you define the physical association attribute first.
Typically it is common to establish both directions of an association at the same time, that is, both the direct and reverse associations. You can use the Direct Association dialog to create and edit both associations at the same time.
Reverse associations appear in the mapping tree under the node of the class you have specified a reverse association with.
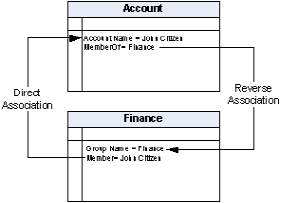
Example: Reverse Association
The following diagram shows a direct and reverse association between the account and group finance class, that is, a bi-directional association, created when you map the attribute in the account that contains the groups the account belongs to, for example, the memberOf attribute, to the group's naming attribute.
An indirect association occurs when there is a third entity defines the association between any two classes of object. For example, an intermediate table that binds two other database tables together.
In an indirect association, the association is stored as an independent entity rather than as a property on one of the objects.
For example, there is an indirect association between an account object and a group object if there is an intermediate table, such as a membership table, that identifies the associations between individual accounts and groups.
In a direct association, objects have an attribute that points directly to the other object. However in an indirect association, both of the related objects have attributes that point not to each other, but to the membership table.
Membership tables define the members of each group. They contain the association mappings that identify the individual accounts and groups that are related, for example, the groups an account belongs to, and a list of accounts in each group. In a membership table, associations between objects are stored in a many-to-many mapping table.
Membership tables let you specify a separate lookup table for associations between account and group objects and map the relevant attributes.
To define an indirect association, you specify the membership table that contains references to both of the related objects.
When you create an indirect association between two objects, Connector Xpress automatically creates the reverse association, that is; indirect associations are by definition bi-directional.
Note: You can only create indirect associations for JDBC mappings.
Example: Indirect Association
The following diagram shows the indirect association that has been mapped between the employee and department classes using a membership table. The following is an example schema and database.

The following are the three tables in the database:
The virtual attribute memberOf contains Group IDs, that is the departments the employee is a member of.
The virtual attribute members contains Account IDs, that is,the list of employees in the department.
To define group membership and create an association between classes that defines the class as a group class, you do the following:
Note: When you create a project, Connector Xpress creates a user account class by default.
Note: If you use the wizard to map account and group classes, the wizard automatically creates a group class and the details of the association that you need to complete.
Creating an association defines the group membership and creates the association between the classes.
This example shows you the procedure you would follow if you were an administrator that wanted to map an account class for a JNDI data source. This example shows you to map an endpoint's account class to the provisioning account class. This example assumes that the administrator has set up a JNDI data source.
Follow these steps:
The Select Data Source for new project dialog appears.
The Endpoint Types dialog appears.
Note: These fields are for descriptive purposes only.
Connector Xpress automatically creates a user account provisioning class node in the Mapping tree when you create a project.
The Map Account Class dialog appears.
The Map Attributes dialog appears.
Note: If the table list fails to populate when mapping tables, verify that your database does not have outstanding transactions or locks on the schema metadata.
The Mapped Classes dialog displays a summary of the classes you have mapped. You can use this dialog to revise the native class to provisioning mappings you have made.
The Attribute Details dialog appears.
The dialog displays the LDAP attribute assigned to each field, its datatype, the JavaBean property name that JIAM uses, and whether the field is required (allows null values) and any length constraints.
The Attribute Details dialog appears with the default policy value set.
Note: When you map a required attribute to a well-known provisioning attribute, Connector Xpress sets a default account template value by default.
To create a direct association between two classes, for example, an account class, and a group class, you do the following:
Mapping the group's member attribute specifies that the group's membership attribute is populated by the account's naming attribute.
This describes the association between the group class and the account class and creates a direct association between the account class and group class.
Note: If the native account class does not have a memberOf attribute, to create a virtual memberOf attribute and map it to the group's naming attribute.
Connector Xpress creates the direct and reverse associations between the account and group class you have mapped and automatically creates and displays the association under the User Accounts node.
This example shows you the procedure an administrator would follow to create a direct and reverse association between an account class, and a group class. In this example, the administrator defines an association that describes the relationship between the group class and the user account class.
This example assumes that the administrator has setup a JNDI data source, and created and mapped an account class named User account.
To create a direct and reverse association between an account class and a group class, define an association that describes the relationship between the group class and the user account class.
Follow these steps:
The Mapped Classes dialog appears.
Connector Xpress adds the new class to the mapping tree.
The Map Class dialog appears.
The Map Attributes dialog appears.
Selecting the check box specifies that the member attribute is multivalued and can hold multiple account names.
The Class Associations dialog appears.
Connector Xpress adds a node named with User Account to the mapping tree.
The Direct Association with User Account dialog appears.
Note: Connector Xpress selects the group's naming attribute in the Group of Names By Attribute field as the attribute to map to by default.
Selecting the member attribute maps the groups member attribute to the account's naming attribute. That is, you have specified that the groups member attribute is populated by the accounts naming attribute, and defined the Group of names class as a group class.
The Reverse Association dialog appears.
In this example, the native account class does not have a memberOf attribute, so create a virtual memberOf attribute and map it to the group's naming attribute.
Note: Connector Xpress selects the group's naming attribute in the By Attribute field as the attribute to map to by default.
Connector Xpress creates the direct and reverse associations between the account and group class you have mapped.
This example shows you the process you use to define an indirect association between two classes, for example, an employee class, and a department class using a membership table. To create the indirect association:
This example shows you the steps you would follow if you are an administrator that wants to create an indirect association between an Employees class, and a Departments class using a membership table.
This example uses an example schema, HR, and an example membership table, Membership. The membership table columns Account_Id and Dept_id contain the association mappings that identify the individual employees and departments that are related, as shown in the following example:
To identify individual employees and departments that are related, create an indirect association between them.
Note: This example assumes that you have already set up a JDBC data source, and created and mapped an account class named Employees.
Follow these steps:
The Mapped Classes dialog appears.
Connector Xpress adds a node named Department to the mapping tree.
The Map Class dialog appears.
Note: These fields are for descriptive purposes only.
The Map Attributes dialog appears.
The Class Associations dialog appears.
Connector Xpress adds a node named with Departments under the Associations node for the Employees class in the mapping tree.
The Indirect Association dialog appears.
This table specifies the association mappings that identify the individual employees and departments that are related.
The result is the following:
Note: Connector Xpress selects the naming class attributes by default in the Employees and Departments Attributes list.
Note: In this example, because the Employees and Department classes do not have a memberOf or member attribute, create a virtual member and memberOf attributes.
The virtual attributes you create describe the association between the Employee class and Department class.
These virtual attributes are a virtual representation of the association between the employee class and department classes naming attributes, and the membership table columns you mapped in step 11. The connector uses these virtual attributes to find the employees in a department, and the departments an employee belongs to.
Connector Xpress automatically does the following:
Connector Xpress creates the indirect association between the Employees and Departments class you have mapped.
Specifying a container class is similar to mapping an ordinary class except that the only attribute that you can map is Container Name.
Additionally, you can specify the classes that are the children of this container ("Contained Classes"). For example, the container Employee Groups can only allow Staff Group and Executive Group classes and not individual account classes.
Connector Xpress validates the entries you make in the fields on the following dialogs:
Connector Xpress displays a warning icon next to any field that has invalid input, and a warning icon next to the corresponding node in the mapping tree. Connector Xpress displays details of the violation when you mouse-over the warning icon. The warning icon disappears after you correct your input and click another node in the mapping tree.
|
Copyright © 2015 CA Technologies.
All rights reserved.
|
|