

A CA Ideal accesses the relational database of CA Datacom/DB. To understand how CA Ideal handles the access, a basic description of the database terminology is helpful.
The data in the database is organized into a series of logical collections called tables. For example, all customer information can be defined in a customer table; all order information in an order table; and so on. In each table, all of the data associated with an individual occurrence is a row. For example, all information about a single customer comprises one row.
The data in each table is further defined by type and function into columns. Each column is assigned a name and various attributes. For example, the customer name is defined in the column named CUSTNAME and the ZIP code in the column named ZIP. The data in the column CUSTNAME is alphanumeric and the data in ZIP is numeric.
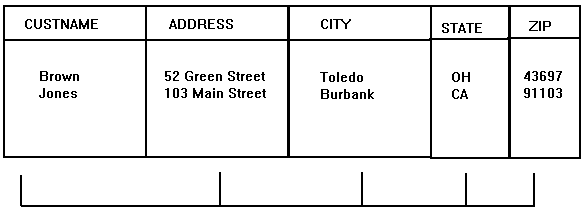
The power of a relational database lies in the fact that data can be accessed without first predetermining any access paths. For example, it is very straightforward to ask for the set of customers whose last name was Brown and lived in Ohio. No additional work other than describing the layout of the table is needed to access it.
In CA Ideal, a dataview is a logical view of external data that lets you make requests independent of the external storage mechanism. Dataviews can represent sequential files, VSAM files, CA Datacom/DB tables (for native command access or SQL access), views, and synonyms (for SQL access or DB2 tables and views). Regardless of the underlying table, file, or view, the programmer sees the definition presented in a consistent way and uses the same language statements to access the data.
Before CA Ideal can use a dataview, the table, view, or synonym must be defined in the database management system. Then, in CA Ideal, an authorized user must catalog the dataview to CA Ideal. The catalog function locates the database management system's definition and makes it accessible to CA Ideal. Any CA Ideal program can then access the dataview, provided that the program is in a system authorized to access the dataview.
a CA Datacom/DB table is defined using the dictionary facilities of Datadictionary. After the required entries are processed, the DBA (database administrator) creates a dataview entity occurrence in the Datadictionary and relates it to the appropriate database elements. a CA Datacom/DB native access dataview can include any subset of fields in the database record, including the entire record, but the fields can only be included from one record. SQL table or view is created with an SQL CREATE statement in a program and supports joins and projections for views. No further action is required before cataloging the table or view to CA Ideal.
Dataviews for unmodeled sequential files and VSAM files are created in CA Ideal and then cataloged.
When a dataview is included in the resource definition of a CA Ideal program, it serves two functions:
Multiple dataviews can be created for a single table to provide flexibility. A program can contain one or more of these dataviews as needed.
In CA Datacom/DB, you can define native dataviews directly from the elements of the table. You can create one or more dataviews to contain any combination of these elements.
In SQL, you can define a dataview based on a table. This dataview contains all of the columns in the table. You can create only one dataview directly from the table. You must use a view to define multiple dataviews for a single table. You can specify the view to contain any of the columns in the table. In fact, views can contain columns from one or more tables. You can use a dataview cataloged on a joined view for read-only purposes.
For more information about the creation and maintenance of dataviews, see the Creating Dataviews Guide. The remainder of this chapter focuses on using CA Ideal to access and manipulate the data in the database. It is applicable to databases for CA Datacom/DB and DB2 databases. The programs written based on this general information about the FOR construct are portable between databases.
For more information about accessing sequential and VSAM files, see the FOR construct in the Programming Reference Guide.
A CA Ideal PDL, Program Definition Language, provides the FOR construct to access the data in the database. There are several variations of the FOR construct. With any variation, a dataview is named to specify which data to obtain. An ENDFOR statement terminates the construct.
FOR ... dataview-name
   : statements
ENDFOR
Basically, the FOR statement selects the rows to process. Each row in the selected set is accessed individually and processed according to the statements specified between the FOR and ENDFOR statements.
The simplest FOR construct, FOR EACH, accesses every row in the table based on the named dataview. For example, the following FOR construct accesses all rows in the CUSTOMER table using the CUSTOMER dataview:
FOR EACH CUSTOMER             :select
   : statements               :process
ENDFOR                        :end^sprocess
The FOR EACH construct implicitly iterates. That is, it loops through the selected set, processing one row at a time. For example, the FOR EACH construct can produce a list of customers from the CUSTOMER table, as follows:
FOR EACH CUSTOMER             :select
   LIST CUSTNAME              :list customer name
ENDFOR                        :end process
This produces:
custA
custB
custC
. . .   and so on
To include a count with this list, the counter TX-COUNT is defined in working data and then incremented as each row is accessed. The value of the counter is written, along with the customer name, using the LIST statement:
SET TX-COUNT = 0
FOR EACH CUSTOMER
   ADD 1 TO TX-COUNT
   LIST TX-COUNT, CUSTNAME
   : statements
ENDFOR
The counter TX-COUNT is defined in working data as a numeric variable. TX-COUNT is initialized to 0 before the FOR construct. The FOR construct then accesses every row in the table. Each row is processed in turn by the statements in the construct. After all of the rows are accessed and processed, the FOR construct terminates.
Since the task of counting the number of accessed rows is so commonly performed, PDL provides a function, $COUNT, to return the total number of rows:
<<CUST>>
FOR EACH CUSTOMER
   : statements
MOVE $COUNT(CUST) TO WCOUNT
LIST WCOUNT 'CUSTOMER RECORDS READ'
ENDFOR
For more information about using $COUNT, see the Programming Reference Guide.
Assume that all rows in the table are accessed and processed, but only certain rows are counted and listed based on specific conditions. The conditions are defined in the FOR construct. For example, if a column named STATE is provided in the CUSTOMER table, you can include an IF construct in the FOR construct to count only those customers in Texas, while still processing all of the customers in the table:
SET TX-COUNT = 0
FOR EACH CUSTOMER
   IF STATE EQ 'TX'
      ADD 1 TO TX-COUNT
      LIST TX-COUNT, CUSTNAME
   ENDIF
   : statements
ENDFOR
The counter reflects only the number of customers in Texas.
Several sets of criteria can be evaluated in a single FOR construct by using the SELECT construct. For example, SELECT can process the number of customers in each state. The entire table is accessed through a single execution of the FOR construct, but the customer rows are processed based on the value in the STATE column. In this example, 50 counters were defined in working data to contain the number of customers in each state. The counters were named using the two-character state abbreviations.
The code could be:
SET AL = 0
SET AR = 0
SET AZ = 0
. . .
SET WY = 0
FOR EACH CUSTOMER
    SELECT FIRST
       WHEN STATE EQ 'AL'
           ADD 1 TO AL
       WHEN STATE EQ 'AR'
           ADD 1 TO AR
       WHEN STATE EQ 'AZ'
           ADD 1 TO AZ
       . . .
       WHEN STATE EQ 'WY'
           ADD 1 TO WY
    ENDSEL
    : statements
ENDFOR
LIST AL AR AZ . . . WY
The processing initializes the counters, increments the appropriate state counter, performs the other statements, and, after the ENDFOR, displays the values.
You can select a set of rows from the entire table by coding IF or SELECT in a FOR construct. In this way, you can apply functions to specific rows in a table. This works well if it is necessary to access every row in the table. The selection criteria are specified on the FOR construct using the WHERE clause to limit the number of rows that are accessed.
You should code a WHERE clause when a specific set of rows is processed. It provides clear information on the set of rows being accessed. It is more efficient to have the database access only the rows, rather than access the entire table and code the selection process in the FOR construct. Not only is the access faster, but it limits the possibility of contention for data across applications. It is essential, when designing an application, to minimize the number of rows being accessed at any one time and the length of time those rows are held.
For example, to process only the customers in Texas, you can specify a FOR EACH construct with a WHERE clause. This code clearly reflects the function and the set of rows to access:
FOR EACH CUSTOMER
   WHERE STATE EQ 'TX'
       : statements
ENDFOR
The WHERE clause can contain compound specifications. For example, to obtain only the rows of customers that are in Texas and have an outstanding balance greater than $500, specify:
FOR EACH CUSTOMER
    WHERE STATE EQ 'TX'
      AND OPEN$ GT 500
   : statements
ENDFOR
You can add further qualifications. Assume that CHECKDATE is a working data variable defined to contain a date value specified at runtime.
FOR EACH CUSTOMER
    WHERE STATE EQ 'TX'
      AND OPEN$ GT 500
      AND ACTDT LT CHECKDATE
    : statements
ENDFOR
CA Datacom/DB and DB2 handle data types differently. For more information about the data-dependent facilities, see the Programming Reference Guide.
You can specify a variable, instead of a literal, as the selection criterion. The following example uses a variable for the selection specification and maintains a single FOR EACH construct to obtain the rows. Since the program prompts for the state and places the user response in a variable (working data or parameter data is valid) named STNAME, you can write the FOR construct to access all customers in the specified state:
FOR EACH CUSTOMER
    WHERE STATE EQ STNAME
    : statements
ENDFOR
The WHERE clause can be very powerful not only because it can contain compound specifications and variables to note the selection criteria, but because a wide variety of relational operators are available. They include:
=          EQ          EQUAL
¬=         NE          NOT EQUAL          NOT=
           GT          GREATER [THAN]
>=         GE          NOT LESS           NOT<          ¬<
<          LT          LESS [THAN]
<=         LE          NOT GREATER        NOT>          ¬>
Valid conditionals include:
AND &
OR |
NOT ¬
Note: Avoiding ambiguity caused by same names. Frequently, a column in one dataview has the same name as a column in another dataview, field, or variable. To avoid any ambiguity, use the fully qualified name. For example, the CUSTOMER dataview contains a column named STATE and the panel PROMPT contains a field named STATE:
FOR EACH CUSTOMER
   WHERE CUSTOMER.STATE EQ PROMPT.STATE
   : statements
ENDFOR
Note: Index or key columns speed access. Columns specified with the WHERE clause, do not have to be key columns. The program is usually faster and more efficient when the columns specified in the WHERE clause are key columns. There are instances when it is not necessary. If the occurrence of a column is in a non-critical program or the particular FOR construct is used infrequently, it might be preferable to retain that column as a non-key column since each key does require storage resources and maintenance.
Once a set of rows is obtained from the database, the sequence in which the rows are processed can be important. For example, the sequence is important when displaying an alphabetical list of the customers in Texas. To retrieve the rows in a specific sequence, use the ORDERED BY clause. If you omit the ORDER BY clause, the order is undefined and the row sequence could vary over time due to either database design changes or changes in the data itself.
Assuming that CUSTNAME is the column containing the customer name, you can use the ORDERED BY clause to order all of the customers in Texas alphabetically by name:
FOR EACH CUSTOMER
    WHERE STATE EQ 'TX'
    ORDERED BY CUSTNAME
    : statements
ENDFOR
You can include additional column names for a more specific sequence. You can code the FOR EACH construct to order the customers in Texas by city and then by name in each city, as shown in the code below. List the column names in the order of precedence. Above, the high-order column, CITY, is named first.
FOR EACH CUSTOMER
    WHERE STATE EQ 'TX'
    ORDERED BY CITY, CUSTNAME
    : statements
ENDFOR
You can order the rows in ascending or descending sequence. The default sequence is ascending order. You can specify it as DESCENDING or, when you specify several columns, a combination of ASCENDING and DESCENDING. You can modify the previous example to sort by activity date (ACTDT column) in descending sequence (oldest first, rather than most recent first):
FOR EACH CUSTOMER
    WHERE STATE EQ 'TX'
    ORDERED BY DESCENDING ACTDT, ASCENDING CUSTNAME
    : statements
ENDFOR
It is necessary to specify the keyword ASCENDING for the column CUSTNAME because it follows DESCENDING ACTDT. If you did not specify ASCENDING here, CUSTNAME would be sorted in descending order.
Note: Indexes facilitate sequencing. As with the WHERE clause, it is usually fastest and most efficient to sequence the rows based on key columns. After careful consideration, it might be necessary to request new keys to suit program requirements. Since keys require storage and maintenance, you should probably not define columns specified on infrequently used ORDERED BY clauses or in non-critical programs as keys. If a column specified on the ORDERED BY clause is a component of more than one key, it might be more efficient to specify all of the component columns of the key. In all cases, the database determines which key to use at runtime.
The FOR EACH statement accesses every row that satisfies the specified criteria. FOR FIRST accesses a specified number of rows starting with the first one retrieved.
Since the FOR FIRST construct, like the FOR EACH construct, is a form of the FOR construct, the WHERE and ORDERED BY clauses specify the selection criteria and the row sequencing. A simple example can demonstrate the difference between FOR FIRST and FOR EACH. Rather than selecting every customer from Texas through FOR EACH, you can use FOR FIRST to access only the first ten customers from Texas.
FOR EACH CUSTOMER            FOR FIRST 10 CUSTOMER
       WHERE STATE EQ 'TX'          WHERE STATE EQ 'TX'
    : statements                 : statements
ENDFOR                       ENDFOR
The sequence in which the rows are accessed can be extremely important when selecting a limited number of rows. A very different set of rows could be accessed from one execution to the next. The ORDERED BY clause ensures the sequence. The ten rows are obtained from all customers in Texas based on the sequence specified in the ORDERED BY clause. The resulting ten rows could, for example, contain the customers whose names start with A, then with B, and so on until ten customers are obtained.
FOR FIRST 10 CUSTOMER
    WHERE STATE EQ 'TX'
    ORDERED BY CUSTNAME
    : statements
ENDFOR
You can specify any number of rows. If there are not a sufficient number of rows to satisfy the specified value, only the available rows are accessed. No error occurs.
You can specify an operand to specify the number of rows as a numeric value or a valid numeric variable. By using a variable to specify the number of rows, you can include the preceding example in a program that prompts for the number of rows to obtain. The returned value can be used as an operand instead of the numeric literal. Assume that NUMROWS is defined as a working data numeric variable:
FOR FIRST NUMROWS CUSTOMER
    WHERE STATE EQ 'TX'
    ORDERED BY CUSTNAME
    : statements
ENDFOR
Frequently, it is necessary to access a single row from the database. This is done so routinely that when a number of rows is not specified on the FOR FIRST construct, 1 is assumed, as in the following, which accesses the first customer in Texas alphabetically.
FOR FIRST CUSTOMER
    WHERE STATE EQ 'TX'
    ORDERED BY CUSTNAME
    : statements
ENDFOR
The first customer can change from one execution to the next since new customers can be added.
Usually a single specific row, in this case a unique customer, is accessed regardless of its relative position alphabetically or otherwise in the table. This is accomplished by the selection conditions. In other words, if the CUSTNAME column was defined to contain unique data for each row, specifying that column on the WHERE clause always retrieves the same row:
FOR FIRST CUSTOMER
    WHERE CUSTNAME EQ 'ANACONDA'
    : statements
ENDFOR
Since only one row can satisfy this WHERE criteria, an ORDERED BY clause is not included. The WHERE clause does not need to specify any other criteria in this situation. Using the same WHERE clause, the FOR EACH construct retrieves the same single row only because the column value is unique. But with the FOR FIRST construct, it is obvious that a single row is accessed.
When coding a FOR construct, consider the possibility that a row is not located to satisfy the selection criteria. If a row is not obtained, processing continues but, unless the program provides for this condition, the user is not notified. If processing depends upon accessing data from the database, unexpected results can occur. The WHEN NONE clause allows the program to handle this situation. For example, when attempting to obtain a single row, you can code the WHEN NONE clause to generate a message if that row is not located:
FOR FIRST CUSTOMER
    WHERE CUSTNAME EQ 'ANACONDA'
    : statements
WHEN NONE
    :issue message
    NOTIFY 'No customer named ANACONDA'
ENDFOR
Frequently a program has a FOR construct in a loop to reprompt the user for selection criteria and re-execute the FOR construct. For example, the previous FOR construct could specify a variable rather than a literal and prompt for the criteria. In the following example, the panel is named PROMPT. The panel fields, CUSTNAME and MSG, are fully qualified to enhance readability:
LOOP
    DO GET-REQST
UNTIL FINISHED
    SET PROMPT.MSG = $SPACES
    FOR FIRST CUSTOMER
       WHERE CUSTOMER.CUSTNAME EQ PROMPT.CUSTNAME
       : statements
    WHEN NONE
       SET PROMPT.MSG = 'Customer not found'
    ENDFOR
ENDLOOP
This code segment demonstrates using WHEN NONE and reprompting. The variable named FINISHED is an example of a flag to terminate the LOOP construct. For more information about coding LOOP, see the Programming Reference Guide. The subprocedure, GET-REQST, controls the input and output functions.
Note: Include the WHEN NONE clause with every use of the FOR construct, even when it is highly unlikely that it will execute (that is, no rows satisfy the selection criteria). A comment in the clause can note that the clause is currently not required:
FOR EACH CUSTOMER
  : statements
WHEN NONE
  : currently not required
ENDFOR
If the criteria on the FOR construct ever change, the WHEN NONE clause can become important. If the clause is always provided, it is more likely to be specified appropriately when the FOR construct is modified. The presence of the WHEN NONE acts as a reminder to code it.
If the code in the WHEN NONE clause is designed to terminate the run, the program should provide a message to the end user and perform cleanup to prevent confusion.
The WHEN NONE clause only executes when there are no rows that satisfy the specified criteria. If, in fact, an error exists in specifying the criteria such that the data type does not conform to the comparison column, a runtime error occurs. For more information about dealing with runtime errors, see the "Error Handling" chapter.
In a relational database, it is important to be able to access multiple tables simultaneously. You can nest FOR constructs to do this as long as each FOR construct specifies a different cataloged dataview. You can nest any combination of FOR EACH and FOR FIRST. You can also nest FOR NEW. For information about FOR NEW, see Adding Rows. In SQL, dataviews can be defined to contain columns from more than one table. A dataview defined in this manner effectively joins the tables. You can use these dataviews on a read-only basis.
Tables are joined based on common columns. For example, assume two tables exist, a CUSTOMER table and an ORDER table. Each order is associated with a single customer. Each customer can have none, one, or more than one order. The tables are constructed such that they are joined by a common column, CUSTID, containing the customer identification number. This could be shown as:
CUSTID  CUSTNAME      |      CUSTID  ORDID
B1000   SMITH         |      B3000   X1234
B2000   JONES         |      B1000   X1222
B3000   GREEN         |      B3000   X1422
The previous example shows that customer B1000 has one order, customer B3000 has two orders, and customer B2000 does not have any orders.
To access every order of a specific customer as named in the variable PROMPT.CUSTNAME, specify:
FOR FIRST CUSTOMER
    WHERE CUSTOMER.CUSTNAME EQ PROMPT.CUSTNAME
    FOR EACH ORDER
        WHERE ORDER.CUSTID EQ CUSTOMER.CUSTID
        ORDERED BY ORDID
        : statements
    WHEN NONE
        NOTIFY 'Customer has no orders'
    ENDFOR
WHEN NONE
    NOTIFY 'No customer found'
ENDFOR
The WHERE clause on the inner FOR locates all of the orders for the customer. In this example, CUSTID is the column that joins the tables. This one column is defined in both tables to contain the customer ID. The column names are qualified to prevent any ambiguity.
Each FOR construct has its own WHERE clause and a WHEN NONE clause and ENDFOR statement to terminate the construct. The inner construct terminates first. Indentation is especially important with nested FOR constructs. Without it, the code becomes confusing. Indentation clarifies at a glance the boundaries of the FOR constructs and the relative nested position of each construct.
Whenever coding nested FOR constructs, without a WHERE clause to limit the set selection of the inner FOR, all rows of the table are read for each row in the outer FOR construct.
Note: Subprocedures promote modularity. To promote structured programming, you can code the FOR constructs in subprocedures. This is especially useful when complex evaluation or multi-level nesting is required. The resulting performance of this segment is the same as if coded in a linear manner:
FOR FIRST CUSTOMER
   WHERE CUSTOMER.CUSTNAME EQ PROMPT.CUSTNAME
   DO GETORDS
   : statements
ENDFOR
. . .
<<GETORDS>> PROCEDURE
  FOR EACH ORDER
      WHERE ORDER.CUSTID EQ CUSTOMER.CUSTID
      DO GETDTLS
      : statements
  ENDFOR
ENDPROC
<<GETDTLS>> PROCEDURE
  FOR EACH DETAIL
      WHERE DETAIL.ORDID EQ ORDER.ORDID
      : statements
  ENDFOR
ENDPROC
Each subprocedure reflects a level of the FOR construct nesting. This code is generally easier to read and maintain. The evaluations pertinent to each level of the nest are separated into their respective set of rows.
The dataviews must be unique when nesting FOR constructs, but you can define several dataviews to access the same table. These dataviews can then be used in nested FOR constructs to access more than one row from a single table.
For example, while processing an order, it might be necessary to find out if another order exists for the customer. The following code segment requires two dataviews, PROCORD and OTHERORD, for the same table, ORDER. The dataviews need not specify the same columns or have the same attributes.
FOR FIRST PROCORD
   WHERE PROCORD.ORDID EQ PROMPT.ORDID
   FOR EACH OTHERORD
       WHERE OTHERORD.CUSTID EQ PROCORD.CUSTID
         AND OTHERORD.ORDID NE PROCORD.ORDID
       : statements
   WHEN NONE
       : statements
   ENDFOR
ENDFOR
The ORDID column retrieves the unique row in the FOR FIRST PROCORD construct and skips the unique row on the FOR EACH OTHERORD construct. The additional qualification on the FOR EACH OTHERORD WHERE clause selects only those orders associated with the customer identified for the unique order in PROCORD.CUSTID.
For more information about this topic, see the Programming Reference Guide.
|
Statements |
Functions |
|---|---|
|
TRANSMIT |
$CURSOR |
|
MOVE |
$EMPTY |
|
REFRESH |
$KEY |
|
RESET |
$PANEL-ERROR |
|
SET ATTRIBUTE |
$PANEL-FIELD-ERROR |
Once the set of rows is obtained, you can display the data on the screen. The NOTIFY statement, the LIST statement, and the TRANSMIT statement provide the facilities for writing to the screen. This section does not describe how to define panels, but rather how to display the panels that were defined.
The NOTIFY statement is an easy way to display the value of a column at the screen. The data is written to the message line. This provides a means of displaying messages at the screen during runtime without coding a message area in a panel. It does, however, limit the total length of the message to 79 characters.
The NOTIFY text displays when a panel is transmitted or when a run is terminated. NOTIFY can be useful when testing a program or when evaluating user input. For example, NOTIFY CUSTOMER.CUSTNAME displays the contents of the column on the message line. You could use the following segment during testing to ensure that the requested row is accessed:
FOR FIRST CUSTOMER
    WHERE CUSTOMER.CUSTNAME EQ PROMPT.CUSTNAME
    NOTIFY CUSTOMER.CUSTNAME ' found'
WHEN NONE
    NOTIFY PROMPT.CUSTNAME ' not found'
ENDFOR
The LIST statement can write the contents of one or more columns to an output file. This file can then display online after the program terminates. The following example writes the customer identification number and name to the output file.
FOR FIRST CUSTOMER
   WHERE CUSTOMER.CUSTNAME EQ PROMPT.CUSTNAME
   LIST CUSTOMER.CUSTID  CUSTOMER.CUSTNAME
WHEN NONE
   NOTIFY PROMPT.CUSTNAME ' not found'
ENDFOR
LIST can also write the contents of a panel to an output file. In other words, you can assign the column values in a row to the appropriate panel fields, and using LIST, write the entire panel contents to an output file. You can then view the file online or print it.
In the following example, the FOR construct accesses each row of data from the CUSTOMER table. The row is moved to the panel fields by the MOVE BY NAME statement. A panel, named CUSTPNL, was defined to contain the data:
FOR FIRST CUSTOMER
    WHERE CUSTOMER.CUSTNAME EQ PROMPT.CUSTNAME
    MOVE CUSTOMER TO CUSTPNL BY NAME
    LIST CUSTPNL
WHEN NONE
    NOTIFY PROMPT.CUSTNAME ' not found'
ENDFOR
For more information about using LIST to generate output, see the Generating Reports Guide.
Usually a panel is sent to the screen to display one or more rows of data in a preformatted manner and, optionally, to return data the user typed.
The TRANSMIT statement sends or transmits the panel to the screen. It also pause program execution while waiting for user input. Once the user signals an end to input by pressing a program function key or Enter, CA Ideal returns control to the program at the statement coded directly after TRANSMIT. CA Ideal handles the transaction boundary processing inherent in executing the TRANSMIT statement and restores all current program values. The user input is available as data in panel fields or by evaluating the panel terminating key.
TRANSMIT is important in updating the database. It is explained in Updating a Table or File.
The following segment displays one row from the CUSTOMER table in a panel named CUSTPNL. The MOVE statement is necessary to assign the column values to the panel fields before performing the TRANSMIT for the panel.
FOR FIRST CUSTOMER
    WHERE CUSTOMER.CUSTNAME EQ PROMPT.CUSTNAME
    MOVE CUSTOMER TO CUSTPNL BY NAME
WHEN NONE
    NOTIFY PROMPT.CUSTNAME ' not found'
ENDFOR
TRANSMIT CUSTPNL
To display multiple rows of data in a single panel, the panel is populated in the FOR construct and transmitted outside of the FOR construct to ensure that the panel contains the data from all of the rows before the actual display.
In the following example, the panel CUSTPNL was defined to contain a repeating group, CUSTDATA. Each occurrence of the group is assigned the values in one row accessed from the table. A variable, PNLINDX, was defined in working data to act as an index to increment through the repeating group in the panel as the assignment proceeds row by row in the FOR construct:
SET PNLINDX = 0
FOR FIRST 10 CUSTOMER
   ORDERED BY CUSTNAME
   SET PNLINDX = PNLINDX  1
   MOVE CUSTOMER TO CUSTPNL.CUSTDATA(PNLINDX) BY NAME
  ENDFOR
  TRANSMIT CUSTPNL
This example assumes that the number of rows retrieved does not exceed the size of the panel. Examples are provided in Appendix D, which uses the $PANEL-GROUP-OCCURS function to limit the number of rows retrieved to the actual size of the panel.
Data maintenance includes three basic functions: Modifying existing data, deleting data, and adding data. The performance of these functions is linked to CA Ideal transaction handling.
You can only modify existing rows explicitly; that is, by direct assignment. There are several statements that you can use. The following are all valid:
SET ACTDT = $TODAY
MOVE PROMPT.CUSTNAME TO CUSTOMER.CUSTNAME

ADD 10 TO OPEN$

SUBTRACT 100 FROM OPEN$
You must make all modifications to the database in the scope of a FOR construct. Additionally, in CA Datacom/DB, the native dataview must be defined as updateable.
To understand how the updates are made in the FOR construct, review the following example. All customers in Texas are assigned to a new salesman. This example selects all customers in Texas as the set, accesses each row, one at a time, and assigns the new salesman ID value to the column SALESMAN in each row. The ENDFOR statement denotes the end of processing for the current row when the database is updated.
FOR EACH CUSTOMER
    WHERE CUSTOMER.STATE EQ 'TX'
    SET CUSTOMER.SALESMAN = NEWID
...
ENDFOR
You can code the FOR construct to contain the evaluation that limits which retrieved rows are updated. In the following example, an IF construct is used. The update to the current row only occurs if the city is Amarillo.
FOR EACH CUSTOMER
    WHERE CUSTOMER.STATE EQ 'TX'
    IF CITY EQ 'AMARILLO'
       SET CUSTOMER.SALESMAN = NEWID
    ENDIF
...
ENDFOR
The modifications are applied to the database when the ENDFOR statement is reached. Before the ENDFOR is executed, you can abandon changes by exiting or quitting the FOR construct.
When QUIT is coded in a FOR construct, the update to the current row and any subsequent rows does not occur. The QUIT statement exits the FOR construct. Therefore, the ENDFOR statement is never reached to apply the changes to the current row in the database and the subsequent rows are never processed. The database still contains the changes made to previous rows processed before the QUIT statement executed.
You can also code a PROCESS NEXT statement in a FOR construct. This statement abandons the current update, but processin continues with the next iteration of the FOR construct allowing subsequent updates to take place.
You can also abandon changes to rows in nested FOR constructs. Notice the use of a label to identify which FOR construct is the object of the QUIT.
<<CUST>>
  FOR FIRST CUSTOMER
    WHERE CUSTOMER.CUSTNAME EQ PROMPT.CUSTNAME
    : statements
    <<ORD>>
      FOR FIRST ORDER
      WHERE ORDER.CUSTID EQ CUSTOMER.CUSTID
      : statements
      IF condition1
         QUIT ORD
      ENDIF
      IF condition2
         QUIT CUST
      ENDIF
   ENDFOR
   IF condition3
      QUIT CUST
   ENDIF
ENDFOR
In this example, the changes to the current ORDER row are bypassed if condition1 is true. Changes to the current ORDER row and the CUSTOMER row are ignored if condition2 is true. Changes to the CUSTOMER row are aborted if condition3 is true. A label is not required on the QUIT statement of the current FOR construct used in the IF construct for condition1 and condition3; however, the program is clearer and easier to maintain if labels are specified.
Deleting rows from a table is an integral part of database maintenance. Unlike modifying the row, deleting the row takes place immediately. The entire row is deleted, regardless of the columns specified in the dataview. In other words, when modifying the contents of a row, only the columns specified on the dataview are available. The system evaluates the actual modifications and performs them at the ENDFOR. The DELETE statement is executed immediately, not at the ENDFOR.
In the following example, the DELETE statement is used. Assume a specific row is deleted if the user presses F4. Otherwise, the subprocedure EVALINP evaluates the row.
FOR FIRST CUSTOMER
   WHERE CUSTOMER.CUSTNAME EQ PROMPT.CUSTNAME
     MOVE CUSTOMER TO CUSTPNL BY NAME
     IF $PF4
         DELETE CUSTOMER
         NOTIFY 'DELETE successful'
     ELSE
         DO EVALINP
     ENDIF
WHEN NONE
    NOTIFY PROMPT.CUSTOMER 'not found'
ENDFOR
Since DELETE is a destructive statement, code it carefully. For example, the previous example displays the row and only executes the DELETE if you press a specific key. You can include a message to indicate that the function was successfully performed.
The BACKOUT statement, since it restores the database to the previous CHECKPOINT or stable condition, restores the deleted row if an intervening CHECKPOINT or TRANSMIT statement with implicit CHECKPOINT was not executed.
The FOR NEW construct adds new rows to a table. Unlike the other FOR constructs, FOR NEW does not iterate. You can code a FOR NEW construct in a LOOP construct to iterate adding rows to a table. Then evaluation is coded in the LOOP to terminate it. For example, in the following code, a subprocedure GETDATA obtains the information for the row and evaluates that information before executing FOR NEW. The subprocedure also sets the flag FINISHED to TRUE based on user input (the user presses a function key) to terminate the loop.
LOOP
   DO GETDATA
UNTIL FINISHED
   FOR NEW CUSTOMER
      MOVE CUSTPNL TO CUSTOMER BY NAME
   ENDFOR
ENDLOOP
The new row is added to the database at the ENDFOR. Before the ENDFOR, you can make any modifications to the table without directly impacting the database. Also, you can code QUIT to bypass adding the row.
When the ENDFOR statement executes, the new row is evaluated and an attempt is made to insert it into the database. If the database table was set up to not allow duplicates, a runtime error occurs if adding the row results in a duplicate. A runtime error causes CA Ideal to display a message on the message line and terminate the run. To avoid this, the WHEN DUPLICATE clause allows the program to recover from the error. Although the error cannot be corrected in the program, the program does not terminate. For example, in the following code segment, a message displays. The LOOP construct prompts the user to re-enter the information for the new row:
LOOP
   DO GETDATA
UNTIL FINISHED
   FOR NEW CUSTOMER
      MOVE CUSTPNL TO CUSTOMER BY NAME
   WHEN DUPLICATE
      NOTIFY 'Duplicate Row, Respecify'
   ENDFOR
ENDLOOP
Note: When using FOR NEW in a LOOP construct, you might want to keep track of the number of rows that are added. You can include a counter in the FOR construct to perform this function. Assume that a variable named CTR was defined in working data and is used in the following example to accumulate the number of new rows:
FOR NEW CUSTOMER
   MOVE CUSTPNL TO CUSTOMER BY NAME
   ADD 1 TO CTR
WHEN DUPLICATE
   NOTIFY 'Duplicate Value, Please Respecify'
   SUBTRACT 1 FROM CTR
ENDFOR
CTR is decremented if the WHEN DUPLICATE clause is executed. This is necessary. The value of the variable is incremented in the FOR construct, regardless of whether the row is successfully added to the database. Since rows are evaluated and added to the database at the end of the FOR construct, a duplicate row is not encountered before the ENDFOR statement. If the row is a duplicate and not added to the database, the CTR must be decremented in the WHEN DUPLICATE clause to maintain an accurate value in the counter.
You can code TRANSMIT in the FOR NEW construct. Although a TRANSMIT performs a CHECKPOINT, the current new row is not included since the new row is not written to the database until the ENDFOR. A TRANSMIT after the ENDFOR commits the new row.
Note: When adding rows to the database, use a dataview containing all of the columns in the table. That way, the columns are initialized either explicitly by the program or implicitly by the default values as specified for the columns.
When default values are not specified for the columns included in the dataview, values are defined based on the data type. Numeric data is set to zero and alphanumeric data is set to blank. Nullable columns are set to NULL. All time, date, and timestamp columns are set to the respective current value at the time the row is added.
Any columns not included in the dataview must also be initialized when the row is added to the database, otherwise, a runtime error can occur because CA Datacom/DB initializes the column to blank regardless of data type, unless Datadictionary field attribute, DBEDITS, is specified as Y. To avoid initialization errors in CA Ideal, use a dataview that includes all of the columns in the row or specify Datadictionary field attribute DBEDITS=Y. For more information, see the [set the ddb variable for your book] Datadictionary Attribute Reference Guide.
You can modify and commit the changes to the database. The following section explains it in detail.
You modify and formally commit the changes to the database in two separate steps. That is, changes to the database are evaluated and applied to each row in the FOR construct when the ENDFOR statement is reached. You can include code in the FOR construct to control the actual changes. This is distinct from committing the changes.
A checkpoint is required to commit the changes to the database. A checkpoint establishes the current stable state of the database. Any changes to the database become permanent or a part of the current stable state. A checkpoint can occur explicitly using the CHECKPOINT statement or implicitly using the TRANSMIT statement.
Before a checkpoint, either implicit or explicit, you can remove or back out the updates from the database through the BACKOUT statement. As a safeguard, BACKOUT is automatically executed when a program abends. You can code it in a program to ensure that changes are not committed for a set of rows when some function cannot complete.
In the following example, the CHECKPOINT statement commits the changes to the database.
FOR FIRST CUSTOMER                 : access the row
    WHERE CUSTOMER.CUSTNAME EQ PROMPT.CUSTNAME
    : statements                   : modify the row
ENDFOR                             : apply the changes
                                   :   to the database
CHECKPOINT                         : changes committed
In this example, a single customer row is accessed and processed using the statements. The changes are made to the database at the ENDFOR. The CHECKPOINT outside of the FOR construct formally commits those changes. Once checkpointed, the changes cannot be lost or backed out of the database.
When a FOR EACH or FIRST construct accesses and modifies several rows, the CHECKPOINT commits the changes made to all of those rows. For example, all of the customers in Texas are accessed and assigned to a new salesman. Although each row is processed individually and the database updated one row at a time, the CHECKPOINT statement outside of the construct commits all of the rows at the same time:
FOR EACH CUSTOMER                  : access the row
   SET CUSTOMER.SALESMAN = NEWID   : modify the row
ENDFOR                             : apply the change
                                   :    to the database
CHECKPOINT                         : all rows committed
The BACKOUT statement removes all of the updates to the database that were made since the last CHECKPOINT. BACKOUT returns the database to the most recent stable state. For example:
CHECKPOINT : changes committed
FOR EACH CUSTOMER                  : access the row
   SET CUSTOMER.SALESMAN = NEWID   : modify the row
ENDFOR                             : apply the changes
                                   :   to the database
BACKOUT                            : changes backed out
                                   :  to checkpoint
In the previous example, modifications are made to the row in the FOR construct. The BACKOUT statement following the FOR construct, however, removes those changes and returns the database to the previous CHECKPOINT state.
Note: You can specify CHECKPOINT or BACKOUT in the FOR construct. Be aware though, that CHECKPOINT in the FOR construct does not include the current row. The modifications to the current row are not applied to the database until the ENDFOR statement is executed. Similarly, BACKOUT does not affect the current row since the changes are not yet in the database. A CHECKPOINT or BACKOUT statement following ENDFOR includes the last accessed row.
CHECKPOINT and BACKOUT release exclusive control of the current row. For further information, see the CA Datacom/DB documentation.
When you use mainframe CA Ideal in a CICS environment, executing a TRANSMIT statement always performs a CHECKPOINT. This ends the current transaction and protects modifications against loss if the system abnormally terminates during TRANSMIT.
The TRANSMIT statement causes a CHECKPOINT.
The following shows the sequence of events that occurs when the program is updating a row and TRANSMIT (with a CHECKPOINT) is executed in the FOR construct:
FOR FIRST CUSTOMER                : access the row
   WHERE CUSTOMER.CUSTNAME EQ PROMPT.CUSTNAME
   : statements                   : modify the row
   TRANSMIT CUSTPNL               : commit previous row
ENDFOR                            : apply the changes
                                  :    to the database
The CHECKPOINT action of the TRANSMIT commits any changes made to the database before the current iteration of the FOR construct. Any changes made to the current row are not applied to the database because ENDFOR was not executed for the current row. A TRANSMIT or CHECKPOINT following ENDFOR commits the current modifications.
For online applications, terminal I/O causes a database checkpoint to occur. Because user input at the terminal can be time-consuming and has the potential to obtain control of multiple rows for indefinite periods of time, the TRANSMIT statement causes a CHECKPOINT.
In other words, with CA Datacom/DB, control is not maintained across CICS transaction boundaries. Each TRANSMIT is considered a CICS transaction. With DB2 and DBSQL ANSI mode, the database cursor is released when any checkpoint occurs.
More than likely, an online application transmits a panel containing the data to update. Just as with display, the data is moved to the panel fields before the TRANSMIT statement is executed. The user then modifies the data displayed on the panel. When the user returns control to the program, the data in the panel fields must then be assigned or moved to the dataview. The actual update to the dataview can be performed based on the evaluation of some condition before executing the MOVE statement. For example, assume that if the user presses PF4, the changes are applied. You can code the program as:
FOR FIRST CUSTOMER
   WHERE CUSTOMER.CUSTNAME EQ PROMPT.CUSTNAME
     MOVE CUSTOMER TO CUSTPNL BY NAME
     TRANSMIT CUSTPNL
     IF $KEY EQ 'PF4'
        MOVE CUSTPNL TO CUSTOMER BY NAME
     ENDIF
ENDFOR
CA Ideal ensures that the modified row has not changed from the initial access to the point of update. An error condition occurs if an attempt is made to apply changes to a row that was modified between the time it was accessed and the time of the actual update to the row. If the checkpoint occurs outside of the FOR construct, there should be no conflict. Access is maintained for the update. However, if you code TRANSMIT in the FOR construct, it causes an automatic checkpoint and the row is released. Another user can access and modify the row between the time of access and time of actual update. If the row was changed from the original, control passes to the error procedure. You can design a program-defined error procedure to handle this situation by re-accessing the row or bypassing the changes. For more information, see the "Error Handling" chapter.
A CHECKPOINT is automatically issued when an application terminates successfully. A BACKOUT is issued when an application terminates abnormally due to a system error. In all other cases, a BACKOUT is only issued if coded in the program.
It is important to consider database access and row availability in a multi-user system. The row is not updated in the database until the ENDFOR when accessing data from a CA Datacom/DB CBS database or a DB2 database. The control of the row from retrieval to release is different in these databases. In either, a CHECKPOINT, TRANSMIT, or BACKOUT releases the row.
There are two levels of exclusive control: Primary and secondary. In the FOR construct, the row currently updated is held with primary exclusive control. Once ENDFOR is reached, the updates are applied to the database and the row is held with secondary exclusive control. Primary exclusive control indicates the current row, secondary exclusive control indicates the updated rows that were not checkpointed. All control is released when a checkpoint is performed. This is demonstrated by an example:
FOR ...                  : access with exclusive control
   SET or MOVE           : update dataview
ENDFOR                   : update database row and downgrade
                         : to secondary control
CHECKPOINT               : release all control
The program that controls the row can access any row, even those held with primary and secondary exclusive control. Another user cannot update rows held under any level of control.
There is one level of access in a program. DB2 supports table level locking and page level locking for all releases. With Release 4, DB2 also supports row level locking, if implemented, and the no lock isolation level. When a row is locked with update intent, no other users can access that row until it is released. The updates are performed at the ENDFOR. When page or table level locking is used, a CHECKPOINT is required to release the lock. When row level locking is used, the lock is released when another row is read from the same set.
If the flag is on, the buffer image of the originally accessed row held in a dataview buffer is compared to the dataview on the FOR construct. If these match, the data has not changed and no update is necessary. If they do not match, an update is being performed. The exact image is then compared to the row currently in the database. If these match, the row is accessed and updated. If they do not match, the row has been modified by another user between the time of the original access and the attempt to apply the updates. An error condition occurs.
The error condition is identified by evaluating $ERROR-DVW-STATUS for 'I3' for CA Datacom/DB and $ERROR-TYPE 'D72' for DB2. For more information about handling this error condition, see the
chapter 6, "Error Handling".
Thus far, the examples using TRANSMIT have modified a single row. When accessing a CA Datacom/DB native dataview, you can issue TRANSMIT in the FOR EACH construct. Even though the accessed rows are released when a TRANSMIT with implicit CHECKPOINT, CHECKPOINT, or BACKOUT statement is executed, the set definition and current position in the set are not lost. This means that you can code these statements in any FOR construct.
The following example shows changes were not made to the current row. The TRANSMIT statement commits the previous row. A CHECKPOINT or TRANSMIT statement outside of the FOR construct is needed to commit the last row accessed.
FOR EACH CUSTOMER                    : access the row
   MOVE CUSTOMER TO CUSTPNL BY NAME  : fill panel
   TRANSMIT CUSTPNL                  : transmit panel
   MOVE CUSTPNL TO CUSTOMER BY NAME  : update row
ENDFOR                               : apply the change
                                     :  to the database
CHECKPOINT                           : commit last row
In DB2, you cannot update multiple rows using TRANSMIT or CHECKPOINT in the FOR construct. The database cursor is released along with the accessed rows when TRANSMIT, CHECKPOINT, or BACKOUT is executed. CA Ideal is only able to locate the current unique row and cannot locate the current row in a multi-row set. For that reason, you can only specify TRANSMIT, CHECKPOINT, and BACKOUT in a FOR FIRST 1 construct that accesses a unique row.
Once the dataview is released by a TRANSMIT with implicit CHECKPOINT, CHECKPOINT, or BACKOUT statement, the dataview fields of the last accessed row are still accessible but not modifiable. For example, as part of an error processing routine, BACKOUT can be followed by a LIST statement to output the dataview fields.
Additionally, the data in the last accessed dataview row is available outside of the FOR construct on a read-only basis. Updates can only occur in the FOR construct.
|
Copyright © 2015 CA Technologies.
All rights reserved.
|
|