To install CA Business Intelligence Using WebSphere 6.1.0.7 and the default SQL Anywhere database
- If you are planning to install CA Business Intelligence on Windows Server 2003, install Windows hotfix KB925336.
- If you are running Query As A Web Service (
QAAWS
) from Business Objects, verify that .Net framework 2.0 is installed.
- If you are installing from a DVD and the Windows Autoplay setting is enabled, the installer starts automatically. If Autoplay is not enabled, or you are installing from a hard drive, run cabiinstall.exe from the root directory of the CA Business Intelligence DVD.
Note: If CA Business Intelligence detects that BusinessObjects Enterprise XI 3.x is already installed on the computer, an error message displays. Click OK to exit the program. The installer program does not continue if it finds a pre-existing version of BusinessObjects Enterprise XI 3.x.
The Please Choose Setup Language screen displays.
- Select English, then click OK.
- Click Next at the Introduction screen.
- Accept the CA Technologies License Agreement, then click Next.
- Click Yes to install the sample Microsoft Access databases and reports or No to skip installing the samples, then click Next.
- If you want to save the CA Business Intelligence response file, click Yes and enter the directory where you want to create the response file, then click Next.
The default locations are:
- For Windows 32-bit computers: C:\Program Files\CA\SC\CommonReporting3
- For x64 computers: C:\Program Files X(86)\CA\SC\CommonReporting3
- Click Install at the Review Settings screen.
The CA Business Intelligence installation wizard begins.
- At the CA Business Intelligence installer's Welcome screen, click Next to proceed with the installation.
- Accept the BusinessObjects Enterprise License Agreement, then click OK.
The Choose Language Packs screen displays.
- Select the language packs you want to install.
Note: The setup program uses this setting for the duration of the installation. You can select the languages that you want to install on your new BusinessObjects Enterprise server later.
- Click Next.
The Install Type screen displays.
- Click New.
- Click Install SQL Anywhere Database Server.
This option enables CA Business Intelligence to install a new copy of the SQL Anywhere database.
- Select the Enable servers upon installation check box if you want to launch BusinessObjects Enterprise when the installation process finishes. If you do not select this option, enable and run the BusinessObjects Enterprise application server manually from the CCM after installation.
- Specify where to install the BusinessObjects Enterprise components in the Destination Folder field (ensure that enough disk space is available).
The defaults are:
- C:\Program Files\CA\Sc\CommonReporting3 (for 32-bit computers)
- C:\Program Files X(86)\CA\Sc\CommonReporting3 (for x64 computers)
- Click Next to continue with the installation.
The Server Components Configuration screen displays.
- Specify a port number in the CMS port field.
The default CMS port number is 6400.
The CMS communicates with other BusinessObjects Enterprise servers through the specified port.
Note: If the port you specified is unavailable or already used by some other service, you are asked to specify another port number.
- Specify a password for the CMS administrator account in the Password and Confirm password fields.
Note: Select the Configure the BusinessObjects Enterprise Administrator password at a later time check box if you want to configure the Administrator password after the installation is complete. If you select this option, log in to the CMC with a blank password the first time to change the Administrator password.
- Click Next to continue with the installation.
The Server Intelligence Agent screen displays.
Note: If the port you specified in step 19 is unavailable or already used by some other service, you are asked to specify another port number.
- Provide a unique name to identify the SIA node in the Node Name field. By default, the node name is same as the system host name.
Note: Do not use spaces or nonalphanumeric characters in a SIA node name.
- Specify a port number for the SIA in the Port field (the default is 6410). The SIA uses this port to communicate with the CMS.
- Click Next to continue with the installation. Once the SIA information is entered, the port number is validated before you can proceed to configure the CMS database for your installation. A warning displays if the port you specified is not available.
The SQL Anywhere Database Server Configuration screen displays.
- Specify the port number for the SQL Anywhere database server in the SQL Anywhere Port Number field. The default port number is 2638. Use this number unless the port is unavailable.
- Specify the Data Source Name. The default name is BOE120. An ODBC DSN connection is created with this name.
- Specify and confirm a password for the SQL Anywhere DBA user account in the SQL Anywhere DBA User Account area.
- Confirm the user name and provide a password for the SQL Anywhere BusinessObjects database user account in the SQL Anywhere BusinessObjects User Account area.
- Click Next.
The Select Web Application Server screen displays.
- Select the WebSphere 6.1 web application server from the drop-down list, then click Next.
The Configure Web Application Server screen displays.
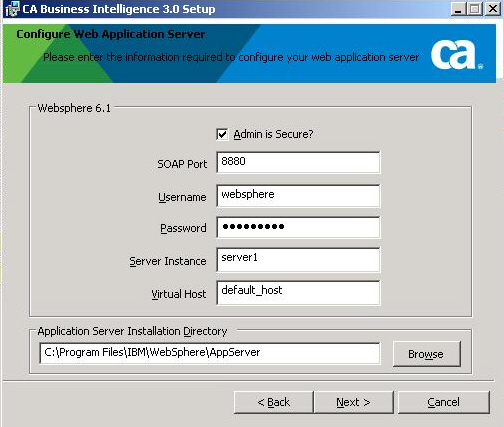
- Select the Admin is Secure check box if you selected the option Enable administrative security during the WebSphere installation. This selection enables security requiring administrative access credentials to the application.
- Enter the SOAP connector port for WebSphere (the default port is 8880).
To identify the SOAP Connector Port for WebSphere:
- Open the WebSphere administrative console (https://localhost:9043/ibm/console/logon.jsp).
- Log in to the application server with the Administrative user name and password.
- Enter the Password for the account with administration rights to the application server.
- Go to Servers, Application Servers, then click the application server profile which you want to use for the deployment (for example, server1).
- Under Communications, Ports, you can view the SOAP connector port that is assigned to the particular application server node.
- Enter the WebSphere application server profile (server1) administrative Username and Password.
- Enter the WebSphere application server profile name (server1, if you are using the default profile that WebSphere created and you have not changed the name) in the Server Instance field.
- Enter the Virtual Host name (default_host or admin_host).
- If you use default_host, your CMC/InfoView applications are deployed on port # 9060.
- If you use admin_host, your CMC/InfoView applications are deployed on port # 9080.
- Enter the installation location of WebSphere, then click Next.
- Click Next to start the installation.
- Once the installation is complete, the installation completion message displays. Click Done to finish the installation process.

