

Creating and Using Stored Tables › Stored Table Summary
Stored Table Summary
The following list summarizes the steps involved in defining and using stored tables through the Automatic System Facility:
- Name the table by entering the table name in the Table Name field on the Activity Selection screen and selecting the Define Table function ([PF2]).
- Define the columns by selecting the Define Columns function ([PF2]) from the Table Definition screen. On the Column Definition screen, enter the column names and widths. Optionally, enter an entry type of NUMERIC or CURRENCY to override the default type of TEXT. Press [Enter] to register the columns with ASF. ASF assigns default values to the Type and Display Seq fields.
- Modify the column definitions as needed and press [Enter] to record the changes with ASF.
- Generate the table by returning to the Table Definition screen from the Column Definition screen (press [Clear]) and selecting the Generate function ([PF3]).
- Load data into the table by returning to the Activity Selection screen (press [PA1]) and selecting the Load Data function ([PF3]). Enter the rows on the Data Display screen, loading each one individually by pressing [PF1].
- Display, change, and remove rows by returning to the Activity Selection screen (press [PA1]) and selecting the Display/Change Data function ([PF4]).
- Select rows for display by returning to the Activity Selection screen (press [PA1]) and selecting the Select Data function ([PF5]). Enter your selection criteria and press [Enter]. Press [Enter] again to display the selected data on the Data Display screen.
- Return to the Activity Selection screen from the Data Display screen by pressing [PA1] once to return to the Data Selection screen, and [PA1] a second time to return to the Activity Selection screen.
- Display the table through CA OLQ by selecting the Query function ([PF13]) from the Activity Selection screen if you have OnLine Query.
Create APPLICANT Table
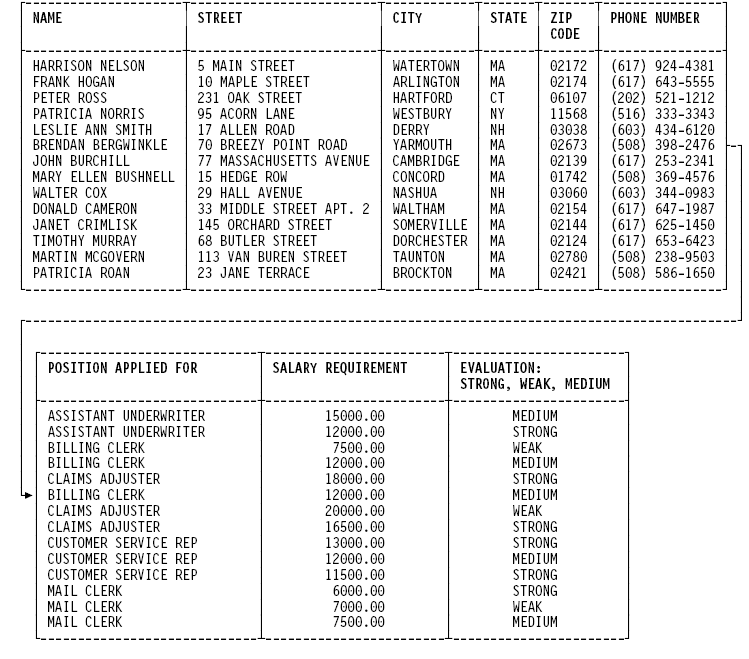
To review stored tables, create the APPLICANT stored table for Fran Snell's employment application. The APPLICANT stored table contains information about applicants for positions at Acme Insurance, as shown below.
Define the APPLICANT table by naming it on the Activity Selection screen and defining the following columns on the Column Definition screen:
|
COLUMN NAME
|
WIDTH
|
TYPE
|
UNIQUE KEY
|
|
NAME
|
30
|
|
X
|
|
STREET
|
30
|
|
|
|
CITY
|
25
|
|
|
|
STATE
|
2
|
|
|
|
ZIP CODE
|
5
|
|
|
|
PHONE NUMBER
|
13
|
|
X
|
|
POSITION APPLIED FOR
|
30
|
|
X
|
|
SALARY REQUIREMENT
|
7
|
C
|
|
|
EVALUATION: STRONG, WEAK, MEDIUM
|
6
|
|
|
Note that the unique key is made up of three columns. Specify the unique key by typing x in the Unique Key field for the NAME, PHONE NUMBER, and POSITION APPLIED FOR columns. Generate the APPLICANT table and load the rows shown above. You will use the JOB and APPLICANT tables that you have just created to define a view as described in the chapter "Deriving Views".
Copyright © 2014 CA.
All rights reserved.
|
|