- Start the Diagram Trace Utility by selecting Start, All Programs, CA, Gen xx, Diagram Trace Utility.
where, xx is the current CA Gen release number.
- From the Build Tool, select the EGOLFWIN module, and then click the Test
 icon on the toolbar.
The Load Module Test dialog appears for the selected load module.
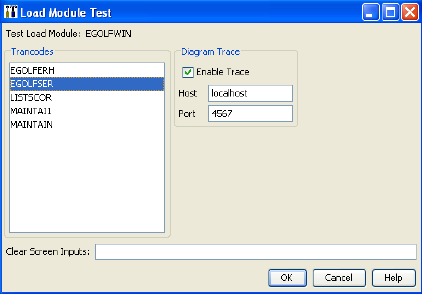
As mentioned earlier, this load module has the equivalent of five entry points. To enter at the eGolf Services Home page, select the trancode EGOLFSER in the list of Trancodes. The application can be tested with or without actually tracing through the action diagram statements. To trace through the action diagram statements, ensure that the Enable Trace check box is checked, and then select the OK push button. The eGolf Services Home page should open.
If you get "Could not successfully verify that Diagram Trace Utility was started at: localhost:4567, ensure it is started and try again." error message, return to Step 1 and start the Diagram Trace Utility.
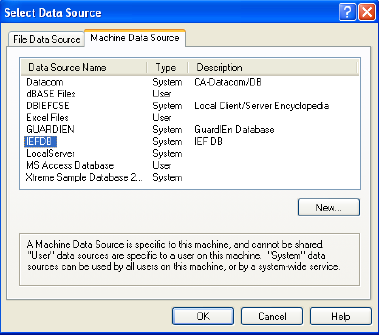
- To use the application, we must first sign up! Select the sign up! push button. When presented with the Select Data Source window, select the Machine Data Source tab. Then select the IEFDB Data Source Name, and then select the OK push button.
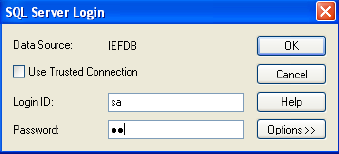
- If a DBMS login dialog opens, enter the appropriate User ID and Password. In the example below, we just need to enter the SQL (User) ID, and Password, and then select the OK push button.
- The Diagram Trace Utility main window shown earlier then opens. If you recall, in Design we assigned a click-event to the sign up! push button. We let the Toolset name the event GOLF_SERVICES_PB_SIGN_UP_CLICK. The Diagram Trace Utility shows that we are about to enter that event.
- From the Debug view toolbar, click the Step Into
 icon. The highlighting moves to line 1, MOVE local_blank golfer to export golfer. If we wanted to, we could go to the Variables view and expand the LOCAL View by selecting the plus sign next to it, and then expand the LOCAL_BLANK_GOLFER. But, there is nothing in that view, which is why it is the "blank" view. We are just using it to initialize the export golfer view prior to opening the GOLFER_REGISTRATION dialog. This prevents the information from a prior session from being redisplayed in the dialog.
Note: It has not actually moved the contents of the local_blank golfer to the export golfer yet, but it will when we select the StepInto icon again.
- From the Debug view toolbar, select the Step Into icon again. The highlighting moves to line 2, Move local_blank golfer to export_confirmation golfer. So the action in line 1 has now been executed and the action in line 2 will be executed when we select StepInto again.
- Select the Step Into icon again. The highlighting moves to line 3, OPEN Dialog Box GOLFER_REGISTRATION. So the action in line 2 has now been executed and the action in line 3 will be executed when we select StepInto again.
- Select the Step Into icon again. The highlighting moves to the bottom of the event action. When we select Step Into again, the eGolf Golfer Registration dialog will open.
- Select the Step Into icon again. The Registration dialog opens. It may be underneath the Diagram Trace Utility. Control is indicated on the Windows task bar by the active task bar button.
Note: Since we are testing this application in a Windows GUI environment, we will not see any of the animation in our GIFs. That is because we are actually looking at the associated BMPs.
When we go to the Web, we will see the animation.
- In the application's eGolf Golfer Registration dialog, enter the required information for a new user and select the Next> push button. In the Diagram Trace Utility, the highlighting is positioned at the GOLFER_REGISTRATIO_PB_NEXT_CLICK click-event that we have associated with that push button.
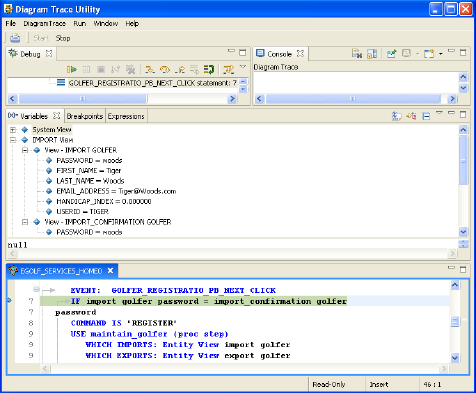
- Select the Step Into icon again. The highlighting moves to line 7, which verifies that the two passwords entered match. This statement has not been executed, but will be executed the next time we select Step Into. If necessary, expand the IMPORT View in the Variables view. Select the + sign next to View IMPORT GOLFER, expanding the attribute views. Select the + sign next to View IMPORT_CONFIRMATION GOLFER, expanding the single attribute view.
In the example below the two passwords are identical, so we would expect the highlighting to proceed to the statement setting the Command to REGISTER. If the passwords were not the same, we would expect the highlighting to drop down to the statement setting the Exit State to password mismatch. Or, we can right-click either of the two passwords to change the values to be the same or different for testing purposes.
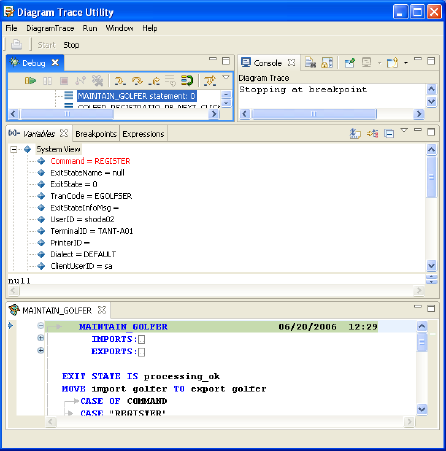
- Select Step Into icon again. As predicted, the highlighting moves to the setting of the Command system variable. However, it has not yet set the Command. We can verify this by expanding the System View variables. Next to the attribute Command, there is no value.
- Select Step Into icon again. The highlighting now moves to the USE maintain_golfer (proc step) statement. Notice that under the System View variables, the Command has now been set to REGISTER. When we select Step Into again, we will effectively leave the client procedure for the maintain_golfer server procedure step. When we return from the server procedure step, we will return to the IF EXITSTATE statement directly below the currently highlighted USE (proc step) statement.
- Select the Step Into icon again.
Note: We are now entering the MAINTAIN_GOLFER server procedure step.
- Select the Step Into icon again.
Note: In the Variables System View notice that the ExitStateInfoMsg has not been entered. We are getting ready to initialize the Exit State.
- Select Step Into icon again. The ExitStateInfoMsg has now been initialized to Processing OK. We are now ready to move the import views to the export views. Expand the Import View Variables and expand the IMPORT GOLFER view.
Note: The golfer information was successfully passed from the client to the server procedure.
- Now, select the EXPORT View Variables and expand the EXPORT GOLFER view. Currently, its values are blank.
- Select Step Into icon again.
Note: The export views have now been populated from the import views. As various action diagrams would be called below, any information they exported would overlay the matched view in the procedure steps export view. Only the login_golfer and calculate_golfer_handicap_index action blocks export information.
Since the system command is REGISTER, we would expect the next statement to be highlighted would be the CASE "REGISTER" statement.
- Select the Step Into icon again. The CASE "REGISTER" statement is highlighted.
- Select the Step Into icon again. The USE add_golfer statement is highlighted. When we select the Step Into icon again, we will be entering the add_golfer action block. Upon completion of that action block, we will be returned to the bottom of this server procedure step, since there are no other statements to be executed.
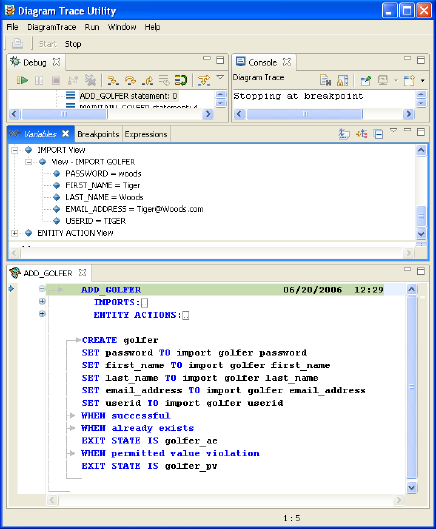
- Select the Step Into icon again. We are now entering the ADD_GOLFER action block. Selecting Step Into will move us to the CREATE golfer statement.
- Select the Step Into icon again. The CREATE golfer statement is highlighted.
Note: The Create action operates on the ENTITY ACTION View. We are going to create an occurrence of a golfer in our database, setting the Entity Action views to the values passed to us in the import views.
- Expand the ENTITY ACTION View and expand View GOLFER. Currently, it is empty.
- Select the Step Into icon again. The WHEN successful statement is highlighted.
Note: This indicates we did not receive an already exists or a permitted value violation. Expand View GOLFER once again and see what values were used to create the new occurrence of the golfer. As expected, they are the same values from the import views.
- Select the Step Into icon again. This returns you to the bottom of this action diagram.
- Select Step Into icon again. This returns us to the bottom of the server procedure step
- Select the Step Into icon again. This returns us to the client procedure step just after the call to the server procedure step. After the server call, we will check the value of the ExitState system attribute to verify that everything worked okay. If so, we will change the ExitState value to the value that will cause us to flow to the golfer's home page, so our golfers can begin to enter their scoring records.
- Select the Step Into icon again. The processing was OK, so we are now positioned to set the ExitState to the value which will cause us to flow to the golfer's home page.
- Select the Step Into icon again. We have set the appropriate ExitState value to initiate the flow to the other client procedure step.
- Select the Step Into icon again. We have executed the statement to close the GOLFER_REGISTRATION dialog and now we are at the bottom of the GOLFER_REGISTRATIO_PB_NEXT_CLICK event.
- Select the Step Into icon again. In the background, you can see that we have switched to the eGolfer Home page. We have an open event associated with this window to pre-populate it with the list of scoring records for the golfer. This is a new golfer, so there will not be any scoring records.
- Continue to Step through the open event for this client procedure. It will:
- Set the system command to LIST.
- Call the list_scoring_record server procedure step that will attempt to read each scoring record for the golfer that was passed to it.
- Return to the bottom of the client procedure step.
- Display the eGolfer Home window with the golfer's first name and handicap index displayed. Keep in mind that it takes a minimum of five scoring records to establish a Handicap Index.
- Continue to test and trace the application. If you would like, you can enter the sample test data shown in the table below.
- To stop tracing completely, click the Stop button on the Diagram Trace Utility main toolbar.
- For additional information, review the Diagram Trace Utility User Guide.
Note: Since this application is intended to be a Web Application, we have omitted the system menu from the Design, which makes it somewhat difficult to close the application. To close or kill the eGolf application, you will need to go to the Task Manager and from the Applications tab perform an End Task.

