Previous Topic: Add an Entity View of GolferNext Topic: Designing Client Procedures


Modify the READ EACH Statement

Follow these steps:

  1. To modify the READ EACH statement, select UNTIL FULL in the TARGETING clause. Then, from the Main Menu select Edit, and toward the bottom of the drop-down menu select Insert After….
  2. Now select the qualifier Sorted Descending, select the attribute date, select the qualifier Sorted Descending, select the attribute time, select the qualifier Where expression, select the expression relationship view, select the occurrence phrase DESIRED persistent view, select the Entity Relationship is maintained by SOME golfer, select the expression AND, select the expression attribute view, select the occurrence phrase THAT persistent view, select the relational operator IS EQUAL TO, select the expression character view, select the occurrence phrase transient view, select the entity view import golfer, and then select the Add push button.

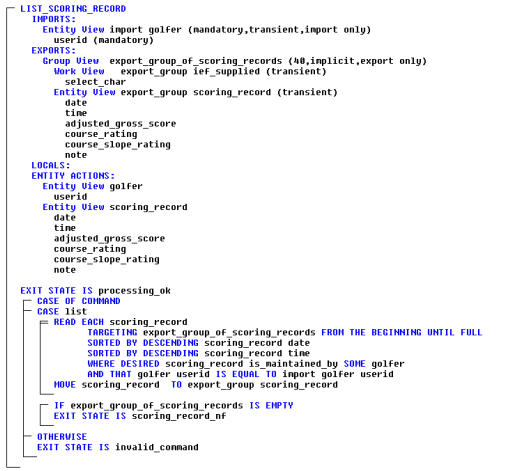
    Now the completed READ EACH statement will read each scoring record for some golfer whose userid was passed to it in the import view, returning them one at a time to the action diagram in the diagram's entity action view. They will be returned sorted by date, and time within the same date, and for each one found it will perform the actions described within the READ EACH statements brackets, which is simply to move it to a position in the export group view. This process will continue until it either runs out of scoring records to read for the given golfer, or when it fills up the export group view with 40 occurrences.

  3. Unlike Create, Read, and Update statements, Read Each statements have no exception conditions. They simply perform the actions within their brackets for each occurrence found. If none are found, they perform no actions. However, we can test the export group view to see if it is been populated, and set an appropriate exit state value if it has not.

    To add this new statement, select the bottom of the READ EACH bracket under the MOVE statement. From the Main Menu select Edit, then Add Statement, then select If….

  4. Now select the expression group view, select the repeating group view export group of scoring records, select the repeating group view condition IS EMPTY, and then select the Add push button.
  5. From the Tool Palette select the Exit State push button, and with the cursor (which now resembles a crosshair) select the IF statement
  6. Now select <Global Exit States>, select the Expand/Contract push button if necessary, scroll down and select the SCORING RECORD NF exit state value, select the Select push button, and then select the Add push button.
  7. Add a CASE OF COMMAND statement that performs this logic when the command value is LIST. Look back to a prior section if you need help.
  8. The next step is to move these two statements within the CASE OF COMMAND statement. To do so, click-and-drag the cursor from the READ EACH to the bracket at the bottom of the IF statement to highlight both statements. (Be careful not to select the blank line above the READ EACH statement.) Then press F7 and with the cursor (which now resembles a hand), select the CASE statement to move these two statements underneath.
  9. Set an exit state value within the CASE OF COMMAND statement to handle the condition when an invalid command is passed to the action diagram.
  10. Initialize the exit state value at the beginning of the action diagram.
  11. Save your model.

The completed action diagram should look like the following example:
Modify the READ EACH Statement