Previous Topic: Rules for Check in and Check outNext Topic: How to Perform Automatic Check in and Check out


Example: Check in and Check out Flow

The following illustration shows the flow in check in and check out processing:

Check in/Check out Flow

  1. A new model is created on a Toolset and saved at that Toolset.
  2. The entire model is checked in to the Host Encyclopedia. The check in adds the model to the list of models residing on the Host Encyclopedia. A read‑only copy of the model remains on the Toolset.
  3. The model in the Host Encyclopedia is checked out to the Toolset where it replaces the read‑only copy that was left there in Step 2.

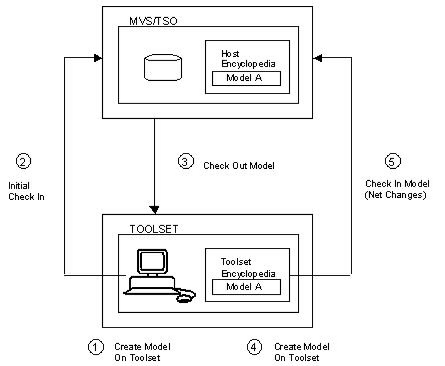
    Note: The Host Encyclopedia records the user ID of the person who checks out the model. It does not record the workstation to which the model is checked out.

  4. On the Toolset, changes are made to the model that was checked out. When the changes are saved on the Toolset, the complete model now resides only on the Toolset.
  5. The user updates the model on the Host Encyclopedia by using Update and Check In Model or Update But Do Not Check In option.

    Because this update is not the initial check in (Step 2), only the changes made to the model are sent to the Host Encyclopedia.

    If the model is updated with check in, the model is checked into the Host Encyclopedia, and the Toolset again contains a read‑only version of the model.

    Note: If you skip the check out in Step 3, Step 5 fails because the model is not checked out to the user trying to do the check in. Only the user, model owner, or encyclopedia administrator who checked a model out can check the model back in.