

Configuring Comm. Bridge Server Connections › Transport API – Additional Details › LU6.2 CPI-C Connections › Details for Configuring for LU6.2
Details for Configuring for LU6.2
When configuring a Comm. Bridge to use CPI-C for a target server, the following parameters from the SNA network configuration are required:
- Partner LU name of the application LU name for CICS or z/OS APPC address space (for use with IMS)
- Local LU Alias
Note: This field may or may not be used depending on the SNA service provider. Certain SNA providers allow an application to specify the Local LU Alias prior to allocating a conversation. Others select the LU based on their own defined convention. This field is ignored if the SNA service provider does not allow the Local LU Alias to be specified by the application program.
For more information about how a Local LU is selected for use by a CPI-C application program, see the third party vendor documentation.
- Mode Table Entry name
- Code Page number
To set the Comm. Bridge server configuration parameters:
Follow these steps:
- Start the Comm. Bridge and select Server > Config…
- Enter a server name and description for this target server connection.
- Select CPI-C from the Transport API selection list. The Comm. Bridge automatically supplies the API DLL name.
- Click Details to display the LU6.2 (CPI-C) Server Configuration – Details dialog.
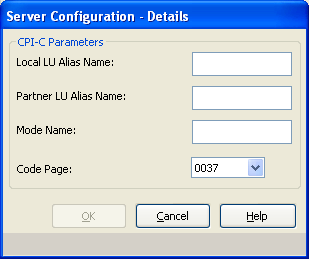
- Provide the LU6.2 parameter values listed above.
- Select an appropriate Code Page value. The Code Page field allows you to select from a list of supported code pages for translation. Only the header portion of the Common Format Buffer (CFB) is translated. The view data contained in the cooperative flow CFB is not subject to translation. The supported code pages include:
- 0037
-
Australia, Brazil, Canada, The Netherlands, Portugal, New Zealand, South Africa, United States of America (USA)
- 0273
-
Austria, Germany
- 0277
-
Denmark, Norway
- 0278
-
Finland, Sweden
- 0280
-
Italy
- 0284
-
Spain
- 0285
-
Ireland, United Kingdom (UK)
- 0297
-
France
- 0500
-
Belgium, Switzerland
Click OK to return to the Server Configuration dialog.
- Click OK to return to the main menu.
- Save the current configuration. For more information about saving configurations, see "Saving Configuration Files."
Copyright © 2013 CA.
All rights reserved.
|
|