

Testing the Client Manager › Testing a Server Connection Using the ECHO Transaction
Testing a Server Connection Using the ECHO Transaction
The Client Manager can be used to test direct connections to servers or can be used to test server connections supported through the use of a CA Gen Communications Bridge.
The following illustration depicts the Client Manager direct connect test environment:

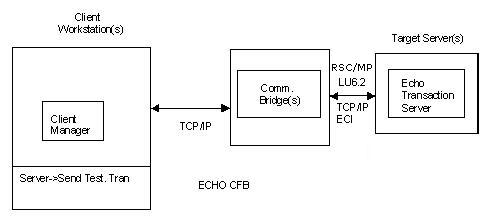
The following is an illustration of a Client Manager connecting to the target server execution environment by way of a Communications Bridge.
This procedure assumes the applicable third party communications software has been configured, initialized, and started on all test machines.
- Verify the target server environment is active.
- LU6.2(CPI-C) (z/OS CICS and z/OS IMS)
If necessary, contact the CICS/IMS administrator to verify that the CICS/IMS region is up (available) and/or to acquire the LU6.2 sessions for the independent LU associated with your Client Manager. A session between CICS/IMS and the SNA service provider must be established.
Note: For target servers using z/OS server environments, see Host Encyclopedia and Host Construction Installation Guide and z/OS Implementation Toolset Installation Guide.
- TCP/IP (Sockets)
- Transaction Enabler (Windows and UNIX)
Start AEFUF and AEFAD
Note: For UNIX target systems using the Transaction Enabler, see the Transaction Enabler User Guide. For Windows servers using Transaction Enabler, see the Windows Implementation Toolset User Guide.
- Tuxedo Proxy Client (UNIX)
Start the Tuxedo Proxy Client and the Tuxedo bulletin board with the configured ECHO transaction server.
Note: For using Tuxedo Proxy Clients, see the Tuxedo User Guide.
- TCP/IP to Enterprise Java Beans CFB Converter Services (Windows and UNIX)
Note: For using EJB Converter Services, see the Distributed Processing - Enterprise JavaBeans User Guide for EJB configuration details.
- z/OS CICS: CICS TCP/IP Direct Connect
Note: For target servers using z/OS CICS, see the Host Encyclopedia and Host Construction Installation Guide and the z/OS Implementation Toolset Installation Guide.
- z/OS CICS: CICS Socket Listener
Note: For target servers using z/OS CICS, see the Host Encyclopedia and Host Construction Installation Guide and the z/OS Implementation Toolset Installation Guide.
- z/OS IMS: IMS TCP/IP Direct Connect
Note: For target servers using z/OS IMS, see the Host Encyclopedia and Host Construction Installation Guide and the z/OS Implementation Toolset Installation Guide.
- Communications Bridge
Note: For target servers using a CA Gen Communications Bridge, see the Distributed Processing – Communications Bridge User Guide.
- NonStop
Does not support Echo transaction server.
- On a client workstation, start the Client Manager and if necessary configure the server connection for connecting to the desired target server. See the Configuring Client Manager Server Connections chapter for details about configuring target server connections.
- Verify the test transaction name specified on the Client Manager Server Configuration dialog. This dialog is launched from the Client Manager main window by selecting Server, Config.
- ECHO is the CA Gen provided transaction name for all servers.
- If the target server is a Communications Bridge and the Bridge is serving a CICS region using ECI as its transport, verify that the Test Tran. Server name is ECHO. ECHO is the CA Gen provided transaction for CICS. The Comm. Bridge uses the name specified in the Test Tran Server entry field as the name of the program that is invoked by the resulting CICS Distributed Program Link (DPL).
Note: For additional information on using ECI from a Comm. Bridge, see the Distributed Processing – Communications Bridge User Guide.
- On the Client Manager main window, select one or more server names from the list.
- On the Client Manager main window, select Server, Send Test Trans.
- Verify that the Client Manager establishes a connection with the selected target servers. Use the status field on the Client Manager main window to track the connection status.
- If your server configuration target is a CICS Socket Listener, the connection will be non persistent. The connection will be closed when the response is returned to the Client Manager. Thus the status field should change from DISCONNECTED to CONNECTED and then back to DISCONNECTED. For all other non CICS Socket Listener server configurations, the connection is persistent, long lived. The status field should change from DISCONNECTED to CONNECTED and remain CONNECTED indicating you have established a connection.
- Verify that a pop-up window appears indicating that the resulting cooperative flow request was successfully returned.
- If the status sequence goes from DISCONNECTED to CONNECTING to DISCONNECTED, you should check the Client Manager's log file and resolve any connectivity problems before continuing the test procedure.
- Watch for pop-up error messages from the communications products as the test executes. If an error message appears, use the information in the Client Manager's log file to determine the cause of the failure. Access the log file by selecting File, Browse, Log File from within the Client Manager application.
Note: You may need to change the logging level to see more detailed logging information.
To change the logging level from the Client Manager main menu, follow these steps:
- Select File, Setup.
- On the File – Setup dialog, select a more verbose logging level from within the Logging Level group box.
- Click OK to return to the main menu.
- On the main window, select File, Save.
- Verify that both check boxes on the File – Save Configuration dialog are marked.
- Click OK to return to the main dialog.
The logging level change takes effect immediately. It is not necessary to restart the Client Manager when changing Logging Level.
- Re-execute the ECHO test.
Copyright © 2013 CA.
All rights reserved.
|
|