

After the Mart is initialized, the user who initialized must log in first. When you log in to Mart for the first time, configure it per the requirements of your organization. You can configure the following settings:
Follow these steps:
The CA ERwin Mart Administrator home page appears. If you have implemented SSL, HTTPS appears in the address bar.
Specifies the profile that is assigned to a user on a model. This profile is assigned whenever a user creates a model and saves it to Mart for the first time. The user inherits the permissions of the default profile selected here on the model that is saved. For example, suppose that User1 is assigned with Modeler profile and the System Administrator selects Architect as the default profile for model creator. If User1 creates Model1 and saves it to Mart, for Model1, User1 inherits the permissions of Architect. Now, suppose that the System Administrator selects Viewer as the default profile for model creator, and suppose that User1 creates Model2 and saves it to Mart. For Model2, User1 inherits the permissions of Viewer.
Specifies the default password that you want to use for new users and for resetting passwords, in the absence of an SMTP server for emails.
Note: Select this option only if you do not have an SMTP server that is configured for emails.
Specifies the name of the SMTP host. Enter the name in the mail.domain.com format. Notification emails are sent from this server.
Specifies the port number of the SMTP server. The default port number is 25. If your company is using an alternate port number for the mail server, specify that port number.
Specifies whether transactions with the SMTP server are authenticated. Select the check box to authenticate.
Specifies the user name to authenticate the SMTP server. Select the Authenticate check box to enable authentication.
Specifies the password to authenticate the SMTP server. Select the Authenticate check box to enable authentication.
Specifies the email ID of the Mart administrator. Notifications to Mart users are sent from this ID.
Specifies the email ID from which administrative emails such as the password reset email are sent.
Mart options are configured.
You have installed and configured CA ERwin DM version 9.1 Mart.
If you are using CA ERwin Data Modeler version 9.0 Mart and you want to upgrade it to release 9.1, upgrade the Mart Server and the Mart database. The Mart server program is upgraded in r9.1, so you must implement the upgraded software.
Note: The procedure to upgrade a Mart from r9.0 to r9.1 is different from the procedure to upgrade from r7.3 through r8.2.7 to r9.1. If your Mart version is r9.0, use the How to Upgrade a Mart from r9.0 to r9.1 procedure to upgrade your Mart to r9.1. The models that are created in r9.0 are upgraded when a user connects to the r9.1 Mart and opens the models. If your Mart version is r7.3 through r8.2.7, use the Installing and Configuring the Mart procedure and install the r9.1 Mart. After installing the Mart, use the Upgrade Mart utility to upgrade the Mart models from r7.3 through r8.2.7 to r9.1.
Important! The r9.1 Mart is designed to work with only CA ERwin Data Modeler r9.1. If you try to connect the r9.1 Mart with CA ERwin Data Modeler r9.0, it may corrupt the Mart and cause unexpected behavior.
The following diagram illustrates how System Administrators can upgrade a Mart from r9.0 to r9.1:
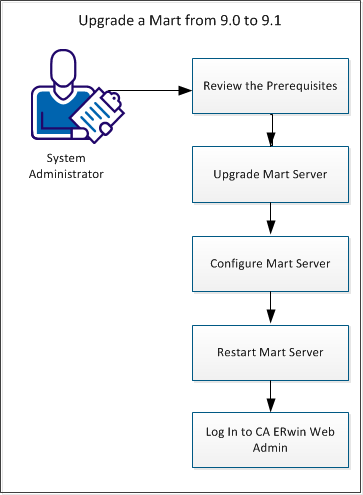
Complete the following tasks to upgrade an existing r9.0 Mart to r9.1:
Review the following prerequisites before you start the upgrade process:
If you are upgrading a Mart from r9.0 to r9.1, upgrade the Mart Server.
Note: The procedure to upgrade a Mart from r9.0 to r9.1 is different from the procedure to upgrade from r7.3 through r8.2.7 to r9.1. If your Mart version is r9.0, use the How to Upgrade a Mart from r9.0 to r9.1 procedure to upgrade your Mart to r9.1. The models that are created in r9.0 are upgraded when a user connects to the r9.1 Mart and opens the models. If your Mart version is r7.3 through r8.2.7, use the Installing and Configuring the Mart procedure and install the r9.1 Mart. After installing the Mart, use the Upgrade Mart utility to upgrade the Mart models from r7.3 through r8.2.7 to r9.1.
Follow these steps:
The CA ERwin Mart Server r9.1 Install Shield Wizard dialog appears.
The Mart Server is upgraded.
The Mart Server program is upgraded in r9.1. To connect to the r9.1 Mart, configure the Mart Server. Use the same database that you have used for the r9.0 Mart.
Important! The r9.1 Mart is designed to work with only CA ERwin Data Modeler r9.1. If you try to connect the r9.1 Mart with CA ERwin Data Modeler r9.0, it may corrupt the Mart and cause unexpected behavior.
Follow these steps:
The CA ERwin Mart Configuration dialog appears.
Configure the CA ERwin Mart Server
Specifies the database server type.
Specifies the port number of the database server.
Specifies the name of the database server where you have installed the Mart database. For example, suppose that you are using SQL Server 2008 as the Mart database. Enter the name of the computer where SQL Server 2008 is installed.
Specifies the name of the database instance.
Specifies the name of the Mart database.
Note: If you are installing the Mart for the first time, use a new database. Do not use an existing database that was created for r7.3 through r8.2.7 Mart. If you are upgrading the Mart from r9.0 to r9.1, use the r9.0 Mart database.
Specifies the user name to connect to the Mart database. Enter the name of a user that is authenticated by the Mart database.
Note: A Windows authenticated user account cannot be used to initialize the Mart.
Specifies the password to connect to the Mart database.
Note: The following fields--Domain Controller Name, Domain/User Name, and Password are required only if you are using the Active Directory authentication.
Specifies the fully qualified name of the Active Directory Server (Domain Controller). Enter the name in the following format:
LDAP://server/distinguished-name
Example: ldap://mktgna:3268/dc=abc, dc=com
Here, mktgna is the server name. You can provide either the name of the server or the IP address. 3268 is the port number to which the server listens.
dc=abc, dc=com is the distinguished-name. The distinguished name is the full path of the object.
Note: If you do not know the Domain Controller Name, use the Nltest command or talk to your System Administrator.
Specifies the domain name and user name in the <domain name>/<user name> format.
Specifies the password of the domain user.
Configure CA ERwin Mart Administrator
Specifies the name of the computer where the Web Server is present. For example, if you are using Tomcat, enter the name of the computer where Tomcat is installed.
Default: localhost
Specifies the port number on which the Web Server is running.
Default: 18170
Specifies the application name with which the Web Server is identified.
Default: MartServer
Specifies if you want to connect to the Mart through a secured connection (SSL). Select this check box if you have implemented SSL.
Specifies that you want to use the IIS web server to connect to the Mart. Select this check box only if you have configured IIS.
The CA ERwin Mart Administrator and the Mart Server are configured.
When you modify the details of the Mart Server and Mart Administration programs, restart the Mart Server service.
Follow these steps:
Log in to CA ERwin Mart Administrator to verify if you have successfully upgraded the Mart Server from r9.0 to r9.1.
Follow these steps:
The CA ERwin Mart Administrator log in page appears. If you have implemented SSL, HTTPS appears in the address bar.
The CA ERwin Mart Administrator home page appears.
The models that are created in r9.0 are upgraded when a user connects to the r9.1 Mart and opens the models.
|
Copyright © 2013 CA.
All rights reserved.
|
|
