

Getting Started › CA Continuous Application Insight Tutorial
CA Continuous Application Insight Tutorial
In this tutorial, you generate transactions by using the LISA Bank demo application. You then view the transactions in the Analyze Transactions window of the DevTest Portal.
Prerequisites
- The following components are running: Enterprise Dashboard, registry, demo server, broker, and portal.
This section contains the following topics:
Step 1 - Increase the Default Capture Levels
Step 2 - Generate Transactions from the Demo Application
Step 3 - View the Transactions in the Analyze Transactions Window
Step 1 - Increase the Default Capture Levels
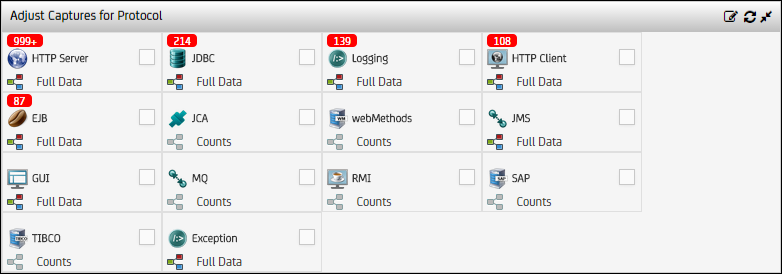
Each protocol that the DevTest Java Agent can capture has a capture level.
The default capture level is Counts. To view the transactions later in this tutorial, you must set the capture level for the relevant protocols to Full Data.
The following graphic shows the Adjust Captures for Protocol pane in the Agents window.
Follow these steps:
- Open the DevTest Portal. If the portal is running on a local computer, the URL is http://localhost:1507/devtest.
- Select Settings, Agents from the left navigation menu.
The Agents window opens.
- In the Agents pane, select the JBoss_LISABank agent.
- If the Adjust Captures for Protocol pane is collapsed, expand the pane.
- If some of the protocols do not appear, click Edit and select Show All Protocols.
- Ensure that the capture levels for the following protocols are set to Full Data:
- HTTP Server
- JDBC
- EJB
- Logging
To change a capture level, select the check box of the protocol and select Full Data from the capture level drop-down list.
Step 2 - Generate Transactions from the Demo Application
DevTest Solutions includes a demo application named LISA Bank.
In this procedure, you log in to the demo application, create an account, and log out.
Follow these steps:
- In a web browser, enter http://localhost:8080/lisabank. If the demo server is running on another computer, replace localhost with the host name or IP address of the remote computer.
The login page opens.
- In the Name field, type lisa_simpson.
- In the Password field, type golisa.
- Click Login.
The welcome page opens. The left side contains buttons for various actions that you can perform.
- Create an account by performing these steps:
- Click New Account.
- In the Account Name field, type My Checking.
- In the Initial Balance field, replace the default value with 500.
- Click Add Account.
- Click Log Out.
Step 3 - View the Transactions in the Analyze Transactions Window
The Analyze Transactions window lets you do the following tasks:
- View transactions
- Search and filter transactions
- View component details
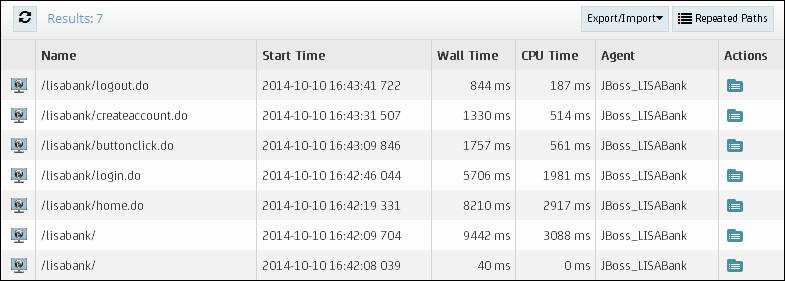
The following graphic shows a set of transactions in the Analyze Transactions window. The transactions are displayed in the List view. The transactions appear in reverse chronological order.
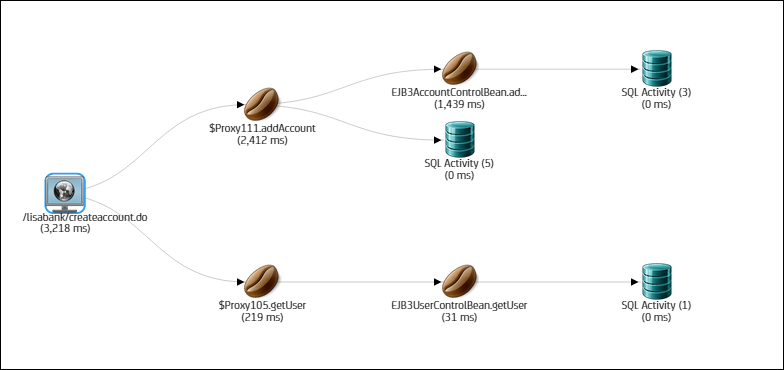
The following graphic shows a path graph for one of the transactions.
Follow these steps:
- Return to the DevTest Portal.
- Select Application Insight, Analyze Transactions from the left navigation menu.
The Analyze Transactions window opens.
- Locate the transaction that has the name /lisabank/createaccount.do.
- Click the Open transaction details button in the Actions column.
The transactions details dialog opens. The upper area contains the path graph. The lower area contains information about the selected node.
- Click an EJB node in the path graph.
- Review the information that appears in each of the tabs.
- Close the dialog.
Copyright © 2014 CA Technologies.
All rights reserved.
|
|