

This section describes the parameters that are necessary to run the WS-security example.
XML Encryption-Decryption
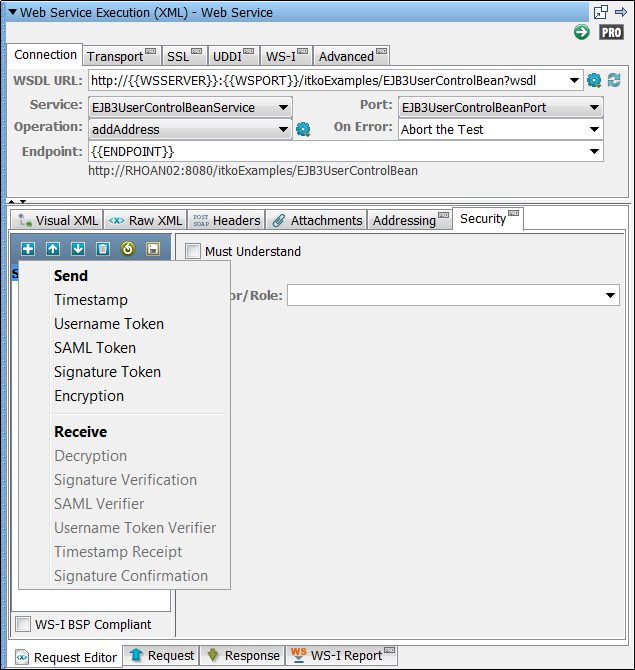
Encryption
Select the Use Encryption check box.
The location of the keystore file.
Enter the password for the keystore.
Enter an alias for a public key.
Leave empty or make the same as Keystore Password for PKCS #12 files.
Select the appropriate key ID type from the pull-down menu.
Select Triple DES, AES 128, AED 192, or AES 256.
Select PKCS#1: RSA Encryption Standard v1.5 or Optimal Asymmetric Encryption Padding with RSA Encryption.
The default behavior is to encrypt only the SOAP Body contents.
To specify different parts to encrypt, click the Select button to identify the parts to be encrypted.
Values:
Enter the value for the element.
Enter the name of the element.
Click Add to repeat the process.
To include the Body element, manually add it. To include the Binary Security Token as a part, use the Element name Token.
Decryption
The location of the keystore file.
Enter the password for the keystore.
Enter an alias for a public key.
Leave empty or make the same as Keystore Password for PKCS #12 files.
XML Signature Token-Signature Verification
Signature Token
Select the Add Signature check box.
The location of the keystore file.
Enter the password for the keystore.
Enter an alias for a private key.
Leave empty or make the same as Keystore Password for PKCS #12 files.
Select the appropriate key ID type from the pull-down menu.
Select DSA with SHA-1.
Values: SHA-1, SHA-256, SHA-384, SHA-512, RIPEMD-160, or MD5 (not recommended).
The default behavior is to sign only the SOAP Body contents.
To specify different parts to sign, click the Select button to identify the parts to be signed.
Values:
Enter the value for the element.
Enter the name of the element.
Click Add to repeat this process.
To include the Body element, add it manually. To include the Binary Security Token as a part, use the Element name Token.
Signature Verification
The parameters that are required to configure the signature verification are a subset of the parameters that are required for signing.
The location of the keystore file.
Enter the password for the keystore.
Enter an alias for a public key.
Leave empty or make the same as Keystore Password for PKCS #12 files.
Timestamp-Timestamp Receipt
Timestamp
Select the Add Timestamp check box.
Enter the lifetime of the message in seconds. Enter 0 to exclude an Expires element.
Note: Some Web services, particularly .NET 1.x/2.0 with WSE 2.0, are not compliant with standard timestamp date formatting, and do not allow milliseconds. For these web services, clear the Use Millisecond Precision in Timestamp check box.
Timestamp Receipt
The parameters that are required for Timestamp Receipt are a super set of those parameters that are required for Timestamp. The additional parameter is:
Select this parameter if you do not want to allow expired timestamps.
Username Token-Username Token Verifier
Username Token
Select the Add Username Token check box.
Enter the user name.
Enter the appropriate password.
Select the password type from the drop-down list (Text, Digest, None). None is typically used with the Add Signature option.
Specifies whether a nonce is required to protect against replay attacks.
Select if a timestamp is required.
To use millisecond precision, select the check box. Some Web services, particularly .NET 1.x/2.0 with WSE 2.0, are not compliant with standard timestamp formatting and do not allow the use of milliseconds.
Select to add a signature that is built using a combination of the username and password as the key.
To specify different parts to sign, click the Select button to identify the parts to be signed.
Values:
Content: Encrypt only the content.
Enter the value for the element.
Enter the name of the element.
Click Add to repeat for as many elements as you want.
To include the Body element, manually add it. To include the Binary Security Token as a part, use the Element name Token.
UserName Token Verifier
Select the Verify Username Token check box.
Enter the user name.
Enter the appropriate password.
To use millisecond precision, select the check box. Some Web services, particularly .NET 1.x/2.0 with WSE 2.0, are not compliant with standard timestamp formatting and do not allow the use of milliseconds.
Select the check box if signature verification is required.
SAML Assertion Token-SAML Assertion Receipt
SAML Assertion Token
Select the Add SAML Token check box.
Perform one of the following options:
Click Verify to have DevTest parse the SAML Assertion XML and build the SAML Assertion object as it would when sending the SOAP request. Verifying is useful to confirm that the SAML Assertion that could have been created manually is a valid SAML Assertion. Verifying also attempts to verify any signatures that are associated with the assertion. However, it is likely that DevTest cannot verify the assertion without configuring a public certificate with which to verify.
Select the Signed Sender Vouches check box if the sender must sign the assertion (the sender instead of the bearer/creator of theassertion vouches for its authenticity). When selected, the following information is required:
The location of the keystore file.
Enter the password for the keystore.
Enter an alias for a private key.
Leave empty or make the same as Keystore Password for PKCS #12 files.
Select the appropriate key ID type from the pull-down menu.
Select DSA with SHA-1.
Values: SHA-1, SHA-256, SHA-384, SHA-512, RIPEMD-160, or MD5 (not recommended).
The default behavior is to sign only the SOAP Body contents.
To specify different parts to sign, click the Select button to identify the parts to be signed.
Values:
Enter the value for the element.
Enter the name of the element.
To repeat this process, click Add. To include the Body element, add it manually.
To include the Binary Security Token as a part, use the Element name Token.
SAML Assertion Receipt
To scan the response for a SAML Assertion Receipt header in the response, select the Process SAML Assertion check box. If you select this option and there is no SAML Assertion Receipt header, an exception occurs.
Signature Confirmation
To scan the response for a signature confirmation header in the response, select the Signature confirmation check box. If you select this option and there is no confirmation header, an exception occurs.
Using the Keystore Verifier
You can verify your keystore settings to ensure that you are using the correct format, password, alias, and alias password. To produce verification reports, click the Verify button on the editors for SSL, Signature, Encryption/Decryption, and SAML settings.
SSL verification validates the Keystore password only. The SSL verification also confirms at least one of the keys in the keystore can be loaded using the keystore password.
WS-Security verification validates the Keystore password, the alias, and the alias password. A correct validation is indicated with a green entry. Any validation errors that are found are shown in red. Warnings are shown in orange.
Note: This verification only verifies the keystore parameters. There could still be issues with the web service, such as a mismatch in certificate sets or an incorrect choice of algorithm. These issues must be validated independently.
Alias Search
If you do not know the expected alias name for a WS-Security setting, use the keystore verifier. The keystore verifier lists all of the aliases in the keystore. Leave the Keystore Alias and Alias Password boxes empty and click the Verify button.
Aliases have a blue background.
Verification fails because the Keystore Alias and Alias Password boxes were left blank.
WS-I Report
When you click the Execute button on the Object Editor window, the validation runs. A report is generated and saved (in the reports directory in the DevTest install directory). You can view the report by pressing the WS-I Report tab at the bottom of the window.
Note: The format of this report is standard, and the Web-Services-Interoperability Organization (WS-I) dictates the format.
|
Copyright © 2014 CA Technologies.
All rights reserved.
|
|