

Product: CA Datacom®
Release: 14.0.00
OS: z/OS
The SQL Web Connect (SWC) feature provides limited use of CA Datacom SQL and CA Datacom Server to sites with an active license for CA Datacom/DB. This capability extends your data access to include SQL batch and web-based connectivity to CA Datacom resources. This scenario describes how a CA Datacom database administrator (DBA) installs and configures CA Datacom Server for SQL Web Connect (SWC) into a CA Datacom environment that does not already have the CA Datacom Server present. Adapt these general instructions to your specific site CA Datacom/DB implementation.
This Knowledge Base Article constitutes a portion of the official CA product documentation for this CA product. This Knowledge Base Article is subject to the following notices, terms, and conditions.
The following prerequisites help ensure a successful installation of CA Datacom Server (Server) for SQL Web Connect:
Note: For more information about installing SQL Web Connect, see the How to Install SQL Web Connect scenario.
Important! As you proceed through the CA CSM installation for CA Datacom Server, the USS component is not required.
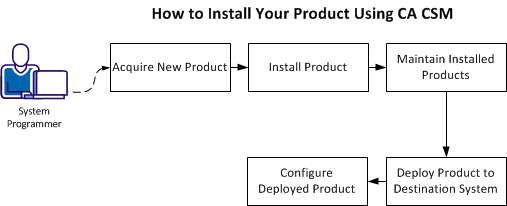
As a DBA in your mainframe environment, you can install, maintain, deploy, configure, and customize features for the database product. To complete your installation of CA Datacom Server for SQL Web Connect, you need to install and modify the CA Datacom Server configuration using the following procedures.
The following graphic shows the workflow for installing and activating CA Datacom Server for the SQL Web Connect feature.

Complete the following steps to install and configure CA Datacom Server for SQL Web Connect:
As a system programmer, your responsibilities include acquiring, installing, maintaining, deploying, and configuring CA Technologies mainframe products on your system.
CA CSM is an application that simplifies and unifies the management of your CA Technologies mainframe products on z/OS systems. As products adopt the CA CSM services, you can install your products in a common way according to industry best practices.
This scenario describes the steps for a system programmer to acquire, install, deploy, and configure products and maintenance. Not all tasks may apply to your organization. For example, you may decide not to deploy and configure products. In this case, do not perform the product deployment task and the product configuration task.
Before you use this scenario, you must have CA CSM installed at your site. If you do not have CA CSM installed, you can download it from the Download Center at http://ca.com/support. This web page also contains links to the complete documentation for CA CSM.
You access CA CSM from a web browser.
Note: This scenario applies to the latest version of CA CSM. If you are using an earlier version, see the appropriate bookshelf on the CA Chorus Software Manager product page.
This scenario is a high-level overview of steps that you perform using CA CSM. For more detailed information, use the online help that is included in CA CSM.
You perform the following tasks to install products and manage them on your system:
You access CA CSM using the web-based interface.
You need the URL of CA CSM from the CA CSM administrator.
Follow these steps:
The login page appears.
Note: If the Notice and Consent Banner appears, read and confirm the provided information.
The initial page appears. If you log in for the first time, you are prompted to define your account on the CA Support Online website.
Note: For more information about the interface, click the online help link at the top right corner of the page.
You are prompted for the credentials to use on the CA Support Online website.
You are prompted to review your user settings.
Note: These settings are available on the User Settings page.
A dialog opens, which shows the progress of the configuration task. You can click Show Results to view the details of the actions in a finished task.
Important! If your site uses proxies, review your proxy credentials on the User Settings, Software Acquisition page.
Acquisition allows you to download products and product maintenance from the CA Support Online website at http://ca.com/support to a USS directory structure on your system. The products to which your site is entitled and the releases available are displayed in the Available Products section on the Products page.
You perform the following high-level tasks to acquire a product using CA CSM:
To use CA CSM to acquire or download a product, you must have a CA Support Online account. If you do not have an account, create one on http://ca.com/support.
To access CA CSM, you require its URL. You can get the URL from your site CA CSM administrator and log in using your z/OS credentials. When you log in for the first time, you are prompted to create a CA CSM account with your credentials that you use to access http://ca.com/support. This account enables you to download product packages.
After you log in to CA CSM, you can see the products to which your organization is entitled on the Products tab.
If you cannot find the product that you want to acquire, update the product list. CA CSM refreshes the product list through http://ca.com/support using the site IDs associated with your credentials.
After you find your product in the product list, you can download the product installation packages.
CA CSM downloads (acquires) the packages (including any maintenance packages) from the CA Support Online website.
After the acquisition process completes, the product is ready for you to install or apply maintenance.
CA CSM simplifies and manages SMP/E installation tasks. You can browse and install a product that you acquired and that is available in the product list on the Products page. You can also install the maintenance for the products that are currently installed in a managed SMP/E environment on the driving system.
You perform the following high-level tasks to install a product using CA CSM:
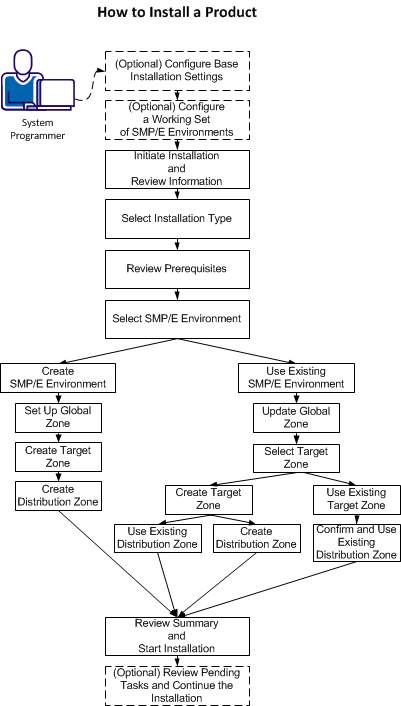
Note: If you install a product or its components into an existing target or distribution zone, older versions are deleted from the zone and associated data sets. We recommend that you use new target and distribution zones for this installation so that you can apply maintenance to your current version, if necessary.
CA CSM installs the product.
After the installation process completes, check for and install available product maintenance. The product is ready for you to deploy. Sometimes, there are other steps to perform manually outside of CA CSM before continuing.
You can migrate existing SMP/E environments into CA CSM to maintain all your installed products in a unified way from a single web-based interface.
You can use CA CSM to maintain a CA Technologies product.
You perform the following high-level tasks to maintain a product using CA CSM:
During the migration, CA CSM stores information about the SMP/E environment in the database.
If you cannot find the required release, perform the following steps to download the maintenance:
CA CSM applies the maintenance to your product.
After the maintenance process completes, the product is ready for you to deploy to systems that are defined in the system registry.
Deployment is a process of copying SMP/E target libraries to a destination system. The destination system could be the local z/OS system, a remote z/OS system, or a sysplex. You identify the destination system, deployed data set names, and the transport mechanism as part of the deployment process. Deploying a product makes it available for configuration.
Important! Before you deploy a product, set up the destination systems and remote credentials in the system registry.
You perform the following high-level tasks to deploy your products using CA CSM:
Note: You can also set up methodologies when creating a deployment, or use existing methodologies, if you have set up any previously. If you do so, you can skip this step.
CA CSM deploys the product to the destination system.
After the deployment process completes, the product is ready for you to configure.
Configuration is a process of copying the deployed libraries to run-time libraries and customizes the product for your site to bring it to an executable state. You can configure CA Technologies products that you have already acquired, installed, and deployed using CA CSM. You cannot use CA CSM to configure a product unless you have already used CA CSM to deploy the product.
You perform the following high-level tasks to configure your products using CA CSM:
CA CSM configures the product.
After the configuration process completes, the product is ready for you to use.
This procedure lets you access and install the most recent PTFs to ensure that you have the most up-to-date maintenance. Log on to CA Support to download, receive, and apply the CA Datacom Server 14.0 z/OS PTF listed in RI55738.
Use the following SYSIN options to tailor the startup JCL for use with SQL Web Connect. A copy of this JCL can be found in the YT14STRT member of the CAYTMAC data set. Replace the SYSIN parameters shown in the Sample YT14STRT member. Use the options exactly as shown to correspond with the ODBC Data Source options that are described later.
SERVERNAME=SWC_SERVER
APPLID=SWC_SERVER
PLANNAME=SWCS
PROTOCOL=CCI
DBUSERS=5
TIMEOUT=1
TIMEOUTWAIT=5
LOGON=YES
SUPMSG=NO
CBSIO=200000
TRACEON=NO
Sample YT14STRT
//YT14STRT JOB (ACCT,INFO),'PROGRAMMER',
//     CLASS=0,MSGCLASS=T,MSGLEVEL=(1,1),
//     GROUP=,USER=*UID,PASSWORD=*PSW
//*
//*------------------------------------------------------------------**
//*
//*  * CA DATACOM SERVER SAMPLE STARTUP JOB(SEE USER GUIDE)
//*
//*  EDIT AND SUBMIT THE FOLLOWING SAMPLE JCL TO START UP THE
//*  CA DATACOM SERVER FACILITY.
//*
//*------------------------------------------------------------------**
//*
//* INSTRUCTIONS:
//*      ***  CHANGE JOB CARD AS NECESSARY FOR YOUR SITE.
//*   1. CHANGE THE DATASET NAMES IN THE STEPLIB TO THE DATASETS
//*       USED IN YOUR SITE.
//*   2. CHANGE THE SYSIN CONTROL CARDS TO THE CORRECT VALUES FOR
//*      YOUR SITE.
//*   3. MAKE SURE YOUR MULTI-USER FACILITY HAS THE CORRECT SYSIN
//*      VALUE TO BE ABLE TO COMMUNICATE WITH CA DATACOM SERVER.
//*
//*------------------------------------------------------------------**
//DBSERVER EXEC  PGM=SVDBSPR,REGION=6000K
//STEPLIB  DD DSN=datacom.db.cuslib,       <-- CA Datcom/DB DBSIDPR module
//         DISP=SHR
//         DD DSN=datacom.server.CAYTLOAD, <-- CA Datacom Server Target Loadlib
//         DISP=SHR
//         DD DSN=datacom.CABDLOAD,        <-- CA Datcom/DB Target Loadlib
//         DISP=SHR
//SYSTCPD  DD DSN=VTAM.TCPIP.TCPIP.DATA,DISP=SHR
//CEEOPTS  DD DSN=datacom.server.CAYTMAC(CEEUOPT),DISP=SHR
//SYSOUT   DD SYSOUT=*
//SYSPRINT DD SYSOUT=*
//SYSUDUMP DD SYSOUT=*
//SNAPER   DD SYSOUT=*
//CEESNAP  DD SYSOUT=*
//CEEDUMP  DD SYSOUT=*
//TCPTRACE DD SYSOUT=*
//SYSIN  DD  *
SERVERNAME=SWC_SERVER
APPLID=SWC_SERVER
PLANNAME=SWCS
PROTOCOL=CCI
DBUSERS=5
TIMEOUT=1
TIMEOUTWAIT=5
LOGON=YES
SUPMSG=NO
CBSIO=200000
TRACEON=NO
/*
//
Follow these steps:
If you have 32-bit Windows, download only the 32-bit version - CCIPCS32. If you have a 64-bit Windows, download both CCIPCS32 and the 64-bit version CCIPCS64. The 32-bit applications use CCIPCS32 and the 64-bit applications use CCIPCS64. You can install both packages on a 64-bit Windows. The same is true for the CA Datacom Server client packages.
Note: At the end of the install process, you are prompted to configure CA CAICCI-PC. Defer this configuration until after the CA Datacom Server 14.0 client package is installed.
If you have 32-bit Windows, download and/or run only the 32-bit install package:
CA Datacom Server Version 14.0 x86.exe
If you have 64-bit Windows, download and/or run both the 32-bit and the 64-bit package:
CA Datacom Server Version 14.0 x64.exe
In 64-bit Windows, there are two ODBC Data Source Administrators – a 32-bit and a 64-bit version.
The ODBC Data Source Administrator that is directly accessible in the Control Panel, under Administrative Tools always corresponds to the bitness of Windows. Therefore, on 32-bit Windows, it is the 32-bit ODBC Administrator; on 64-bit Windows, it is the 64-bit ODBC Administrator.
You can execute 32-bit and 64-bit applications transparently on a 64-bit Windows platform. Recent versions of Microsoft Office applications, such as Excel and Access, are available as both 32-bit and 64-bit versions. Additionally, CA Visual Express is a 32-bit application that can run on a properly configured 64-bit version of Windows.
Important! 64-bit applications can use only 64-bit drivers and 32-bit applications can use only 32-bit drivers. In a single process, all of the code must be either 32-bit or 64-bit. Data Source (DSNs) are likewise separated by bitness since a Data Source is defined for a specific driver. Therefore, we have both CA Datacom Server 32-bit with 32-bit CAICCI-PC and CA Datacom Server 64-bit with 64-bit CAICCI-PC.
Use the 32-bit version of the ODBC Data Source Administrator to configure data sources for 32-bit applications. Failure to do so causes confusion when a properly configured ODBC DSN does not work because it is loading the wrong type of driver.
You cannot access the 32-bit ODBC Data Source Administrator directly from the Start menu or control panel in 64-bit Windows. To create or modify 32-bit Data Sources on 64-bit Windows, run C:\WINDOWS\SysWOW64\odbcad32.exe. Consider making a shortcut on your Start menu or desktop if you access it frequently.
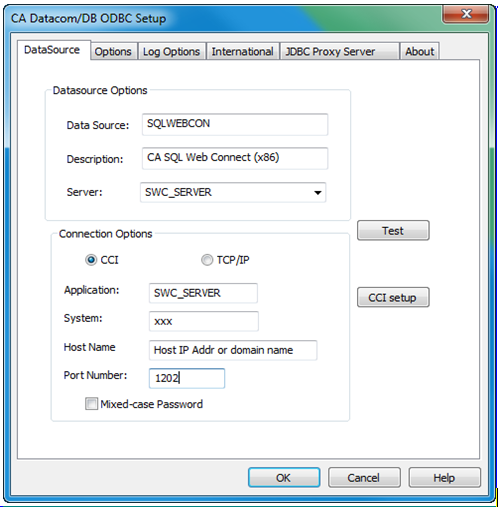
Follow these steps:
On the CA Datacom/DB ODBC Setup panel:
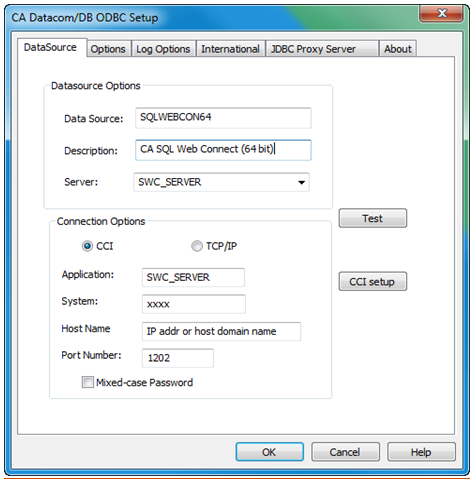
Data Source Options
Data Source: SQLWEBCON64
Description: CA SQL Web Connect (64 bit)
Server: SWC_SERVER
Connection Options
Click the CCI radio button.
Application: SWC_SERVER
System: xxxx - Enter the CCI SYSID from SYSID(xxxxx) in the CA PARMS.
Host Name: IP address or domain name of the LPAR where CAIENF and CA Datacom Server Mainframe regions are installed and running.
Port Number: 1202 (default) or the port number for CCI
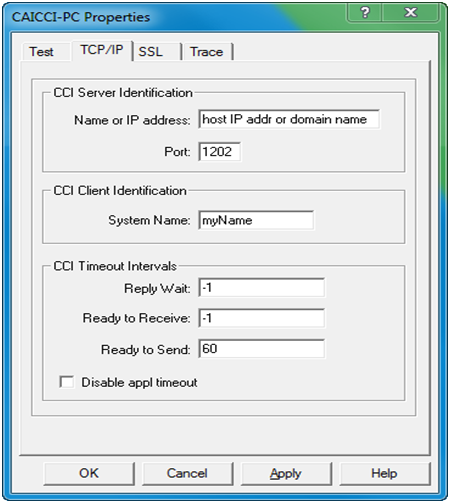
On the CAICCI-PC Properties panel:
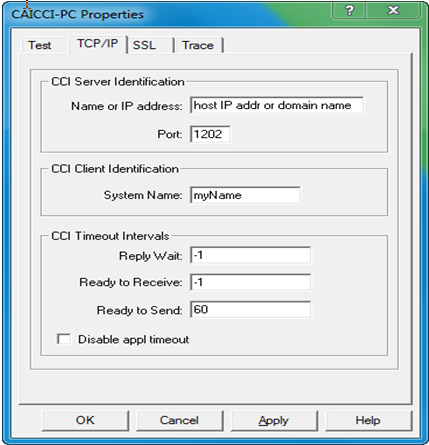
CCI Server Identification
Name or IP address: IP address or domain name of host LPAR
Port: 1202 (default)
CCI Client Identification
System Name: Enter a value of up to 8 characters that uniquely identifies the local machine. For more information, see CAICCI-PC help.
Note: CAICCI-PC TCP/IP configuration is all that is required for the SQL Web Connect connectivity. The SSL configuration is optional.
Follow these steps:
On the CA Datacom/DB ODBC Setup panel:
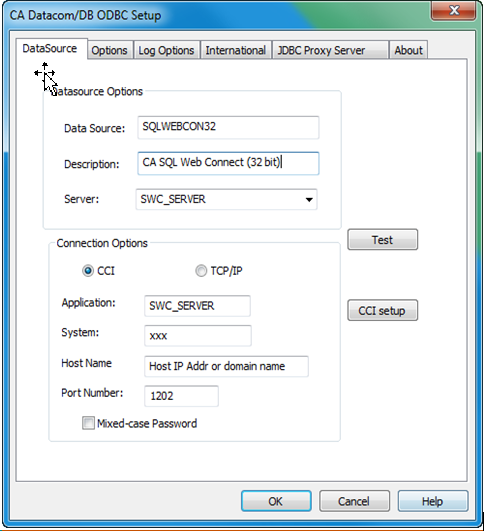
Data Source Options
Data Source: SQLWEBCON32
Description: CA SQL Web Connect (32-bit)
Server: SWC_SERVER
Connection Options
Click the CCI radio button.
Application: SWC_SERVER
System: xxxx - Enter the CCI SYSID from SYSID(xxxxx) in the CA PARMS.
Host Name: IP address or domain name of the LPAR where CAIENF and CA Datacom Server Mainframe regions are installed and running.
Port Number: 1202 (default) or the port number for CCI.
On the CAICCI-PC panel:
CCI Server Identification
Name or IP address: IP address or domain name of host LPAR
Port: 1202 (default)
CCI Client Identification
System Name: Enter a value of up to 8 characters that uniquely identifies the local machine. For more information, see CAICCI-PC help.
Note: CAICCI-PC TCP/IP configuration is all that is required for the SQL Web Connect connectivity. The SSL configuration is optional.
In 32-bit Windows platforms, there is only one ODBC Data Source Administrator that is directly accessible in the Control Panel.
Follow these steps:
On the CA Datacom/DB ODBC Setup panel:
Data Source Options
Data Source: SQLWEBCON
Description: SQL Web Connect
Server: SWC_SERVER
Connection Options
Click the CCI radio button.
Application: SWC_SERVER
System: xxxx - Enter the CCI SYSID from SYSID(xxxxx) in the CA ENF PARMS.
Host Name: IP address or domain name of the LPAR where CAIENF and CA Datacom Server Mainframe regions are installed and running.
Port Number: 1202 (default) or the report number for CCI.
CCI Server Identification
Name or IP address: IP address or domain name of host LPAR
Port: 1202 (default)
CCI Client Identification
System Name: Enter a value of up to 8 characters that uniquely identifies the local machine. For more information, see CAICCI-PC help.
Note: CAICCI-PC TCP/IP configuration is all that is required for the SQL Web Connect connectivity. The SSL configuration is optional.
The CA Datacom Server JDBC driver JAR file, cadcjdbc.jar, is included and installed with the Windows install package. You can find it in the following locations:
c:\Program Files\CA\CA-DatacomServer\Java\Classes\cadcjdbc.jar
c:\Program Files (x86)\CA\CA-DatacomServer\Java\Classes\cadcjdbc.jar
Note: Program Files (x86) is the 32-bit application location in Windows 64-bit.
The CA Datacom Server JDBC Class object is “ca.datacom.jdbc.DatacomJdbcDriver”. To load the Class object for the JDBC driver, a Java application must call the Class.forName method.
Class.forName(“ca.datacom.jdbc.DatacomJdbcDriver”);
The following URL format makes a DriverManager connection to the CA Datacom Server for SQL Web Connect. As with the ODBC connection configuration, code the options precisely as shown to correspond with the CA Datacom Server mainframe region startup options. The connection URL is case-sensitive.
jdbc.datacom:/ServerName=SWC_SERVER,ApplicationID=SWC_SERVER,SystemID=xxxxx,
HostName=DNSorIPADDR,HostPort=1202,ConnectType=CCI,UserID=uid,Password=pwd
Specifies the SYSID(xxxxx) set in the CA Common Services CAIENF procedure which starts a subtask for CAICCI.
Specifies the IP address or domain name of the z/OS LPAR where the CAIENF procedure and the CA Datacom Server mainframe region reside.
Specifies the userid and password with which to make the connection.
The following sample represents the JDBC application that you can use with the SQL Web Connect/CA Datacom Server JDBC driver.
/**
 * simpleApp
 *
 *   Sample JDBC application for use with the SQL Web Connect/Datacom Server JDBC driver.
 */
import java.sql.Connection;
import java.sql.DatabaseMetaData;
import java.sql.DriverManager;
import java.sql.ResultSet;
import java.sql.SQLException;
import java.sql.Statement;
/public class simpleApp {
/**
 * @param args
 */
public static void main(String[] args) {

 Connection con = null;			// JDBC Connection object

String connectString = null;	// connection URL string object

try{
 // Load the CA Datacom Server JDBC Driver class
 Class.forName("ca.datacom.jdbc.DatacomJdbcDriver");

 // Create the connection URL for the SQL Web Connect Server
 connectString = "jdbc:datacom:/ServerName=SWC_SERVER,
     ApplicationID=SWC_SERVER," +
                 "SystemID=ccisysid,HostName=hostname,HostPort=1202,ConnectType=CCI," +
                 "UserID=uid,Password=pwd";
 System.out.println(connectString);
 System.out.println(" ");

 // Establish a connection to Datacom Server
 con = DriverManager.getConnection(connectString);

 // Display Database Meta Data for CA Datacom Server

 DatabaseMetaData dmd = con.getMetaData();
 System.out.println("DatabaseProductName: " + dmd.getDatabaseProductName());
 System.out.println("DatabaseProductVersion: " +
    dmd.getDatabaseProductVersion());
 System.out.println("DriverName: " + dmd.getDriverName());
 System.out.println("DriverVersion: " + dmd.getDriverVersion());
 System.out.println("============================");
 System.out.println("JDBCMajorVersion: " + dmd.getJDBCMajorVersion());
 System.out.println("DiverMajorVersion: " + dmd.getDriverMajorVersion());
 System.out.println(" ");

 // Query the SYSADM.MUF_IDENTITY table in Datacom/DB MUF

 String sqlText = "SELECT  * FROM SYSADM.MUF_IDENTITY ";

 Statement stmt = con.createStatement();
 ResultSet rs = stmt.executeQuery(sqlText);

 System.out.println(sqlText);
 System.out.println(" ");

 while (rs.next())
 {
  System.out.println("MUF NAME: " + rs.getString(1));
  System.out.println("MUF JOBNAME: " + rs.getString("MUF_JOBNAME"));
  System.out.println("MUF JOBID: " + rs.getString("MUF_JOBID"));
  System.out.println("CXX NAME: " + rs.getString("DIR_NAME"));
  System.out.println("VERSION LEVEL: " + rs.getString("VERSION_LEVEL"));
  System.out.println("SERVICE PACK: " + rs.getString("SERVICE_PACK"));
 }
 System.out.println(" ");

} catch (ClassNotFoundException cnfe) {
        cnfe.printStackTrace(System.err);

} catch (SQLException sqle) {
           int ec = sqle.getErrorCode();
           System.out.println("ErrorCode: " + ec);
           sqle.printStackTrace(System.err);
        } catch (Exception sqle) {
           sqle.printStackTrace(System.err);
        } finally {
           try {
                if (con != null)
                    con.close();
        } catch (SQLException sqle) {
           int ec = sqle.getErrorCode();
           System.out.println("ErrorCode: " + ec);
        }
     }
   }
}
|
Copyright © 2013 CA Technologies.
All rights reserved.
|
|