

A system administrator initially creates a CA CloudMinder tenant environment. At that time, various default administrator accounts are created in the environment, including the following accounts:
|
User ID |
Administrator Type |
|
cspadmin |
System or Hosting administrator |
|
mspadmin |
System or Service administrator |
|
admin |
Tenant administrator |
The system creates these accounts with identical passwords. A system administrator typically uses these accounts during the initial configuration of a new tenant environment. Various types of administrators also use these accounts over time to perform configuration and maintenance for the CA CloudMinder environment.
For security reasons, we recommend that upon initially logging in to a default administrator account, you create a duplicate of that account with a unique User ID and password. After you have created the duplicate account, delete the default account.
Replace the default account that corresponds to the type of administrator role that you fulfill. For example, if you are a hosting administrator, replace the cspadmin default account.
Note: Do not replace or delete default accounts that do not correspond to an administrator role that you fulfill. For example, if you are a tenant administrator, do not replace or delete the cspadmin account. If you do so, other types of administrators are unable to log in with those accounts to perform configuration and maintenance for your environment.
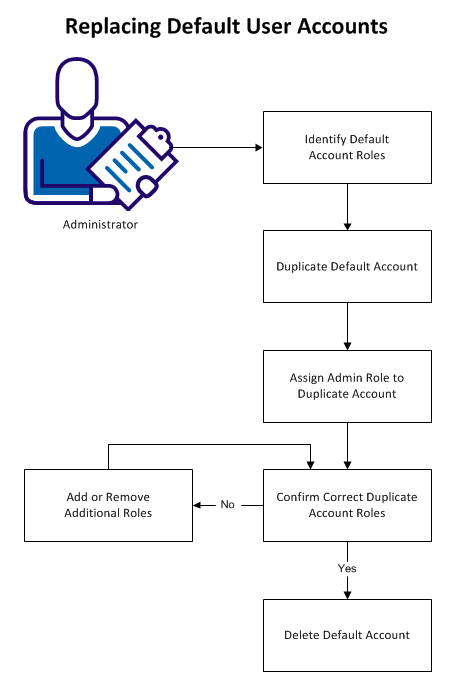
The following diagram shows the information to understand, and the steps to perform, in replacing default user accounts.
The following topics explain how to replace default user accounts:
Identify the roles that are associated with your default account, so you can accurately duplicate them in your replacement account.
Follow these steps:
Use the password that your system administrator designated to your default account during environment creation.
A search screen appears.
|
User Account |
Administrator Type |
|
cspadmin |
System or hosting administrator |
|
mspadmin |
System or service administrator |
|
admin |
Tenant administrator |
A list of admin roles that are assigned to the user account appears.
Note: In the cspadmin account, ignore the System Manager role. It is not necessary to duplicate this role when you create the replacement account.
Create a duplicate account that is based on your default administrator account.
Follow these steps:
|
User ID |
Administrator Type |
|
cspadmin |
System or Hosting administrator |
|
mspadmin |
System or Service administrator |
|
admin |
Tenant administrator |
The user account profile appears.
Note: Do not alter the Organization.
The groups screen appears. The system automatically duplicates the groups contained in the default account.
The system creates the user account. The account contains the correct groups, but does not yet contain the correct roles.
Assign the appropriate admin roles to the duplicate account.
Follow these steps:
A search screen appears.
The user profile screen appears.
A search screen appears.
|
User ID |
Admin Role |
|
cspadmin |
CSP Administrator |
|
mspadmin |
MSP Administrator |
|
admin |
Tenant Administrator |
An updated list of the roles that are assigned to the account appears.
The system assigns the role to the account.
Note: When you assign one of the Administrator roles to an account, the system automatically assigns several related roles at the same time. This configuration ensures that all required privileges are assigned to the account simultaneously.
Before you delete your default user account, confirm that the roles assigned to your duplicate account match the roles in the default account.
Follow these steps:
A search screen appears.
The user profile screen appears.
A list of admin roles that are assigned to the user account appears.
Note: For the duplicate cspadmin account, ignore the System Manager role. It is not necessary to duplicate this role in the replacement account.
If the roles assigned to your duplicate account do not match the default account, add or remove additional admin roles.
Follow these steps:
A search screen appears.
The user profile screen appears.
An updated list of the roles that are assigned to the account appears.
The system assigns or removes the role.
You have confirmed that the duplicate account you created matches your default account. You can now delete the default account.
Important! The mspadmin account is the default Inbound Administrator. The system uses the Inbound Administrator to create users during the Explore and Correlate process. Before deleting the mspadmin account, update the Inbound Administrator from mspadmin to a different user account. You must have access to the Management Console to do this. In the Management Console, select Environment, then your environment, and navigate to Advanced Settings, Provisioning.
Follow these steps:
A search screen appears.
The system deletes the default account.
The process of replacing your default user account is now complete. This process helps prevent improper login attempts on your system.
You can now use the duplicate account that you created to perform all administrative functions that were associated with the default role.
|
Copyright © 2014 CA.
All rights reserved.
|
|