

The Advanced Authentication Manager role is one of the roles that control Advanced Authentication. To disable Advanced Authentication, disable all authentication methods that are based on Advanced Authentication, disable all advanced authentication flows, and then disable the Advanced Authentication Manager role. The outcome is that Advanced Authentication is not available to any application. No further configuration changes can be made to Advanced Authentication until you re-enable the role.
Follow these steps:
The Enable/Disable Admin Role screen opens.
The Advanced Authentication service is disabled.
CloudMinder 1.5 supports RADIUS. RADIUS offers two-factor authentication for VPN systems protected by CloudMinder. RADIUS is enabled by default, and you configure RADIUS clients as outlined in the following diagram:
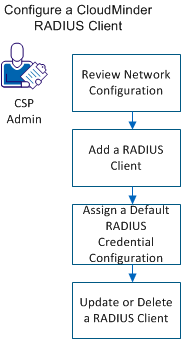
As a prerequisite, configure the ArcotID OTP application to use the ArcotID OTP authentication type. To configure a CA CloudMinder RADIUS Client, complete the following tasks:
Review this section before adding RADIUS clients and configuring a firewall and load balancer.
Authentication Manager is not exposed outside the network. A proxy server runs on the web server, which forwards authentication requests. All requests must go through the proxy.
AuthMinder is on the app tier and listens on port 1812 for UDP traffic. The web-tier proxy server listens to client requests on 1812, and listens to AuthMinder responses on 1814. This information is important when configuring your firewall and load balancer.
If SNAT is enabled on the web-tier load balancer, each external IP of the VPN servers that sends requests to CA CloudMinder should be mapped to a unique, static, internal IP. The same internal IP should be used when you add RADIUS clients.
You can add a RADIUS client for an organization from the Arcot Administration Console.
Follow these steps:
Specifies the IP Address of the RADIUS client through which users authenticate to AuthMinder Server.
Specifies the secret key shared between the RADIUS client and the AuthMinder Server.
Note: Keys must be between 1 and 512 characters.
Specifies a short description of the RADIUS client. If you configure multiple clients, the description of each client helps distinguish between clients.
Select In-Band Password.
Specify 224.
Specifies the value corresponding to the attribute ID. You can pass static values, such as user attributes or a combination of static values and variables. For example ,for the user JSmith, you can include the full name in RADIUS response as:
Name=$$LNAME$$,$$FNAME$$
to return:
224= [Name=Smith, John]
Note: The mapped attributes FNAME, LNAME, TELEPHONENUMBER, and EMAILADDR can be returned.
The RADIUS client is added.
This section shows you how to assign a default RADIUS credential type resolution configuration.
Follow these steps:
The default RADIUS credential type resolution configuration is assigned.
If a RADIUS client is configured, the RADIUS Configuration page displays the configured clients in the Configured RADIUS Clients table. You can use this table to update or delete the RADIUS client IP addresses.
Follow these steps:
|
Copyright © 2014 CA.
All rights reserved.
|
|