

The Policy Server is managed through a user interface that is generated dynamically based on the administrative privileges of the user.
Important! When working on the task pane on the right, always save your changes before opening or closing the menu pane on the left or navigating to another task.
Do not use the Refresh or Back buttons of the browser while using the CSP console. Using these buttons resubmits the form, repeats the action that was initiated by clicking a button in the form, and creates an invalid state.
The Policy Server is managed through a graphical user interface. The interface is generated dynamically based on the administrative privileges of the user. This chapter discusses how to log in to the CSP console and the common procedures that you use while configuring and managing Policy Server objects.
The Administrative UI contains two panes:
The menu of tasks on the left can be open or closed. If the menu is closed, you can open it by clicking the right-facing arrow. Likewise, if the menu is open, you can close it by clicking the left-facing arrow.
Important! When working on the task pane on the right, always save your changes before opening or closing the menu pane on the left or navigating to another task.
Do not use the Refresh or Back buttons of the browser while using the CSP console. Using these buttons resubmits the form, repeats the action that was initiated by clicking a button in the form, and creates an invalid state.
Follow these steps:
https://host.domain:8443/iam/siteminder/adminui
http://host.domain:8080/iam/siteminder/adminui
http://host.domain:port/iam/siteminder/adminui
https://host.domain:port/iam/siteminder/adminui
Specifies the name of the CSP console host system.
Specifies the fully qualified domain name of the CSP console host system.
Specifies the port on which the application server listens for requests.
The system displays the relevant tabs for your administrator privileges. The contents of this window differ based on the privileges of the administrator account you use to log in to the CSP console.
The CSP console lets you view, modify, and delete Policy Server objects. Although the details of each task differ by object, the general methods are similar. For example, the procedure for deleting an agent is similar to the procedure for deleting a response.
The easiest way to create a Policy Server object is to copy an existing object and modify its properties. You can use the properties of the existing object as a template, only changing the information that is different for the new object. The copy option is not available for all objects.
Note: Your administrative privileges determine the objects you can access.
Follow these steps:
Example: Click Infrastructure, Agent.
Example: Agent
The object is created.
You can view the properties of a Policy Server object.
Note: Your administrative privileges determine the objects you can access.
Follow these steps:
Example: Select Policies, Domain.
Example: Domain
The View screen appears with information about the object you selected.
The CSP console lets you modify the properties of existing Policy Server objects.
Note: Your administrative privileges determine the objects you can access.
Follow these steps:
Example: Click Policies, Domain.
Example: Realms
The object is modified.
You can delete a Policy Server object that is no longer needed.
Note: Your administrative privileges determine the objects you can access.
Follow these steps:
Example: Click Infrastructure, Authentication.
Example: Authentication Schemes
The Policy Server object is deleted.
Every CSP console task stays in the task-persistence database indefinitely or until removed by a CA SiteMinder® administrator. You can remove tasks from the database and free up disk space by scheduling cleanup tasks. Cleanup tasks allow you to manage the size of the task-persistence database and improve runtime performance.
Every task exists in the task-persistence database in one of the following states:
A task in the audit state has been initiated in the CSP console, but not submitted. For example, View tasks are initiated in the CSP console, but are never submitted.
Submitted tasks are tasks that have been submitted for processing in the CSP console, but that are not yet complete.
Completed tasks are submitted tasks that completed processing. Completed tasks include tasks that completed processing successfully and tasks that failed to complete processing successfully, but are nonetheless complete.
Cleanup tasks can remove tasks in the audit state and completed state from the task-persistence database. Cleanup tasks cannot remove submitted tasks that are still pending.
You can schedule, modify, and delete cleanup tasks through the following two options:
Use this option to schedule new cleanup tasks or modify existing ones.
Use this option to delete scheduled cleanup tasks.
You configure cleanup tasks to remove tasks in the completed state and the audit state from the database. You can also configure limits for the cleanup task itself.
Note: You can only run scheduled jobs for cleaning up the submitted tasks when you log in as the System Manager. The System Manager account is defined using the Configure Administrative Authentication option. This account that is used during the initial registration of the CSP console and can be from an external administrator store. The cleanup submitted task functionality is not available to any other administrators, including administrator accounts with super user permissions.
Follow these steps:
Select this option and click Next to skip the scheduling step and go directly to the Clean Up Submitted Tasks pane.
Specifies the minimum age in Months, Weeks, Days, Hours, or Minutes of the completed tasks that must be removed.
Note: Task age is measured from the time that tasks are completed.
(Optional) Specifies the maximum number of days to keep tasks in the audit state in the task-persistence database.
Limits: one or greater
Default: one
(Optional) Specifies a time limit in minutes for the cleanup task.
(Optional) Specifies a task limit for the cleanup task.
The Cleanup task is submitted for processing.
You can delete scheduled cleanup tasks that are no longer needed.
Follow these steps:
The delete task is submitted for processing.
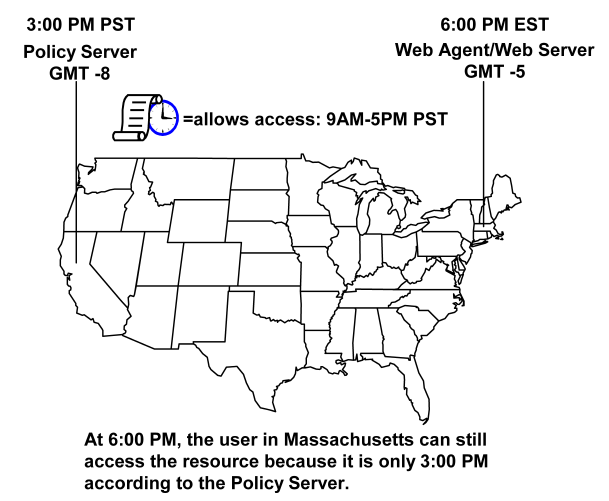
For each system that has a Policy Server or Web Agent installed, you must set the system clock for the time zone appropriate to that system’s geographical location. Policy Servers and Web Agents use the time zones to calculate time relative to Greenwich Mean Time (GMT).
The following figure shows how the Policy Server executes a policy relative to time. A resource is stored on a Web Server in Massachusetts and is protected by a Policy Server in California. The policy allows access to the resource between 9:00 a.m. and 5:00 p.m. However, the user in Massachusetts can still access the resource at 6:00 p.m. because the policy is based on the Policy Server’s time zone, Pacific Standard Time (PST), which is 3 hours behind the Web Agent’s time zone, Eastern Standard Time (EST).
Note: For Windows systems, the time zone and the time of day that you set in the Date/Time control panel must agree. For example, to reset a system in the USA from Eastern Standard Time to Pacific Time, you must set the system’s clock back three hours and change the time zone to Pacific Standard Time. If these two settings do not match, single sign-on across multiple domains and agent key management will not work properly.
|
Copyright © 2013 CA.
All rights reserved.
|
|