

This section contains the following topics:
How to Integrate Service Desk to CA Clarity PPM User Tasks
How Service Desk to Harvest User Tasks are Integrated
This section describes the connection between Service Desk and CA Clarity PPM when Harvest is not also installed.
It describes how to:
Service Desk analysts use basic Service Desk functionality to manage and evaluate Service Desk change orders. When integrated with CA Clarity PPM, an additional Project field is available on the Service Desk Change Order form.
Service Desk includes predefined change order categories that are associated to predefined workflows. Your Service Desk administrator can define additional categories and workflows using these out-of-the-box components. If a Service Desk change order represents work to be tracked and managed on an existing CA Clarity PPM project, select the appropriate category.
When you create a Service Desk change order task, CA Clarity PPM sends an update to Service Desk. The log comment is entered in Service Desk Change Order Activity Log List.
To create a CA Clarity PPM change order task from Service Desk
Note: If you have Harvest connected with CA Clarity PPM and you use Harvest to manage the source code, select Project.Maint Clarity Harvest.
|
Field |
Description |
|---|---|
|
Order Description |
A detailed description of this change order or request. On search windows that display this field, enter the first characters in the field and click Search. |
|
Description |
The Order Description from the original Service Desk change order that created the CA Clarity PPM task. |
|
Need By Date |
The date and time specified in the Service Desk ticket (e.g., change order) by which you want the ticket closed and resolved. |
|
Project |
Service Desk asset or project CI that was set up to point to the project in the external system, like Harvest or CA Clarity PPM. You must define the external project to Service Desk before you can initialize integration with the external project. This Project field is then used in the change order that you create to link it to the project in the external system. |
|
Requester |
The name of the person initiating the ticket (record). This person must be a defined contact in Service Desk. |
|
Affected End User |
The name of the person affected by the ticket (record). This may be the same person who reported the ticket. This person must be a defined contact in Service Desk. |
Note: The changes you make to workflow tasks do not display until you save the ticket.
Service Desk analysts typically initiate CA Clarity PPM incidents after the change order representing the demand is analyzed and it has been determined that the change order be managed in CA Clarity PPM. The CA Clarity PPM incident can remain as an incident, or the CA Clarity PPM change manager can convert the incident to a project.
To create a CA Clarity PPM incident from Service Desk
|
Field |
Description |
|---|---|
|
Order Description |
A detailed description of this change order or request. On search windows that display this field, enter the first characters in the field and click Search. |
|
Category |
Shows the type of change order to which this task is associated. |
|
Description |
The Order Description from the original Service Desk change order that created the CA Clarity PPM task. |
|
Need By Date |
The date and time specified in the Service Desk ticket (e.g., change order) by which you want the ticket closed and resolved. |
|
Requester |
The name of the person initiating the ticket (record). This person must be a defined contact in Service Desk. |
|
Affected End User |
The name of the person affected by the ticket (record). This may be the same person who reported the ticket. This person must be a defined contact in Service Desk. |
The Change Workflow Detail window appears.
The workflow invokes the connection between Service Desk and CA Clarity PPM, and the incident is created.
Note: The changes you make to workflow tasks do not display until you save the ticket.
Note: See the Demand Management User Guide for more information.
Note: For more information about Service Desk workflows, see the Unicenter Service Desk Administrator Guide or Service Desk online help.
Service Desk analysts typically initiate CA Clarity PPM ideas after the change order representing the new application or product idea request is analyzed and is determined that the change order will be managed in CA Clarity PPM. The CA Clarity PPM idea can remain as an idea, or the CA Clarity PPM demand manager can convert the idea to a project.
To create a CA Clarity PPM idea from Service Desk
|
Field |
Description |
|---|---|
|
Order Description |
A detailed description of this change order or request. On search windows that display this field, enter the first characters in the field and click Search. |
|
Category |
Shows the type of change order to which this task is associated. |
|
Description |
The Order Description from the original Service Desk change order that created the CA Clarity PPM task. |
|
Need By Date |
The date and time specified in the Service Desk ticket (e.g., change order) by which you want the ticket closed and resolved. |
|
Requester |
The name of the person initiating the ticket (record). This person must be a defined contact in Service Desk. |
|
Affected End User |
The name of the person affected by the ticket (record). This may be the same person who reported the ticket. This person must be a defined contact in Service Desk. |
The Change Workflow Detail window appears.
Note: The changes you make to workflow tasks do not display until you save the ticket.
Note: See the Demand Management User Guide for more information.
Note: For more information about Service Desk workflows, see the Unicenter Service Desk Administrator Guide or Service Desk online help.
When you have Service Desk and CA Clarity PPM connected, certain CA Clarity PPM actions trigger an update to be sent from CA Clarity PPM to Service Desk. These updates are logged as comments on the Service Desk Change Order Activity Log.
The following is a list of the CA Clarity PPM actions that trigger comments to be logged on Service Desk Change Order Activity Log:
When Service Desk is integrated with Harvest, certain Harvest actions trigger an update to be sent from Harvest to Service Desk. These updates are logged as comments on Service Desk Change Order Activity Log.
In Service Desk, you can view the Change Order Activity Log List from the Activities tab of the Change Order Detail window. For more information about the Activity Log, see the Service Desk online help.
This section describes the connection between Service Desk and Harvest when CA Clarity PPM is not also installed. It describes how to create Harvest packages from Service Desk change order maintenance requests. You can send Service Desk change orders directly to Harvest as a new package, without requiring CA Clarity PPM.
You can create a Service Desk change order for software work that needs to be managed in Harvest as a new package. Each change order represents the work required to fix an issue reported by a Service Desk end-user. After the package is created in Harvest, you can monitor its Harvest lifecycle using Service Desk until the work is completed.
The following steps outline this process:
A typical scenario would involve a request ticket, which is logged into Service Desk by an end-user, requiring some work to be performed on a project. This project also happens to be defined in Harvest. The Service Desk analyst, who reviews the incoming request, decides to create a change order to be managed in a Harvest project as a package. Each time a Service Desk analyst initiates the connection process by creating a change order that is associated with a defined Harvest project and appropriate category, Service Desk creates a new package in Harvest. This package is created in the first of the four Harvest lifecycle states-planning-and can be managed by Harvest users.
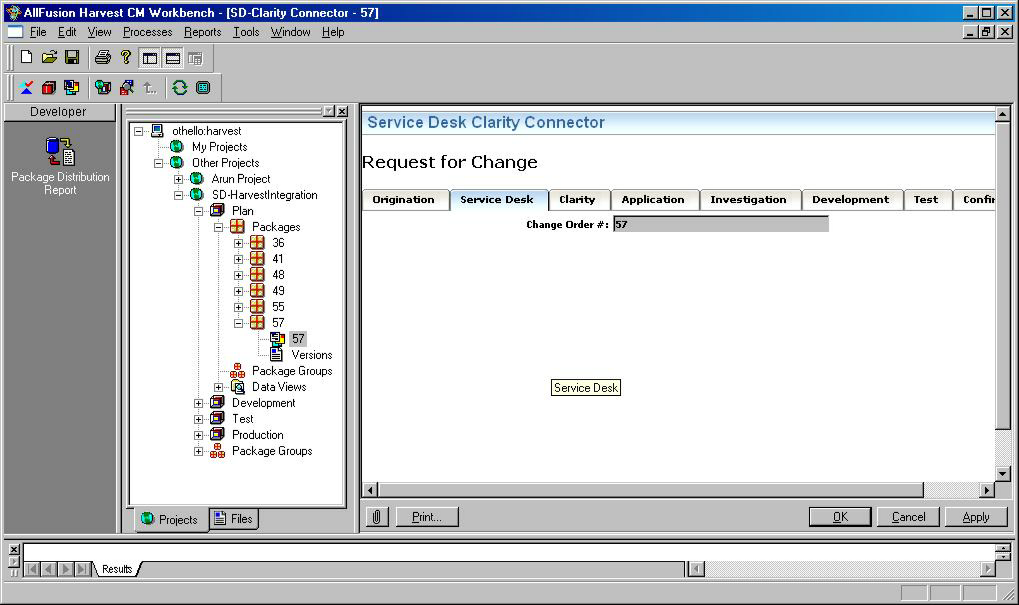
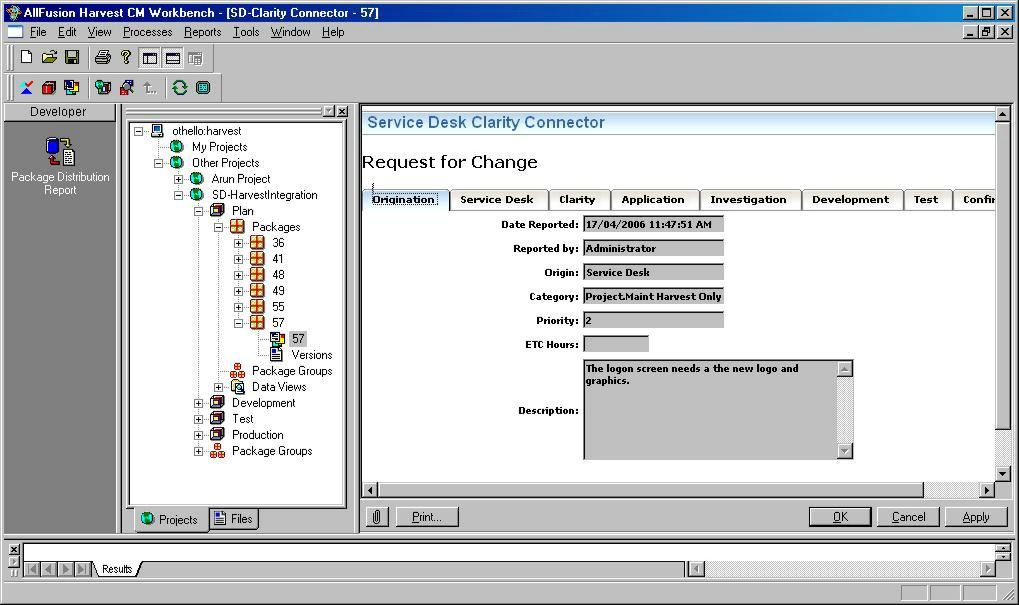
When you create a package, an Event Occurred comment is entered in the Service Desk Change Order Activity Log List, which is visible to Service Desk analysts. The connection process also triggers Service Desk to send additional information about the change order to Harvest, which is used to populate the Service Desk Clarity Connector Request for Change form in Harvest. This form is maintained at the package level in Harvest, and it contains Origination information, as well as the original Service Desk change order number that created the package. The default package name assigned in Harvest is the Service Desk change order number that created it. This name can be changed in Harvest by editing the package properties.
A Harvest package, which is a basic unit of work, is stored in Harvest under a Harvest project. There can be multiple packages associated with a project, each representing a work request for the project. The packages created from Service Desk allow Harvest users to become aware of issues originating in Service Desk related to their projects. The package is managed in Harvest as work is being performed, and is promoted through the planning, development, testing, and production lifecycle states by Harvest developers, testers, and managers. The connector also updates the associated Service Desk change order Change Order Activity Log List with the work activities performed in Harvest, such as promoting the package to another lifecycle state. This two-way communication keeps the Service Desk analyst up-to-date on any package events occurring in Harvest which affect the associated change order.
Note: For integration, Service Desk includes default categories and their associated workflow tasks. You should use the Project.Maint Harvest Only change order category when setting up the connection between Service Desk and Harvest.
The following graphic illustrates the creation of a change order in Service Desk and the results in Harvest. In Harvest, notice the change order number and the position of the new package under the planning (PLAN) lifecycle state.
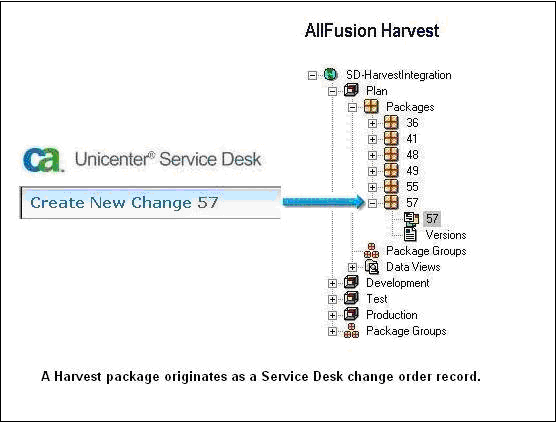
The following sections show you how to create Harvest packages from Service Desk change orders and how to monitor the package lifecycle until it is closed.
Depending on how your Service Desk interface is configured, the project you create will either be an asset or a configuration item (CI). For standard Service Desk, the term asset is used to define components in families such as projects, hardware, software, and so on. If your Service Desk has been configured with an Information Technology Infrastructure Library (ITIL) interface, the term CI is used instead of the term asset. The examples in this document use the ITIL term CI when defining the Harvest project in Service Desk.
Before you can create a Service Desk change order which will initiate and create a package in Harvest, the Service Desk analyst must create a Service Desk project CI. This identifies the Harvest project to Service Desk. This Service Desk project CI must contain the Harvest Project name. The Service Desk project CI object that you create here will be used later in the Project field when you create the Service Desk change order. You need to create this Service Desk project CI once for each unique Harvest project you want to identify to Service Desk.
To create a Service Desk project CI
The Create New Configuration Item window opens:
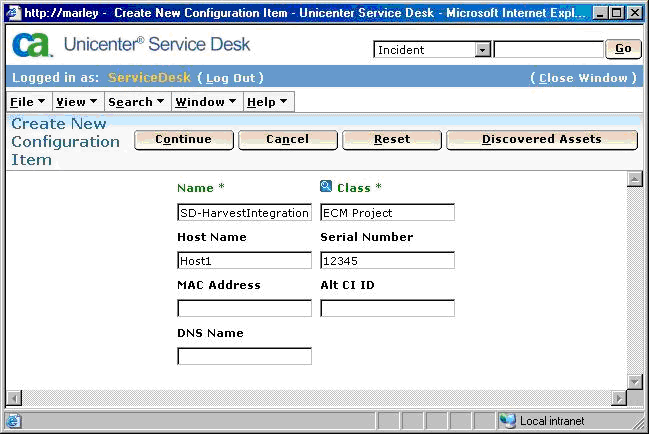
Note: It is a good idea to use the Harvest project name as the name of the Service Desk project CI so that Service Desk users can easily identify the relationship between the Service Desk project CI and the Harvest project in Harvest.
The following detail window appears so you can finish creating the Service Desk project CI:
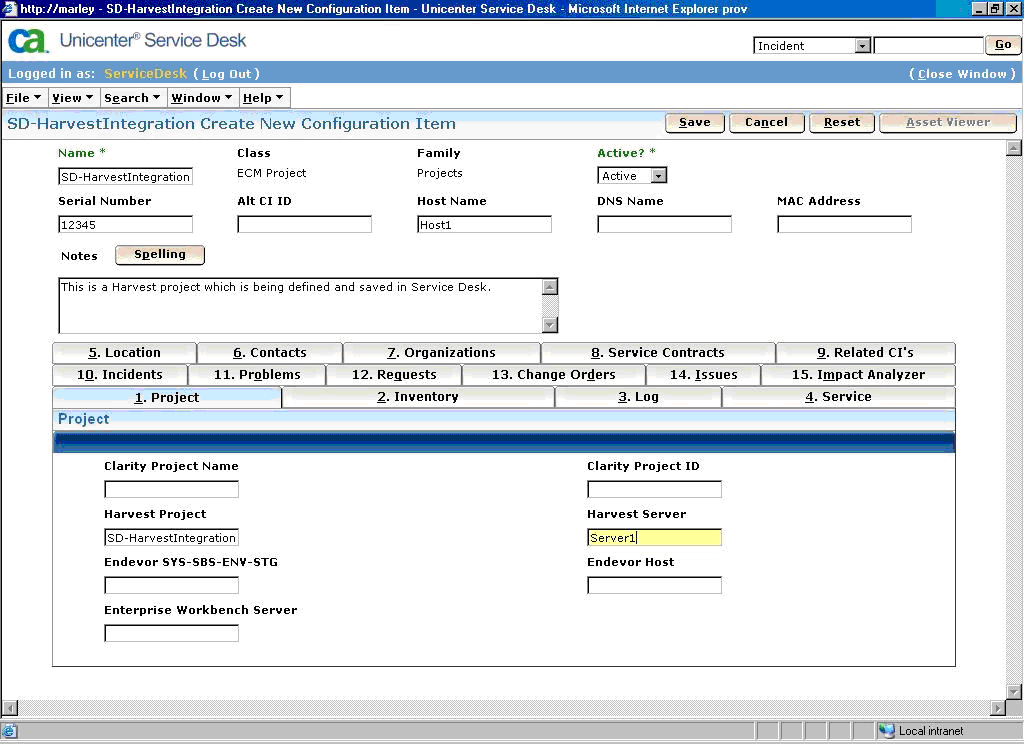
Note: The Harvest project name must match the Harvest project as defined in Harvest using the lifecycle template. If you do not know the name of the Harvest project, contact the Harvest Administrator.
The Service Desk project CI is saved and a message appears at the top of the window indicating it is saved.
The Service Desk analyst creates a change order to identify the work to be performed. This information is transferred to Harvest in the package created under the associated Harvest project.
To create a change order
The Create New Change window opens.
|
Field |
Description |
|---|---|
|
Order Description |
A detailed description of this change order or request. On search windows that display this field, enter the first characters in the field and click Search. |
|
Need By Date |
The date and time specified in the Service Desk ticket (e.g., change order) by which you want the ticket closed and resolved. |
|
Project |
Service Desk asset or project CI that was set up to point to the project in the external system, like Harvest or CA Clarity PPM. You must define the external project to Service Desk before you can initialize integration with the external project. This Project field is then used in the change order that you create to link it to the project in the external sstem. |
|
Requester |
The name of the person initiating the ticket (record). This person must be a defined contact in Service Desk. |
|
Affected End User |
The name of the person affected by the ticket (record). This may be the same person who reported the ticket. This person must be a defined contact in Service Desk. |
|
Priority |
Shows how much attention a ticket should receive. Your system administrator can modify the default priority codes, so they can vary from one installation to another. In search areas and on windows where you can edit this field, select the value you want to use from the associated drop-down list. |
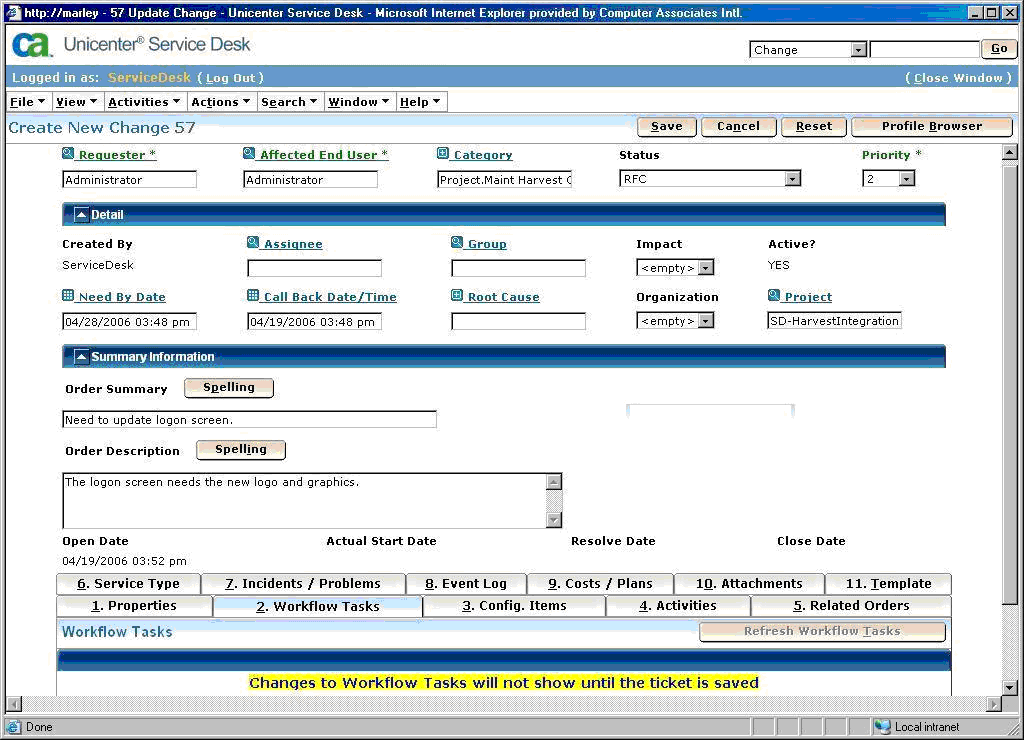
The change order is created.
By default, Service Desk includes categories have been defined and associated with the appropriate workflow tasks for the Harvest and CA Clarity PPM integration. The change order you created has three pre-defined workflow tasks attached. The following workflow tasks are associated with the Project.Maint Harvest Only category used in the change order:
Note: You can also create your own categories and workflows if necessary.
Service Desk analysts can view workflow tasks on the Workflow Tasks tab in the change order detail window:
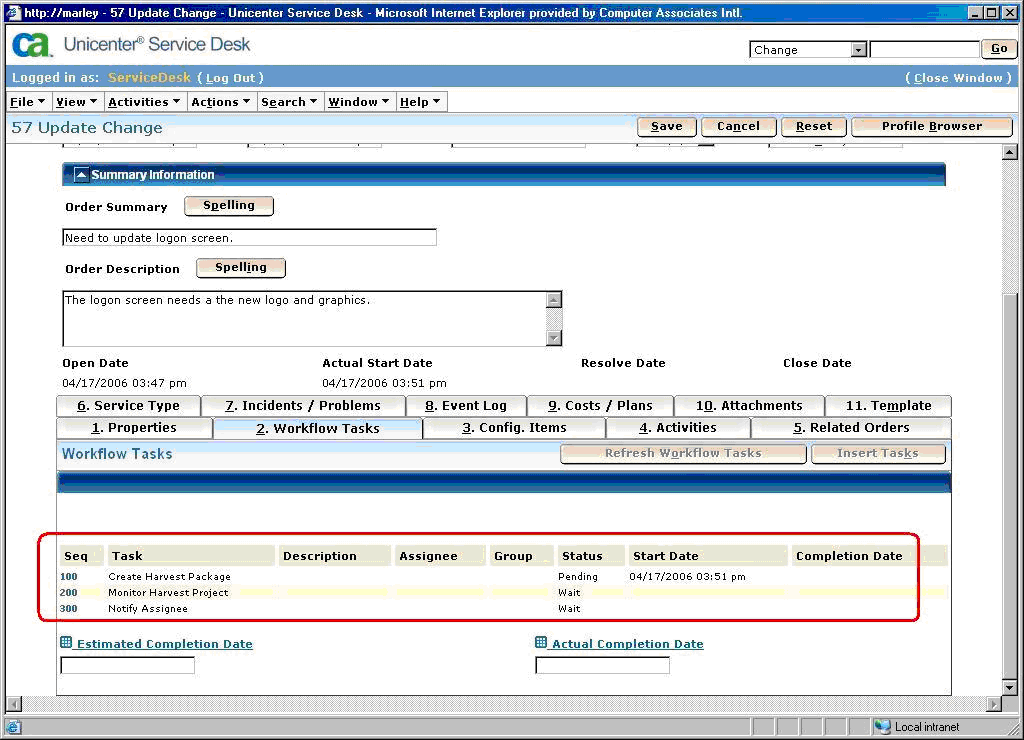
To initiate the Harvest integration process
The Change Workflow Detail window opens.
The Update Change Workflow window opens.
The Create Harvest Package integration macro is started.The workflow is saved, its status is changed to Complete, and a Harvest package is created.
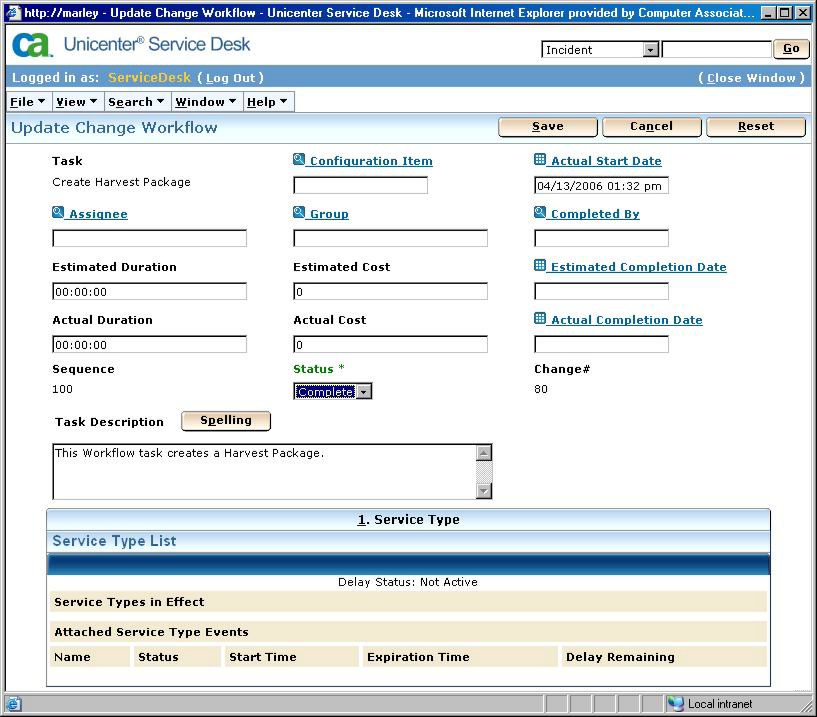
When the package is successfully created, Harvest changes the status of the 200 Monitor Harvest Package workflow to In Progress and logs an Event Occurred comment in the Service Desk Change Order Activity Log List.
Note: If you do not enter all the required fields in the change order, the status of the Create Harvest Package workflow is set to Failed, and a log comment is entered in the Service Desk Change Order Activity Log List detailing the connection failure. To re-initiate the connection, enter the missing required fields and save the change order. Then, change the status of the Create Harvest Package workflow task back to Complete.
After you initiate the Harvest integration and create the Harvest package, the package lifecycle involves the following tasks:
Information from the Service Desk change order that created the package is maintained in Harvest at the package level. For example, you can view the change order number from the Service Desk Clarity Connector Request for Change form, as illustrated in the following:
The Origination tab on the Service Desk Clarity Connector Request for Change form contains data that was transferred from the Service Desk change order that created the package.
In Harvest, when the package is promoted to the production lifecycle state, Service Desk automatically sets the status of the 300 Notify Assignee workflow task to Pending. After the notification is sent back to the Service Desk change order Activity Log List, the status of the workflow is automatically changed to Complete. The Service Desk assignee then updates/closes the change order and notifies the Service Desk end-user.
The following table lists the user actions that trigger comments to be entered in Service Desk Change Order Activity Log List.
|
User Action |
System Action |
Activity Log Type |
|---|---|---|
|
In Service Desk, set the status of the Create Harvest Package workflow task to Complete on a Service Desk change order. |
A new package is created in Harvest under the designated project. The default package name is the change order number that initiated it. |
An Event Occurred comment is logged in the Change Order Activity Log List. |
|
A Service Desk Change Order is entered with missing required field information, and the status of the Create Harvest Package workflow task is set to Complete. |
A new package is not created in Harvest. The workflow task fails. |
An Event Occurred comment is logged in the Change Order Activity Log List indicating that the create package failed. |
|
A Harvest package is promoted or demoted by the Harvest manager. |
In Harvest, the package is moved between the plan, development, test, and production lifecycle states. |
A log comment is entered in the Change Order Activity Log List. When a package is promoted to the production lifecycle state, a comment is logged, and the status of the Notify Assignee workflow task is set to Complete. |
Notes:
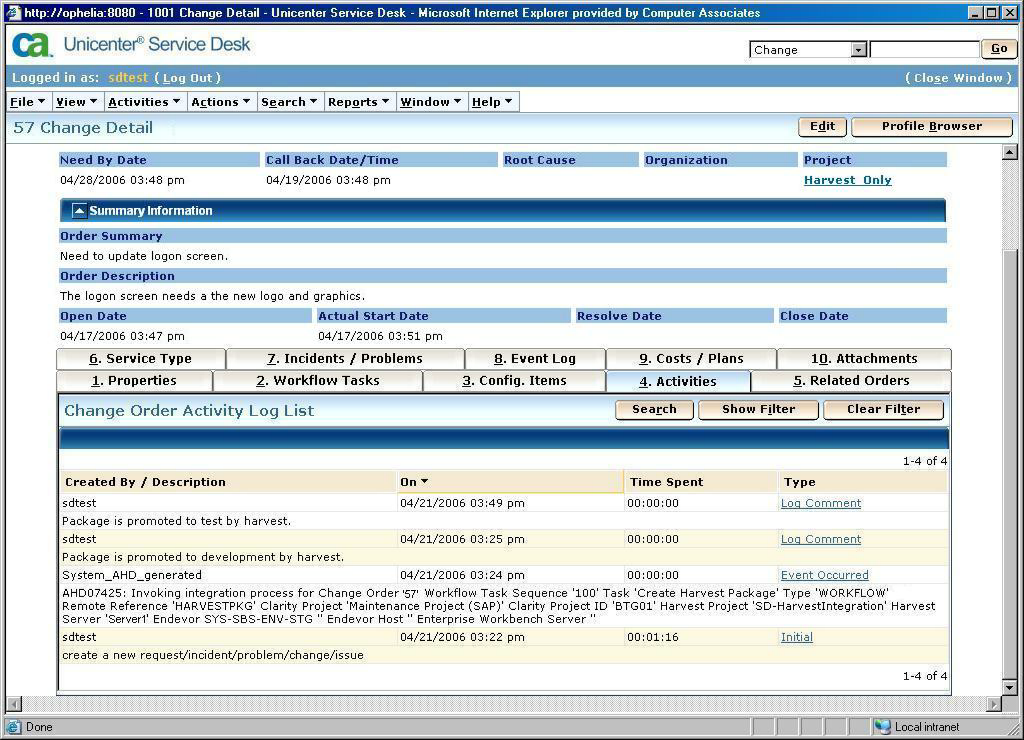
Harvest package status is tracked in Service Desk and is logged to the originating change order Change Order Activity Log List. In the following example, the list displays the initial change order creation, the Create Harvest Package workflow event, and promotion of the package in Harvest.
|
Copyright © 2013 CA.
All rights reserved.
|
|