

This section contains the following topics:
How Project Data is Shared Globally Across Projects
How to Open CA Clarity PPM Projects in Open Workbench
A project is a related set of tasks performed to achieve a specific objective. Before planning a project, you should have a general idea of what it entails, who is responsible for managing and working on it, when it needs to be done, and how much it will cost. Once you create your project you will want to populate it with phases, activities, and tasks, and perform other important project management tasks, such as assign resources to tasks and create project schedules.
You can store the projects that you create as files on your computer, a server, or a network location. Use the Project Properties dialog box to define your new project. This dialog box consists of five tabs: Description, Scheduling, Resources, Key Tasks, Advanced, and Notes.
Note: If you are using Open Workbench with CA Clarity PPM, you can store projects directly to CA Clarity PPM. You must have CA Clarity On Demand Schedule Connect installed to do this.
To create a new project
A new project is created.
The Description tab on the Project Properties dialog appears.
Defines the ID for the project.
The project properties are saved.
You can create CA Clarity PPM projects using the command line. You can do this from the:
Use the following command line arguments to create CA Clarity PPM projects:
The npWBench /r file.rmp + /rR CLARITY\[projectID] command creates a new master project with a Read-only project file and a Read-only CA Clarity PPM project.
This command has the following format:
npWBench /r [file].rmp + /rR CLARITY\[projectID]
Defines the name of the master project you want to create.
Defines the name of the CA Clarity PPM project you want to create.
The npWBench [file].rmp + /r CLARITY\[projectID file2].rmp /r repoName\[probED2] command creates a new master project in read/write mode and opens two CA Clarity PPM subprojects in read-only mode.
This command has the following format:
npWBench [file].rmp + /r CLARITY\[projectID file2].rmp /r repoName\[probED2]
Defines the name of the master project you want to create.
Defines the name of the first CA Clarity PPM subproject you want to create.
Defines the name of the second CA Clarity PPM project you want to create.
You can manually enter resources in the resource detail pane of a view, define their properties, and assign them to tasks. The resources that you create are automatically available for you to assign to tasks in your project.
Best Practice: If you are using Open Workbench with CA Clarity PPM, create the resources in CA Clarity PPM. Any new resources you create in Open Workbench must have matching resource IDs in CA Clarity PPM in order to save the project to CA Clarity PPM.
Note: If the Resource and Team objects have attributes with the same ID, Open Workbench picks the attribute in the Team object.
You can define resources by categories for reporting and analysis, as groups of more than one, or as roles, such as "Business Analyst." Resources can use different units of measure. Once you create a resource, you define its properties in the Resource Properties dialog box. You can access the Resource Properties dialog box from views that displays the resource detail pane.
To view usage for material and expense non-labor resources, you must set the view's format to cost. To view usage for expense non-labor resources, you must define the billing rate for resources.
To create a resource
A new empty resource row is added to the resource detail pane.
The General tab on the Resource Properties dialog box opens.
The Resource Properties dialog box closes.
Note: For more information, see the Resource Management User Guide.
Resources provide the necessary people needed to ensure projects are completed on time and within budget.
Global resources are those resources that are available to you to staff on projects when you are using Open Workbench with CA Clarity PPM. You can select a team of resources from a list of global resources and make them available to your project. The global list displays roles and resources to which you have booking rights.
Staff can consist of labor, materials, equipment, and expense resource or role types. If you are using Open Workbench with CA Clarity PPM, you may want to include non-labor resources or roles in your CA Clarity PPM project if you want process financial transactions against them. For example, you may want to bill customers for the cost of traveling to customer sites.
You can add the following resource of role types to projects:
You can add staff to your project by manually inserting a resource line item and entering the resource details directly in the resource detail pane of a view, such as the Gantt Chart view. To add a resource, right-click anywhere in the resource section and select Insert from the shortcut menu. You can also copy resources from another project you have open in Open Workbench and paste them into your project.
If you are using Open Workbench with CA Clarity PPM, you can add resources or roles to your project from:
Note: For more information, see the Project Management User Guide.
Note: You can also add a resource to a project by creating a new resource in Open Workbench and then adding the resource to CA Clarity PPM.
To add resources or roles to a project using Open Workbench
The Description tab on the Project Properties dialog box opens.
The Resources page opens.
Note: If you are using Open Workbench with CA Clarity PPM and you have not defined resource categories in CA Clarity PPM, roles is selected and the list box is unavailable.
Note: To view a list of roles and resources linked to the role, click the "+" sign or double-click the role folder.
 Role icon
 Resource icon
You can sort the list by clicking the column heading.
The selected resources or roles are added to the Team Resources grid and are allocated to the project.
The Project Properties dialog box closes.
There are several methods you can use to create tasks on new and existing projects, move tasks around in projects, and delete tasks. At a minimum, you can add tasks and define some of their properties directly in a spreadsheet view, depending on the task-specific field names the view displays. Or, you can add tasks and define their properties in the Task Properties dialog box.
Use the Task Properties dialog box to define your new task's properties. This dialog box consists of the following five tabs: General, Scheduling, Dependencies, Advanced, and Notes. The tabs you can use in this dialog box depend on whether you are creating a phase or activity, a task, or a milestone.
You can add tasks to your project directly in a spreadsheet view, such as the Gantt Chart view.
To create a task
A new task row is added to the view about the selected task.
The General Tab on the Task Properties dialog box opens.
Tasks constitute the work steps of your project. During the project planning process, you define the tasks that you need to complete in order to accomplish your project's objectives. In Open Workbench, project tasks are organized according to a Work Breakdown Structure (WBS). The default WBS for Open Workbench includes the following default hierarchical levels:
Note: You can change the labels used to identify your WBS levels.
Phases are the major steps required to achieve the project's goal. Most well defined projects have multiple phases with specific objectives. Within each phase there are any number of activities leading to the completion of the phase's objectives. You can further divide each activity into tasks—the smallest identifiable project component—and milestones, which mark significant events or dates used to measure a project's progress.
The number of tasks you can add to a project or a WBS is limited only by the memory and disk space on your computer.
During the planning process, you can establish and fine tune task durations for all project tasks to obtain an acceptable total project duration. With Open Workbench, you can create tasks with either fixed or variable durations, sometimes referred to as time-constrained and resource-constrained tasks, respectively. Use the General tab on the Task Properties page to define a task's duration.
For example, a meeting task is time-constrained rather than resource-constrained.
The following task duration types are handled differently by Autoschedule:
Use the Resources tab of the Task Properties dialog box to make and modify task assignments. You can also assign resources to tasks from a view that displays the resource detail pane. Use this tab to apply properties to more than one task (see Multiple Select Property Notes) from this tab.
Note: When you assign a resource to a key task, the Start and Finish date are determined by the resource's ETC.
To assign a resource to a task
The Resources tab on the Task Properties dialog box opens.
The selected resource is assigned to the task and appears in the Assigned Resources grid.
The Task Properties dialog box closes.
A Loading Pattern defines how work is spread across the duration of a task. The loading pattern for a resource defines how resource assignments are used to complete tasks when you recalculate the task duration and you autoschedule your project. You have five patterns available to help replicate how team members work on tasks.
You can assign resources to tasks using any of five loading patterns: Uniform, Contour, Fixed, Front, or Back. When you use these loading patterns in conjunction with Autoschedule, you can automatically produce a workable schedule that allows for real-world variations in the way work is assigned and completed.
The Uniform loading pattern assigns resource time evenly across a task only on those days when the resource is available to meet the task requirements. For example, if a resource is scheduled to work four hours per day on a task, the resource will not be scheduled to work on that task on days when the resource is only available to work on the task for three hours. The maximum percentage and resource availability is taken into account when assigning resources to tasks using this loading pattern.
Note: To use this loading pattern, you must set the resource's maximum percentage on the task.
Graphically, this loading pattern can look like this:

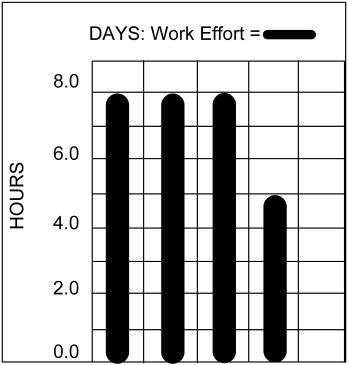
Front Loading Pattern
The Front loading pattern allocates resource usage as early in the task as possible. Resources are assigned to get work done as early as their availability permits. The resource's maximum percentage on a task and resource availability are taken into account when assigning resources to tasks using this loading pattern.
Note: To use this loading pattern, you must set the resource's maximum percentage on the task.
Graphically, this loading pattern can look like this:
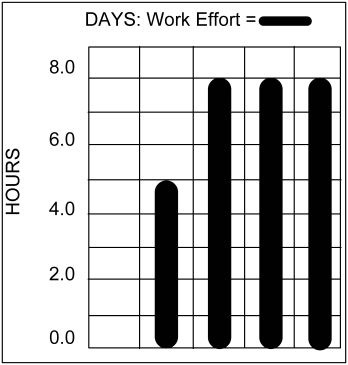
The Back loading pattern allocates resource usage as late as possible in the task. Resources are assigned to get work done as late as their availability permits. The Max % and resource availability is taken into account when assigning resources to tasks using this loading pattern.
Note: To use this loading pattern, you must set the resource's maximum percentage on the task.
Graphically, this loading pattern can look like this:
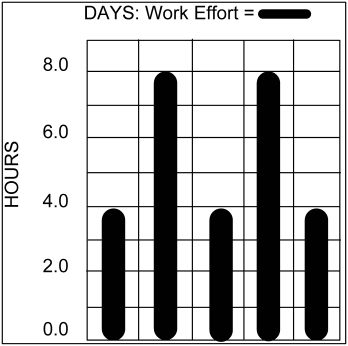
This Fixed loading pattern allocates resource usage to tasks according to your needs. Open Workbench automatically locks fixed resource assignments so that they are not changed when you autoschedule or when you recalculate task duration.
When you use this loading pattern, you can create a discontinuous task, or one that starts and stops, and then starts again. You can display the pattern in views where ETC is tabulated.
Graphically, this loading pattern can look like this:
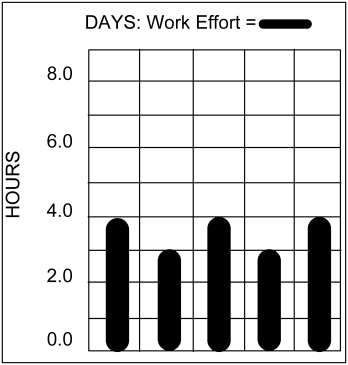
The Contour loading pattern fits resource loading around the resource's remaining availability, smoothing out the peaks and valleys. It is a very flexible loading pattern; it can appear as the reverse or mirror image of overlapping task patterns.
If a task's duration, start date, or finish date changes, or if you autoschedule the task or enter new ETC values, this pattern assumes the characteristics of the Uniform loading pattern. The changes you make to the duration of a task after it is scheduled causes resource assignments for each period to even out across the duration of the task.
Graphically, this loading pattern can look like this:
Use the Loading field on the Resources tab of the Task Properties dialog box to set a resources loading pattern on a task.
To set a resource's loading pattern
The Resources tab on the Task Properties dialog box opens.
Defines the pattern by which you want Open Workbench to load resource assignment data.
Options: Uniform, Fixed, Front, Back, or Contour.
Default: Front
The resource detail section of the view is updated to reflect the resource's loading pattern.
You can save projects as .xml or Open Workbench .rmp project files. Use the Save As dialog box to save your project. If you are using Open Workbench with CA Clarity PPM, you can save new projects to CA Clarity PPM using this dialog box.
To save a project to a file
The Save As dialog box opens.
Displays the current folder when saving Open Workbench .rmp project files or XML files to your computer or network. Select a file location from the drop-down.
Displays the file name when saving Open Workbench .rmp project files or XML files to your computer or network. Choose the name of the file to which you want to save this project from the drop-down.
Note: There is no limit to the number of times you can save local copies of your project with the same file name.
Defines the type of file you want to save the project.
Values:
Specifies whether or not to hold the lock or unlock the project when saving it to your computer or network.
Note: This check box is displayed when you choose Open Workbench or XML from the Save Type As drop-down.
Important! If you do not check this box, you can have issues saving your changes to CA Clarity PPM.
The project is saved and the Save As dialog box closes.
Open Workbench shares certain types of project data globally across all of the projects you have open in Open Workbench. This information is retrieved from:
The following project data is shared globally across all open projects:
You must have administrator access rights to edit global project settings in CA Clarity PPM.
For more information, see the Project Management User Guide.
Open Workbench projects have an .rmp file extension and you can save them to your computer or a network location. When you open an Open Workbench project, they display in Open Workbench as windows with named tabs or with title bars, using the default view you specified on the Locations tab on the Options dialog box.
To open a project, use the same steps as you do for opening CA Clarity PPM projects in Open Workbench.
If you are using Open Workbench with CA Clarity PPM, you can open CA Clarity PPM projects from:
Note: If you are using Netscape Navigator, the browser must be aware of the CA Clarity PPM Schedule Connect MIME type before you can open the project in Open Workbench.
Before opening CA Clarity PPM projects in Open Workbench:
If Open Workbench is running and Schedule Connect is already connected to a CA Clarity PPM server, Schedule Connect attempts to open a project with the same ID from the CA Clarity PPM server to which Schedule Connect is currently connected. If the project ID is not found, the project cannot open.
When you open a CA Clarity PPM project in Open Workbench:
All baseline data is loaded. To only load the current baseline, you must configure the project management settings in CA Clarity PPM and Open Workbench. You can open programs in Open Workbench using CA Clarity PPM in read-only mode.
Note: For more information, see the Project Management User Guide.
If you are using Open Workbench with CA Clarity PPM, you can open any project (active or inactive) that you have rights to view or edit in Open Workbench using CA Clarity PPM. To open projects from CA Clarity PPM, they must be formatted for Open Workbench.
If you can view or edit a project, you can choose to open the project in read-only or read/write mode. If you only can view a project or if the project is currently locked, you can open the project as read-only.
When you open a project from CA Clarity PPM, the following occurs:
Note: For more information, see the Project Management User Guide.
If you are using Open Workbench with CA Clarity PPM, you can open any CA Clarity PPM project you have rights to view or edit from Open Workbench using CA Clarity PPM Schedule Connect. Use the Open dialog box to open your project from Open Workbench.
When you view the list of projects in the Open dialog box, the following icons display next to the project ID:

You have Project - Edit Management access rights to the project.

You have Project - Edit Management access rights to the project.
Note: This icon displays if the project is a master project.

You have read-only access to the project.

You currently have the project open and locked.

The project is currently locked by another user.
Note: For more information, see the Project Management User Guide.
To open a CA Clarity PPM project using Open Workbench
The Open dialog box opens and a list of available projects is displayed.
Displays the CA Clarity PPM server that Open Workbench is currently connected to when opening projects from CA Clarity PPM.
 Click to see a list of available project names.
 (Default view) Click to see a detailed list of available projects.
 Click to open Open Workbench .rmp project files or XML files from your computer or network.
Displays the currently selected folder when opening Open Workbench .rmp project files or XML files from your computer or network.
 Click to open projects from CA Clarity PPM.
You can filter the list by using the wildcard (*).
Displays the unique identifier of the selected project.
Defines the type of file you want to open.
Values:
Specifies whether you want to open the project in read-only mode.
Default: Cleared
Note: This check box is only available if you have edit rights to the selected project. If you have view rights to the project, this check box is selected and unavailable.
Specifies whether you want to open the selected project as a subproject in a new master project.
Default: Cleared
Note: You can save this new master project back to CA Clarity PPM.
The project opens in Open Workbench.
You can open CA Clarity PPM projects using the command line. Use this method to open single and master projects without first starting Open Workbench. You can do this from the:
Use the following command line arguments to create or open CA Clarity PPM projects:
The npWBench file.rmp /R CLARITY\[projectID] command opens one or more CA Clarity PPM projects. The project's subprojects are not opened.
This command has the following format:
npWBench file.rmp /R CLARITY\[projectID]
Defines the name of the CA Clarity PPM project you want to open.
To open projects using a command line
The Run dialog box opens.
The Command Prompt window opens.
The Command Prompt window opens.
|
Copyright © 2013 CA.
All rights reserved.
|
|