

Before you can deploy skilled professionals to the right project teams, you need to create the named resources and generic roles in the application. A resource is a person or an object, such as equipment, that is used to fill a role or perform a task. A role is a generic description of a function or an object. Resources and roles are categorized into labor and non-labor resources and roles. Non-labor resources and roles include equipment, material, and expense.
Example: Create resources and roles
Forward Inc., recruited ten resources through the campus recruitment this year. All these resources are allocated 100 percent to a training project in the following capacities: developer, quality engineer, and information engineer. The system administrator has to create labor and non-labor resources and roles for the project.
The following diagram describes how a system administrator creates a resource and a role:
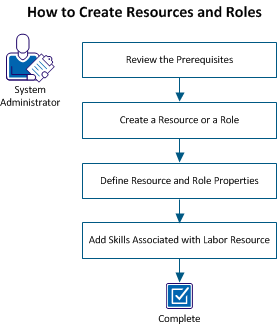
To create a resource and a role, perform these steps:
To complete all steps in the scenario, complete the following tasks:
|
Administration - Resources |
Resource - Edit General - All |
Resource - View |
|
Resource - Create |
Resource - Enter Time |
Resource - View - All |
|
Resource - Edit |
Resource - Hard Book |
Resource - View - Access Rights |
|
Resource - Edit - All |
Resource - Hard Book - All |
Resource - View - Financial |
|
Resource - Edit Access Rights |
Resource - Navigate |
Resource - View Financial - All |
|
Resource - Edit Administration |
Resource - Soft Book |
|
|
Resource - Edit Financial |
Resource - Soft Book - All |
|
|
Resource - Edit Financial - All |
Resource - Update Skills |
|
|
Resource - Edit General |
Resource - Update Skills - All |
|
You can create resources or roles of the following types:
|
Resource Type |
Description |
Can be Allocated |
Has Skills |
|---|---|---|---|
|
Labor |
Any person or role that works or completes tasks. |
Yes |
Yes |
|
Equipment |
Any type of machinery used to perform a job, such as delivery trucks, printers, and computers. |
Yes |
No |
|
Material |
Any type of material used to perform a job, such as training guides, chemicals, or fuel. |
Yes |
No |
|
Expense |
Any costs associated with a resource or a role, such as the cost of traveling to a customer site. |
Yes |
No |
Create a labor resource using both the Home and Administration menus because the resource information is configured from both the administration and application side.
When you create labor resources on the application side, your CA Clarity PPM administrator must enable the new resources to allow them to log in to the product. The CA Clarity PPM administrator must activate their status and create a password on the administration side.
In this scenario, the system administrator creates resource profiles from the application side and enables the resources from the administration side.
Follow these steps:
Indicates the primary role for the resource. Roles can change from investment to investment. A primary role lets other CA Clarity PPM resources see at a glance the primary area of expertise of a resource.
Defines the category that identifies the area of expertise of the resource.
Example: "Software Development" or "Product Marketing"
Specifies whether the resource works for an outside company.
Default: Cleared
Defines the number of hours in a business day that the resource is expected to work. The availability number is automatically multiplied by five, which is the number of days in a standard working week.
Default: 8
Note: This field is mandatory only for the Labor type and not for Equipment, and Material type resources and roles. The value for labor type resources and roles must be greater than zero. Expense type resources and roles do not have availability as they do not have the notion of time (hours or days). ETC is based on availability, and as a result an expense resource or role assigned to a task does not have a default ETC.
Specifies an Input Type Code for the resource. This code is used for billing purposes.
Indicates the tracking method used to enter time for this resource.
Values:
Default: Clarity
Specifies if the resource can track time spent on task assignments using timesheets. When cleared, the resource cannot log time on any project.
Default: Selected
Specifies the resource for inclusion in datamart. When cleared, the resource is not added in datamart.
Default: Cleared
Identifies the name of the person creating the resource.
Default: The resource currently logged in.
Indicates the default booking manager for this labor resource.
Defines the financial department and entity associated with the resource. The department belongs to the same entity as the location. Assign a Department OBS to link to a financial entity for financial processing.
Defines the location that is used to match the investment with debit and credit rules for transaction processing of chargebacks. If system or entity defaults indicate that the source location is taken from the investment, use location to match the investment with rate and cost matrices.
A non-labor resource can be created only using the Home menu. Non-labor resources include equipment, material, and expense. Though some of the fields vary depending on the resource type you select, the overall steps for creating each type of resource are the same.
In this scenario, the system administrator creates the following non-labor resources: desktops, laptops, and servers.
Follow these steps:
Values: Equipment, Material, and Expense
Note: In this scenario, select Equipment.
Indicates the primary role for the resource. Roles can change from investment to investment. A primary role lets other CA Clarity PPM resources see at a glance the primary area of expertise of a resource.
Defines the category that identifies the area of expertise of the resource.
Example: Projector, server
Specifies whether the resource works for an outside company.
Default: Cleared
Defines the number of hours in a business day that the resource is expected to work. The availability number is automatically multiplied by five, which is the number of days in a standard working week.
Default: 8
Note: This field is mandatory only for the Labor type and not for Equipment, and Material type resources and roles. The value for labor type resources and roles must be greater than zero. Expense type resources and roles do not have availability as they do not have the notion of time (hours or days). ETC is based on availability, and as a result an expense resource or role assigned to a task does not have a default ETC.
Specifies an Input Type Code for the resource. This code is used for billing purposes.
Indicates the tracking method used to enter time for this resource.
Values:
Default: Clarity
Specifies if the resource can track time spent on task assignments using timesheets. When cleared, the resource cannot log time on any project.
Default: Selected
Specifies the resource for inclusion in datamart. When cleared, the resource is not added in datamart.
Default: Cleared
Identifies the name of the person creating the resource.
Default: The resource currently logged in.
Indicates the default booking manager for this labor resource.
Defines the financial department and entity associated with the resource. The department belongs to the same entity as the location. Assign a Department OBS to link to a financial entity for financial processing.
Defines the location that is used to match the investment with debit and credit rules for transaction processing of chargebacks. If system or entity defaults indicate that the source location is taken from the investment, use location to match the investment with rate and cost matrices.
A role can help define the tasks and scope for a project. Later, you can replace the role with a resource that performs the actual work. You can create labor and non-labor roles from the application side based on your requirements. Though some of the fields vary depending on the resource type you select, the overall steps for creating each type of role are the same.
In this scenario, the system administrator creates the following labor roles: associate developer, associate quality engineer, and associate information engineer.
Follow these steps:
Default: Labor
Note: You can use other resource types to create a role. In this scenario, select Labor.
Specifies the parent role for this role.
Example: The Application Developer role is a parent to the Web Developer role.
Defines the category that identifies the area of work for the role.
Example: Software Development or Product Marketing.
Defines the number of hours in a business day that the role or the resource replacing the role is available for work or is expected to work.
Default: 8
Note: This field is mandatory only for the Labor type and not for Equipment, and Material type resources and roles. The value for labor type resources and roles must be greater than zero. Expense type resources and roles do not have availability as they do not have the notion of time (hours or days). ETC is based on availability, and as a result an expense resource or role assigned to a task does not have a default ETC.
Indicates the default booking manager for this labor resource or role.
Defines the financial department and entity associated with the resource. The department belongs to the same entity as the location. Assign a Department OBS to link to a financial entity for financial processing.
Defines the location that is used to match the investment with debit and credit rules for transaction processing of chargebacks. If system or entity defaults indicate that the source location is taken from the investment, use location to match the investment with rate and cost matrices.
The properties tab becomes available after you save the resource or role that you created. This tab displays the profile information that you entered when creating the resource or role. You can edit the fields, and can also manage the resources, groups, and OBS units assigned access to the resource or role. Use the subpages to:
You can add contact information only for a labor resource. This information is available to anyone who has access to the resource.
Follow these steps:
Use the Financial subpage to capture all the information needed to track financial time for a resource or role on a project. The application uses the financial properties of the resource to apply the correct rates and costs to the transactions as they are processed. Enable the resource or role to specify that the role or resource is active financially. Enable the financial transactions for a resource to post to CA Clarity PPM and display on the applications financial pages and reports. The financial actuals are visible in the product only if a resource is financially enabled.
To enable financial attributes, you must have these access rights:
|
Task |
Access Right1 |
|
Edit financial attributes for a specific resource or role. |
One of the following rights:
|
|
Edit financial attributes for all resources and roles. |
One of the following rights:
|
You can financially enable any resource that is involved with financial transactions or works with any financial features, including financial planning and forecasting.
Follow these steps:
Indicates whether the financial attributes for a resource are enabled. A resource that is financially inactive cannot be used in the rate matrix. The product uses NULL for the financial attributes that are associated with that resource.
Select Financially Active to enable the resource to record financial management activities against an investment.
Signifies user-defined values that group transaction types for the resource and is used with financial processing.
Categorizes financially enabled resources and is used with financial processing.
If the resource is a labor type, complete the department and location fields to be able to mark the resource as financially active.
Refers to the percentage of the targeted billing rate that is billable. Enter the target percentage billable for this resource, if applicable.
You can enable the financial attributes for any type of role that is involved with financial management.
Follow these steps:
Indicates whether a role is financially active.
Select Financially Active to enable the role to record financial management activities against an investment.
Signifies user-defined values that group transaction types for the role and is used with financial processing.
Categorizes financially enabled roles and is used with financial processing.
You can use skills to describe the talent a resource or role requires to complete the tasks. Use the skills tab to perform the following actions:
You can associate a skill only with a labor resource to which you have access. Associating the skills with labor resources can be helpful for those trying to match labor resources to roles and projects.
Follow these steps:
The proficiency level for a labor resource lets you rate the skill of the resource. You can change skill proficiency and interest level settings at any time. Proficiency indicates how well a resource performs the skill. Interest indicates how important this skill is to the resource. Weighting is used as a tiebreaker if there are multiple skills that have the same proficiency and interest.
The three proficiency levels are Beginner, Advanced, and Expert. You can further refine the rating by identifying sublevels within the level. For example, a resource with a proficiency level of 3 - Beginner has more expertise than one with a level of 1 - Beginner.
As a resource gains more expertise in a particular skill, the manager or whoever is responsible for updating the data, modifies the skill to reflect the appropriate level or proficiency and interest.
Interest rating works the same way. The product provides basic interest levels, with Low at the bottom, High at the top, and Medium in the middle. At each level, you can select a sublevel. For example, a resource with an interest level of 7 - Medium has a greater interest in performing a skill compared to one with an interest level of 4 - Medium.
Follow these steps:
After you save the changes, you can view the resources and roles you created both from the application and administration side.
Associations are defined from main resource and role properties pages.
Use the following pages to define resource and role associations:
Profile information about the resource or role. You can edit these fields, and define additional resource, group, and OBS access to the resource or role.
Use this page to view a list of skills associated with a labor resource, and to add or edit skill information. Associating skills with labor resources can be helpful for those trying to match labor resources to roles and projects.
This page lists all the projects to which the resource or role has been added. Use this page to add and remove projects to and from the workload for the resource, and to edit the amount of time the resource or role has been allocated to a project.
This page displays the calendar by month for the resource. Use this page to view scheduling exceptions, such as special non-workdays or shift information, if you have identified such information. You can change calendar information for a resource to which you have the Resource - Edit access right.
Use the resource/role allocations page to view and edit information about the investments to which a resource or role is assigned. You can change booking status, and edit allocations by date or percentage. In addition, you can add and remove investments from both pages.
When you change allocations from resource management pages, you only change investment-level information, specifically, the resource or role allocations to the investment. These dates can differ from the ones to which the resource or role has been assigned to project tasks.
Best Practice: Do not change the investment allocations for a resource or role from resource management pages. Only, the manager of the investment to which the resource or role has been assigned can modify. If you are the manager of the investment, change allocations from the team staff page of the investment. As a resource manager, if you edit allocations for a resource from the resource planning pages, communicate the changes to the manager of the investment.
The changes you make from the resource/ role allocation pages appear on the team staff page for the investment. It is a good idea to let the manager know directly. The manager can then adjust task assignments and the schedule for the investment, if necessary.
For more information, see the Project Management User Guide.
You can edit a resource or role allocation using the Summary and Detail subtabs in the Allocation tab.
Displays the allocation information for a resource allocated to an investment. Use this subtab to view and edit booking status, and allocation information for each investment to which the resource or role is allocated.
Displays the allocation information for a role that is allocated to an investment. Use this subtab to view and edit allocation information for each investment by week in a histogram format.
You can make the following allocation changes:
If a project is locked and in tentative mode, you cannot edit allocations for existing team members.
When you change allocations from resource management pages, you only change investment-level information, specifically, the resource or role allocations to the investment. These dates can differ from the ones to which the resource or role has been assigned to project tasks.
Best Practice: Do not change the investment allocations for a resource or role from resource management pages. Only, the manager of the investment to which the resource or role has been allocated can modify. If you are the manager of the investment, change allocations from the team staff page of the investment. As a resource manager, if you edit allocations for a resource from the resource planning pages, communicate the changes to the manager of the investment. The manager can then adjust task assignments and the schedule for the investment, if necessary.
By default, if an investment is locked, you cannot edit allocations for existing team staff members. The project manager can change the Allow Edit of Allocations when Investment is Locked default project management setting to allow you to make changes to the team while the project is locked.
In the Aggregation section at the bottom of the page, the red bar indicates which months in which the role is overbooked. The yellow bar indicates that no over allocations appear in that period.
Use the Shift Allocation option to shift or scale all or a portion of the resource allocations in one project. This option is useful when you want to extend project allocations beyond the allowable time-scaled view, which extends only for six months by default. You can move resource allocations both back and forward in time.
For example, suppose that an allocation period starts on May 1, continues at its default rate of 100 percent through the end of May, and then goes through June at the reduced allocation of 50 percent. If you shift the allocation to start on June 1, it will go from June 1 through July 2 (for 31 calendar days) at 100 percent, and then through August 2 at 50 percent. You can also shift allocations for time spans that contain no segments.
You cannot change the project schedule dates. Use these dates as guidelines on how far you can shift work back or forward. You cannot shift work previous to the start date, and you cannot shift work past the finish date.
Follow these steps:
Defines the start and finish dates of the project unless they have been changed. These dates create the period that can shift.
Defines the beginning date for the data being shifted.
Note: If you leave the field blank, no shifts occur.
Defines the last date for shifting allocations. Allocations cannot shift beyond the last date.
Defines the percentage change in the allocation required for the shift.
Note: If you leave the field empty, no scaling occurs.
You can create planned and hard allocation curves for the time a resource works on an investment. These curves indicate any deviations from the Default % Allocation field. While the Planned Allocation curve represents the default or total allocation amount requested by the investment manager, the Hard Allocation curve represents the allocation amount that the resource manager committed.
For example, you have a resource with default allocation set at 100 percent. You booked this resource to work on your project from 8/10/12 through 11/10/12. But the resource is also scheduled to work on another project 50 percent of the time through 9/1. In addition, the resource plans to be on vacation from 9/15 through 9/22. In this case, you create two allocation curves for the resource: one that indicates a deviation to 50 percent from 8/01/12 through 9/01/12, and another that indicates a deviation to 0 percent from 9/15/12 to 9/22/12.
When editing the default allocation for a resource, gaps can appear between allocation segments. The gaps are automatically filled by creating new allocation segments.
For more information, see the Project Management User Guide.
Follow these steps:
Defines the percentage of time you want to allocate the resource to a project. You can enter "0" (zero). The change you make here reflects in the Allocation and Allocation % columns on the resource/role allocations page or project team staff page.
Example:
To use the short example preceding these steps, create two rows:
Defines the expected percentage of time for the resources to work (as tentative or committed) on the investment. You can enter zero as the allocation percentage.
You have a resource with default allocation set at 100 percent. You booked this resource to work on your project from 8/10/12 through 11/10/12. But the resource is also scheduled to work on another project 50 percent of the time through 9/1. In addition, the resource plans to be on vacation from 9/15 through 9/22. In this case, you create two allocation curves for the resource: one that indicates a deviation to 50 percent from 8/01/12 through 9/01/12, and another that indicates a deviation to 0 percent from 9/15/12 to 9/22/12.
The allocations detail page displays resource or role allocations by investment and week in a histogram format. Use this page to edit weekly allocations for a resource by investment.
By default, if an investment is locked, you cannot edit allocations for existing team staff members. The project manager can change the Allow Edit of Allocations when Investment is Locked default project management setting to allow you to make changes to the team while the project is locked.
For more information, see the Project Management User Guide.
Investments display by row and allocations display by week in columns. In the Aggregation section at the bottom of the page, the red bar indicates which months in which the role is overbooked. The yellow bar indicates that no over allocations appear in that period.
Follow these steps:
The allocations detail page appears.
By default, the resources are allocated to work on the new project 100 percent of the time for the duration of the project. Sometimes, the default allocation overbooks the resource. When overbooked, reallocate the time for the resource or replace the resource with another resource.
If a project is locked and in tentative mode, you cannot edit allocations for existing team members.
You can add investments to the workload for a resource from both of the resource or role allocations pages.
Note: Only resources identified as staff members can perform a task for a project and record time spent on tasks. Project participants can use the collaboration tools of a project but are not always identified as staff members.
For more information, see the Project Management User Guide.
Follow these steps:
The allocations page appears.
The investments page appears.
The investment is added to the workload for the resource.
You can use the resource/role allocations page to remove projects and investments from the workload of a resource at any time. If a project is locked, you cannot remove that project from the workload of the resource.
When you staff a resource as a project participant, go to the team participants page to remove the resource from participant status.
For more information, see the Project Management User Guide.
Follow these steps:
The allocations page appears.
The confirmation page appears.
Replacing a resource on a project generates a list of resources sharing the same role and is available during the time for the investment. Use the find resources page to replace a resource or role. You can access this page from the allocations summary and detail page.
If a project is locked, you cannot replace existing team members resulting in deleting a team member and transferring assignments. The Replace button appears disabled in this case. Additionally, you can be allowed to replace a resource role only (without replacing task assignment) based on the role replacement settings. For more information about this setting, contact your administrator.
The Availability field identifies the project period and the number of hours the resource you are replacing was allocated to the project. Both the dates and the hours allocated are transferred to the new replacement.
The Availability Match column displays a weighted average that factors in the work period and the availability of each resource. If you do not add any skill specifications to your search criteria, the Total Match column duplicates the Availability Match number. The Skill Match column remains blank. Searching by skills and availability criteria, displays an average of the two in the Total Match column.
The following message appears at the top of the page:
Match scores can be inaccurate if availability dates do not fall into the following range: ddmmyy - ddmmyy
The message indicates a discrepancy between the date range in the message and the dates in the Availability field. That is, the Availability Match score can be inaccurate. For example, say, the dates in the Availability field are 9/1/12 - 2/7/13 and the date range in the message is 9/7/12 - 9/7/13. CA Clarity PPM cannot find a one-to-one comparison for any resource, which lowers the overall availability match scores.
For more information, see the Project Management User Guide.
Consider the following before making a staff member replacement:
For more information, see the Project Management User Guide.
Follow these steps:
The allocations page appears. As a result of replacing the resource, the investment no longer appears in the list of investments for the resource.
If the available hours for a resource are less than the total number of hours, the remaining availability (not the booking) confirmation page appears.
If you add resources to the project or investment, the remaining availability confirmation page indicates overbooking of the resource. If you book at 100 percent (default) availability of the resource, the 100 percent Resource Allocation column lists the number of hours utilized. The Remaining Availability column indicates the actual number of work hours available for the resource to work on the project. When this page appears, you can do the following:
The edit resource calendar page displays the resource availability for various assignments. Use edit resource calendar page to view or add working days, non-working days, and shifts to the calendar for the resource, if you have identified such information. You can change calendar information for a resource to which you have the Resource - Edit access right.
To access the calendar for a resource, open the resource or role whose calendar you want to view, and then select Calendar.
For more information, see the Administration Guide.
Deactivate a resource or role profile when the resource or role is no longer needed. You cannot assign deactivated profiles to tasks. But the profiles continue to display in the resource list unless you filter them out.
Follow these steps:
|
Copyright © 2013 CA.
All rights reserved.
|
|