

This section contains the following topics:
Personalize a Shared Dashboard
Create portlets that show the information you want to see and place the portlets on your personal dashboard for viewing. The portlets can display information in graphical chart format or list format.
You can create as many dashboards and portlets as you need. If you have more portlets than you want to show on one page, you can create a tabbed dashboard for additional pages.
Exporting Dashboard Information to Other Formats
You can export the contents of a dashboard or a portlet displayed in the dashboard to Microsoft Excel or PowerPoint. You can fit the exported data to a page, especially when you export information to PowerPoint for a presentation. Also, place each exported portlet on a separate page, rather than fitting all portlets onto a single page as they appear in a dashboard.
For more information, see the Basics User Guide.
Dashboard Sharing
When you create a dashboard, you are given the ability to view and manage the dashboard. You can share the dashboard with other users, groups, or OBS groups in your organization. If you share your dashboard with another user, the dashboard also appears in the shared user personal dashboard list for viewing.
Two options are available for sharing:
Personalized Dashboards
You can also allow a user to change the shared copy of the dashboard that appears in the user dashboard list. The changes apply only to the user version and other users cannot view them. The changes remain in the user copy until the owner of the dashboard, or a user with manager rights publishes changes. The latter overwrites all personalized changes.
Access Rights to Use Dashboards
CA Clarity PPM administrator assigns the access rights to work with dashboards. The following access rights let you work with dashboards and portlets:
The access rights are global. The navigate rights provide access to the Dashboards and Portlets links in the Personal menu. The create rights allow you to create a dashboard or portlet.
In addition to the rights to create and use a dashboard, you require to have access rights to the information displayed on a dashboard. Access to a dashboard does not automatically include access to the project information. If you share a dashboard, the user with whom you share, also requires the right to see the shared information.
Note: Sharing a dashboard with a user does not automatically ensure that the user can see the dashboard. The user must have the Dashboard - Navigate access right so that the Dashboard option appears in the Personal menu. The Dashboard - Navigate access right is assigned separately.
If you have the appropriate access rights for stock CA Clarity PPM system portlets, select and use the portlets for your dashboards.
Dashboard and Portlet Page Comparison
The following table shows how a dashboard and a portlet page compare in terms of CA Clarity PPM functionality.
|
Functionality |
Dashboard |
Portlet Page |
|---|---|---|
|
Exported Output |
|
|
|
Sharing with specific users |
|
|
|
Page type |
|
|
|
Portlet layout |
|
|
The following scenarios show how team members and a team manager can use a dashboard.
Team Member 1: Karen
Karen, a team member who is responsible for tracking project management information for multiple projects, creates a dashboard with tabs. From the details page of the new dashboard, she creates the portlets that will show the dashboard data. The portlets she creates include:
She configures her dashboard by determining which portlets to present on each tab. Then, Karen adjusts the layout of portlets on each tab by dragging and dropping the portlets into position on the tab layout section. She adds a filter for the dashboard that gives her the ability to filter information for all of the portlets at the same time. When the dashboard is complete, she views the dashboard, filters for the information that she wants, and exports a copy to PowerPoint as a test.
Before each weekly team meeting, she views the dashboard to monitor each project that she tracks and exports the results to PowerPoint. The team leader includes the PowerPoint slides in the regular team meeting agenda.
Team Member 2: Roberto
Roberto, a team member who does not have the right to create dashboards, navigates to Dashboards. Roberto can see two dashboards that his team manager shares with him: Security Development Team and Weekly Time Entries. Roberto views the Security Development Team dashboard. Also sees that he has five assigned tasks and three bugs. He clicks on the first task to get more details and starts working on the task.
Team Manager: Stan
Stan, the team manager creates a dashboard with two tabs: Team Work and Team Status. He populates the tabs with portlets created beforehand and with stock CA Clarity PPM portlets to which he has access. Stan adds the following portlets:
Stan does not allow others to personalize his dashboard. He does share the dashboard with the entire OBS development unit and the executive management team to view portlets in the dashboard.
Before you set up a dashboard, consider the following:
Helps determine if you require tabbed pages.
You can plan for the visual presentation of graphs or the statistical presentation that is possible with rows and columns.
Some users do not have rights to the information you are presenting in portlets. In addition, consider individuals to whom you can give manager privileges for your dashboard.
Follow these steps:
Follow these steps:
The dashboards list page appears.
The create page appears.
Defines the name of the dashboard. The name appears on the title bar of the dashboard and in the list page for dashboards.
Defines a unique alphanumeric identifier for the dashboard.
Defines the purpose of the dashboard and provides any relevant information.
Specifies if the dashboard is a single page or tabbed pages.
Specifies if the users with whom you share a dashboard can change the copy that appears in their dashboards list. Personal changes to a dashboard are local to the user who makes them. The changes are overwritten when the owner of the dashboard, or a user with administrator privileges publish new changes.
Open the dashboard details page to complete the dashboard layout. From the details page, you can:
To view the details page, open Home, and from Personal, click Dashboards, then click the name of the dashboard in the list that appears.
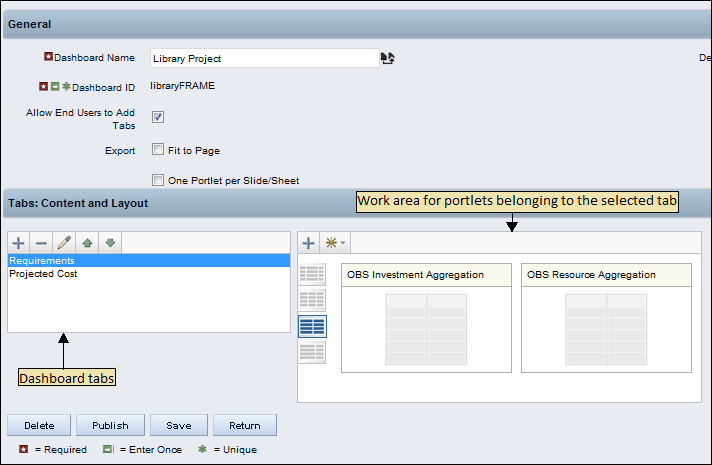
The following illustration shows the details page for a dashboard that has two tabs. In the Contents and Layout section, the Requirements tab is highlighted on the left and the portlets added to the tab show on the right. The toolbars for working with tabs and portlets are shown below the work areas. Mouse-over an icon in the toolbar to display its purpose.
Dashboard Layout Templates
To lay out a dashboard, select a template layout that determines the number of portlets appearing in a row and the percentage width for each portlet position. You can then add portlets and drag them to the position in the Content and Layout section.
A layout template provides a guideline for your displayed dashboard. If a portlet is large (a grid portlet with many columns), it can exceed the space allotted to it in a row. In this case, the portlet is not truncated. But a larger size is accommodated by moving portlets to another row when the dashboard displays. Hence, a displayed dashboard does not look exactly the way you design it in the Content and Layout section.
The following list shows the available templates available for dashboards.


This procedure explains how to add portlets to a dashboard. The procedure assumes the dashboard and portlets are already created.
Follow these steps:
A list page of available portlets appears.
The details page appears with the portlet icons showing in the work area of the Content and Layout section.
You can mouse-over each template in the list for the column format it represents. The template you select determines how many columns appear on the dashboard and the percentage of the dashboard allotted to each column.
This procedure explains how to add tabs and portlets to a dashboard. The procedure assumes the dashboard and portlets are already created.
Note: When creating a dashboard, ensure that you designate the Type as Page with Tabs to add tabs to the dashboard. If the option is not selected, you cannot add a tab.
Use the Tabs: Content and Layout section to manage the tabs for the dashboard. The following list describes the purpose of the icons used in this section:
Adds a new tab to the tab list in the content pane or adds an existing portlet to the tab in the layout pane.
Removes a tab from the dashboard.
![]()
Opens a tab for editing.
Moves a tab up in the dashboard presentation.
Moves a tab down in the dashboard presentation.
![]()
Opens a page to create a portlet.
Follow these steps:
The create page appears.
Defines the name for the tab that appears on the dashboard.
Defines a unique alphanumeric identifier for the tab.
Defines the purpose of the tab and provides any relevant information.
Specifies if a user who can view the dashboard can personalize the tab. The changes are local to the user who makes them.
Follow these steps:
The right pane in the Content and Layout section changes to display any existing configuration for the tab.
A list page of available portlets appears.
The details page appears with the portlet icons for the tab showing in the layout area.
You can mouse-over each template in the list for the column format it represents. The template you select determines how many columns appear on the dashboard and the percentage of the dashboard allotted to each column.
You can share a dashboard with a user, a group of users, or an OBS group. When you share, the dashboard appears in the user list of dashboards for viewing. By default, when you share, the user you share with has view only rights.
You can also assign manager rights to a user. The rights let the user change and publish the dashboard to all who can view the dashboard.
Follow these steps:
Follow these steps:
A dashboard manager can publish changes to a dashboard. When a dashboard manager publishes, the new changes affect every user who can view the dashboard. If a user personalizes the dashboard, the changes are overwritten by the new changes being published.
Follow these steps:
The dashboards list page appears showing your dashboards.
The dashboard details page appears.
Follow these steps:
The details page for the dashboard appears.
The properties page appears.
Removing a portlet from a dashboard, does not delete it but remains in your portlets list page. To delete the portlet permanently, delete it from the portlets list page.
Follow these steps:
The details page for the dashboard appears.
You can personalize another user dashboard when shared with you. The changes that you make are visible only to you and not to other users who view the dashboard on their computers. If the creator of the dashboard modifies and publishes the dashboard, your personal changes are lost.
You can personalize the following:
Follow these steps:
The dashboards list page appears.
The dashboard displays for viewing.
The content page appears.
|
Copyright © 2013 CA.
All rights reserved.
|
|